- Leave appropriate empty spaces for form fields and spaces for “buttons” such as checkboxes and radio buttons. This facilitates PDF editor to recognize and insert the form fields.
- Use graphics tools to draw lines, boxes, spaces to create the form fields.
- Do not create lines or spaces to create the form fields by a series of underscores or spaces created by the Spacebar Although these “lines” or “spaces” visually appear like “form fields”, they are indeed “text characters”. Screen reader would still identify and read them as underscores or “blank”. It may be confusing to screen reader users.
- Do not use tables for formatting layout of different form fields.
- Format any heading structure of the form, e.g., form title, names of different subsections in the form. Use the Styles Pane instead of manual formatting of the texts for formatting the heading structure.
- Use appropriate font and font size.
- Check and ensure sufficient colour contrast between the background colour and font colour.
- Insert Alt Text for graphical content.
- Export the word document to PDF by Save As instead of Print to PDF.
- After exporting the source document to PDF, those form fields are not yet fillable. Actual fillable form fields and buttons must be added to the PDF form. The form fields can be added to the PDF form automatically and manually. It is recommended to first add the form fields automatically, and then modify and add any form fields manually.
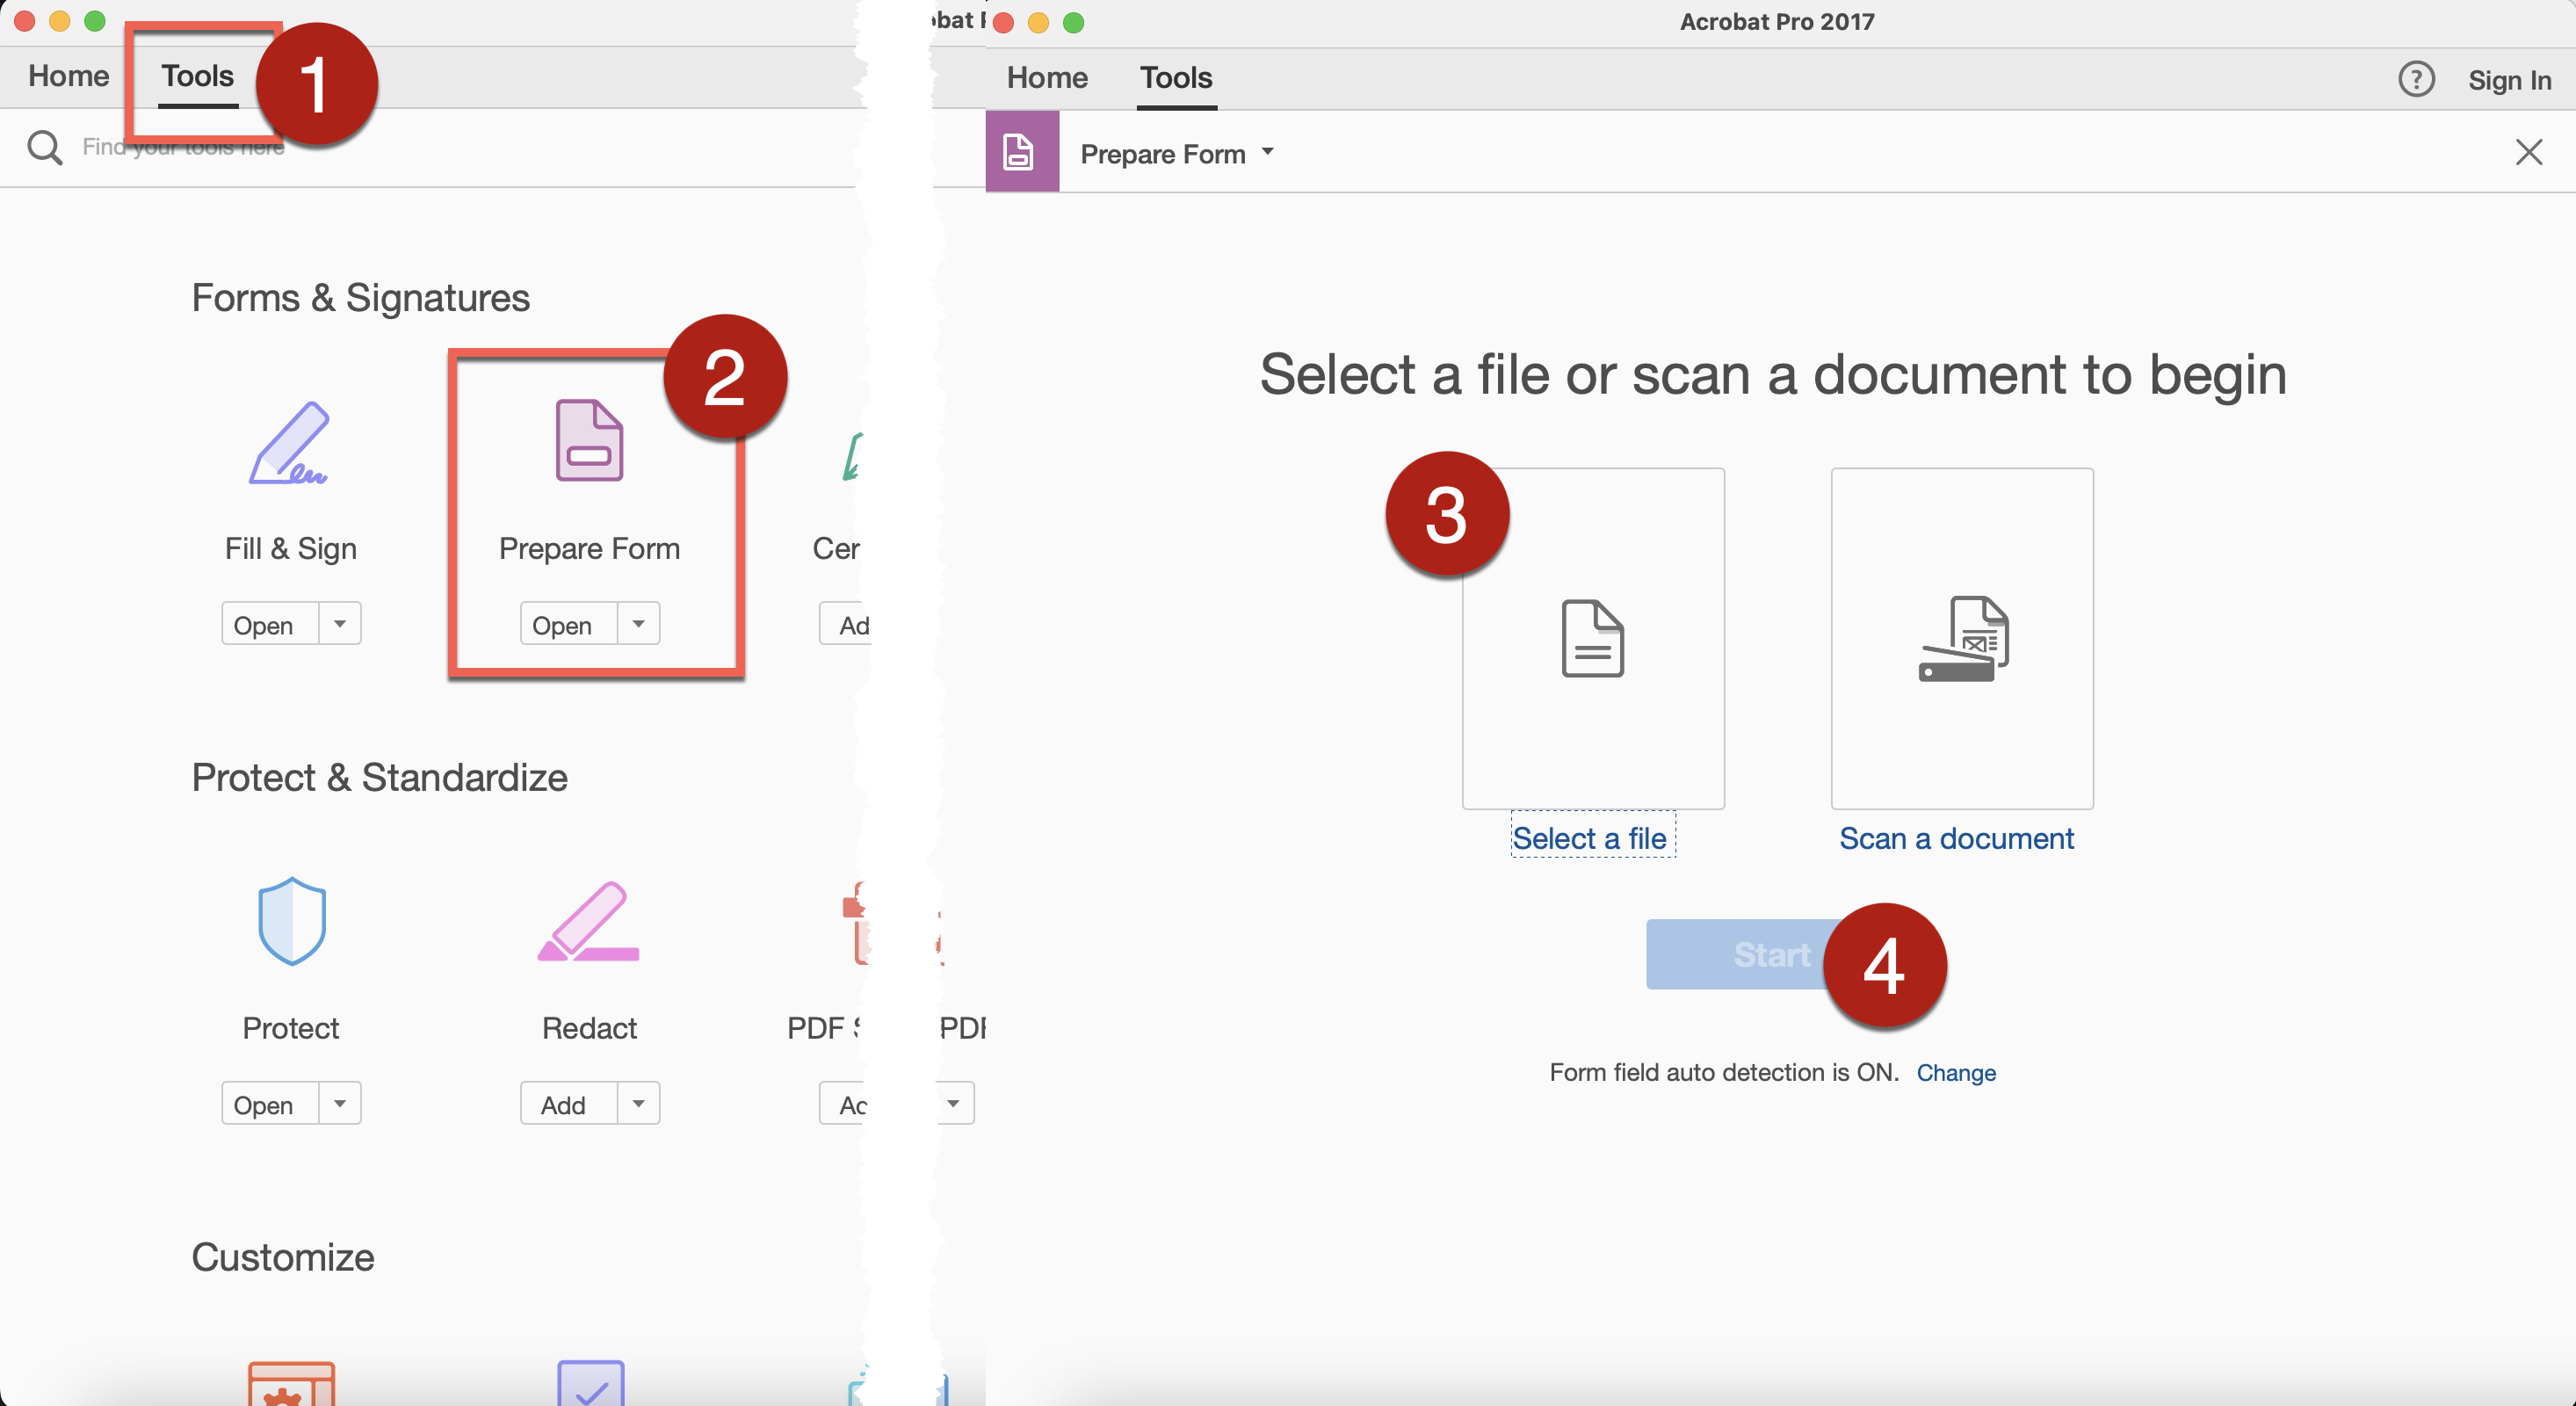
- To add fillable form fields automatically:
- Go to Tools > Prepare Form. Select the source document of the form. Select Start. The system will automatically analyze the source document of the form and insert form fields and buttons.
- Note that some automatically recognized and inserted form fields might be wrong. It is necessary to always check the fields and modify manually.
- To remove existing form fields manually:
- Click on the field to be removed. Press the Delete key on keyboard.
- To add form fields manually:
- Select the desired type of form field from the top toolbar. Different type of form fields, like buttons, check boxes, pop-up menus and text boxes could be created.Place the selected form field on the corresponding location on the PDF.
- Adjust the size of the newly added form field to ensure it can match the original pre-existing field spaces and locations on the source document.
- For example, the length of the text box added should cover the “lines” on the source document reserved for entering text. The size of the checkbox added should cover the pre-existing checkbox on the source document.
- Use the tools in the right pane to modify and customize the form field properties such as layout, appearance, and actions.
- References about the different form field properties and suggested procedures:
- Add Form Fields. WebAIM.
- PDF form field properties. Adobe.
- When you are adding the fillable form files to the PDF form, you can access the name of each field under the editing view. However, the published view of the PDF form does not display these labels. While sighted users could read the text near the fields to know the purposes of the fields, screen reader users have no idea about the form fields.
- Screen readers make use of the tooltips, instead of the names, of the form fields to identify and read aloud the purposes of the form fields. Therefore, it is essential to make sure each form field has a concise and descriptive tooltip to ensure accessibility of the fillable PDF form to screen reader users.
- Tooltip is a text description of an object that is displayed when the user hovers the cursor over that object.
- Since tooltips can provide descriptive information of each form fields and are basically accessible to all users, tooltips would benefit many users, not only screen reader users.
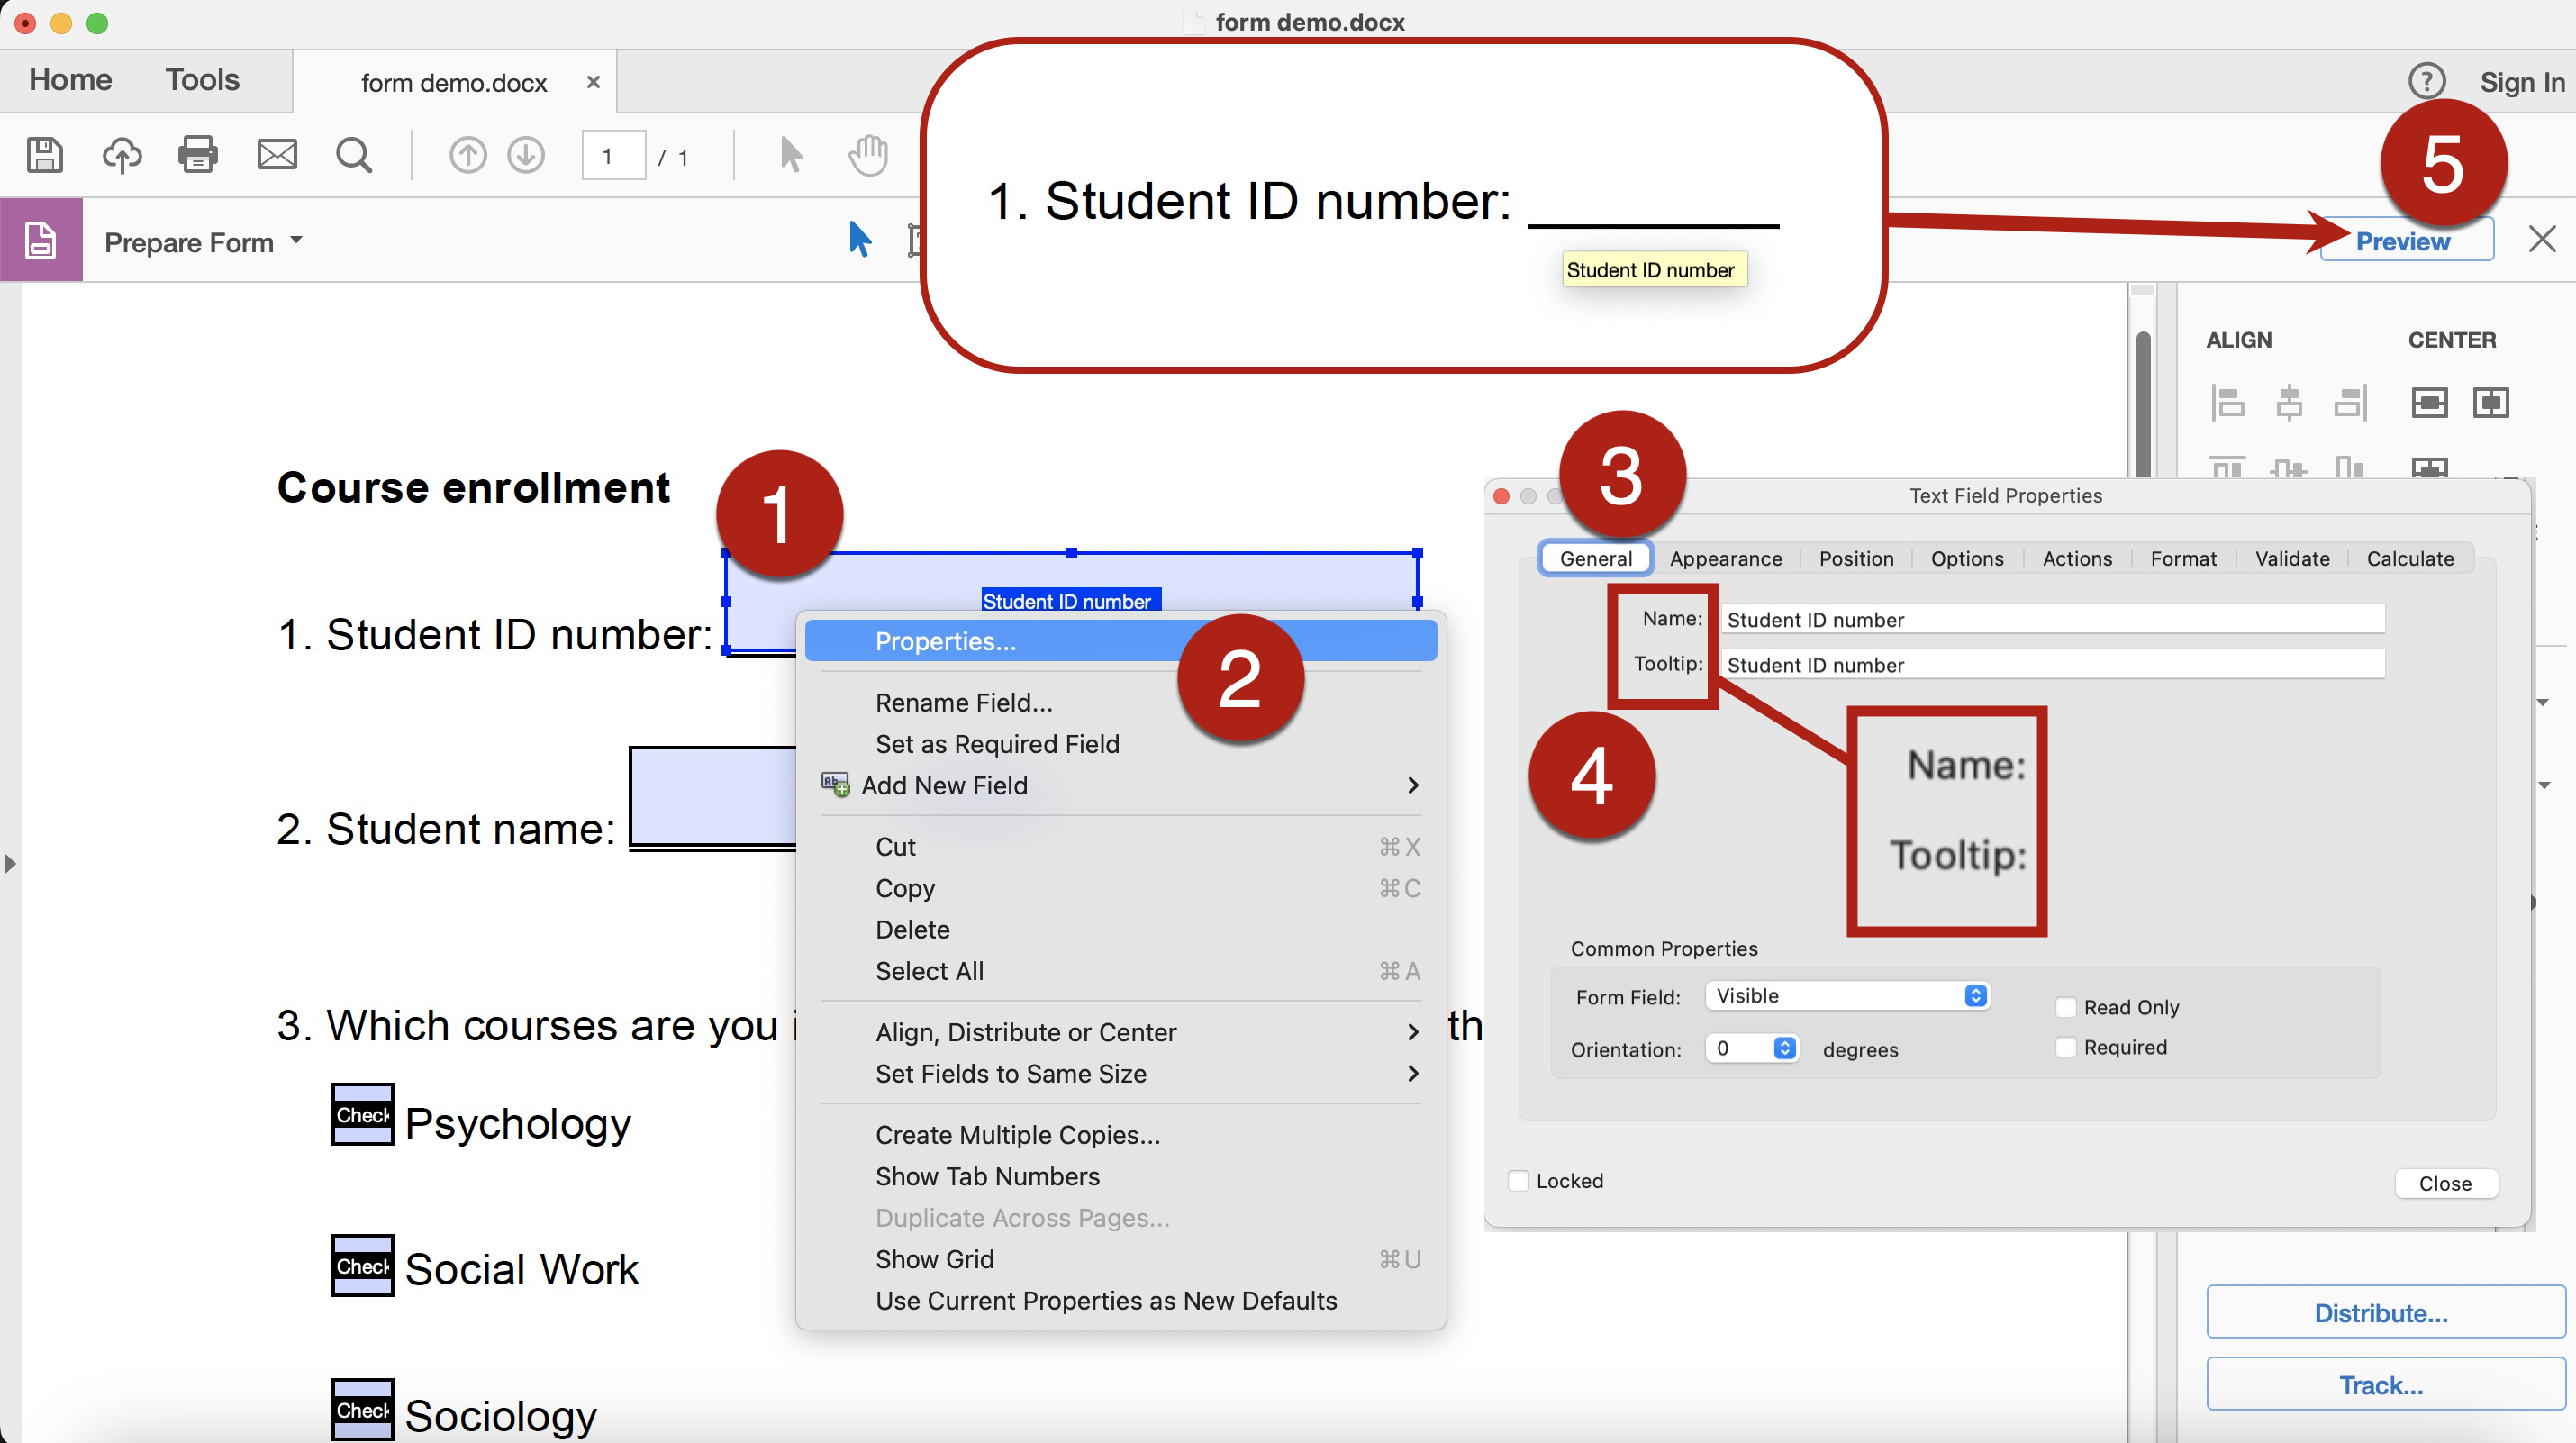
- To insert tooltip of a form field:
- Double-click the selected form field to open the Properties dialog pane. Or right-click the selected form field and select Properties from the dropdown menu.
- In the Properties dialog pane, go to the General Type the tooltip content in the Tooltip field. Select Close.
- Switch to the Preview mode or exit the Prepare Form tool window. If the tooltip is inserted properly, the tooltip will be displayed when you hover the cursor over that form field.
- References about instructions of writing and inserting tooltips for different types of form fields:
- After adding all fillable form fields and tooltips, make sure to add tag to each form field.
- Tags are invisible identifiers that indicate different elements in the PDF document. The tags do not affect the visual appearance of the document.
- The tags will form a logical and expandable tree structure that allows assistive technologies such as screen readers to identify each element in the PDF and read the content correctly in the intended and logical order. Tags are essential for screen reader users to access the PDF documents.
- A properly tagged PDF form does not necessarily mean the PDF form is fully accessible. However, an untagged PDF form would not be accessible.
- Use the Tags Pane to view, add, remove, reorder, edit all the tags of the PDF form.
- References: Add Tags to Form Fields. WebAIM.
- Make sure the order of the form fields accessed by different users and methods is logical as intended and compatible. It ensures that different users would be able to access, understand, and complete the PDF form in the same order.
- Visual display order.
- Reading order accessed by assistive technologies such as screen readers.
- Keyboard navigation order accessed by keyboard users (e.g., the TAB key).
- Check the reading order by going through the PDF form with screen readers. Fix the order using the Tags Pane, as screen readers make use of the tag tree to access and read the document content. For example:
- Narrator in Windows, built-in voiceover function in Windows.
- VoiceOver on Mac, built-in voiceover function in Mac.
- NVDA, screen reader that can be downloaded free of charge by everyone; available for computers running Microsoft Windows 7 SP1 and later.
- NVDA add-on developed by the Hong Kong Blind Union with a Chinese speech engine.
- Do not use the built-in Read Out Loud function in Acrobat Adobe Pro for testing the reading order and accessibility. It may work differently from assistive technologies such as screen readers.
- To fix the reading order by going through the PDF form with screen readers:
-
- Fix the order using the Tags Pane, as screen readers make use of the tag tree to access and read the PDF document content. Do not only modify the content using the Reading Order Pane.
- Go to View > Show/Hide > Navigation Pane > Tags. Or right-click on the Navigation Pane > Select Tags.
- Click and drag the tags to the correct position. Besides fixing the order the content tags in the tag tree, make sure the required nested structure of some tags are retained for proper recognition by screen readers.
- To move the tag to another location in the tag tree, select the icon of the tag. Drag the tag to the desired location. When you are dragging the tag, a line appears to indicate where the new location will be.
- After modifying the order of tags, verify the tag order of the whole tag tree again by going through the tag tree from the top sequentially using the down-arrow key.
- To check the reading order accessed by keyboard users using the TAB key:
- Switch off the Prepare Form editing mode.
- Save and reopen the PDF form.
- Go through the PDF form using only the TAB key on the keyboard.
- To check the reading order accessed by keyboard users using the Fields Panel:
-
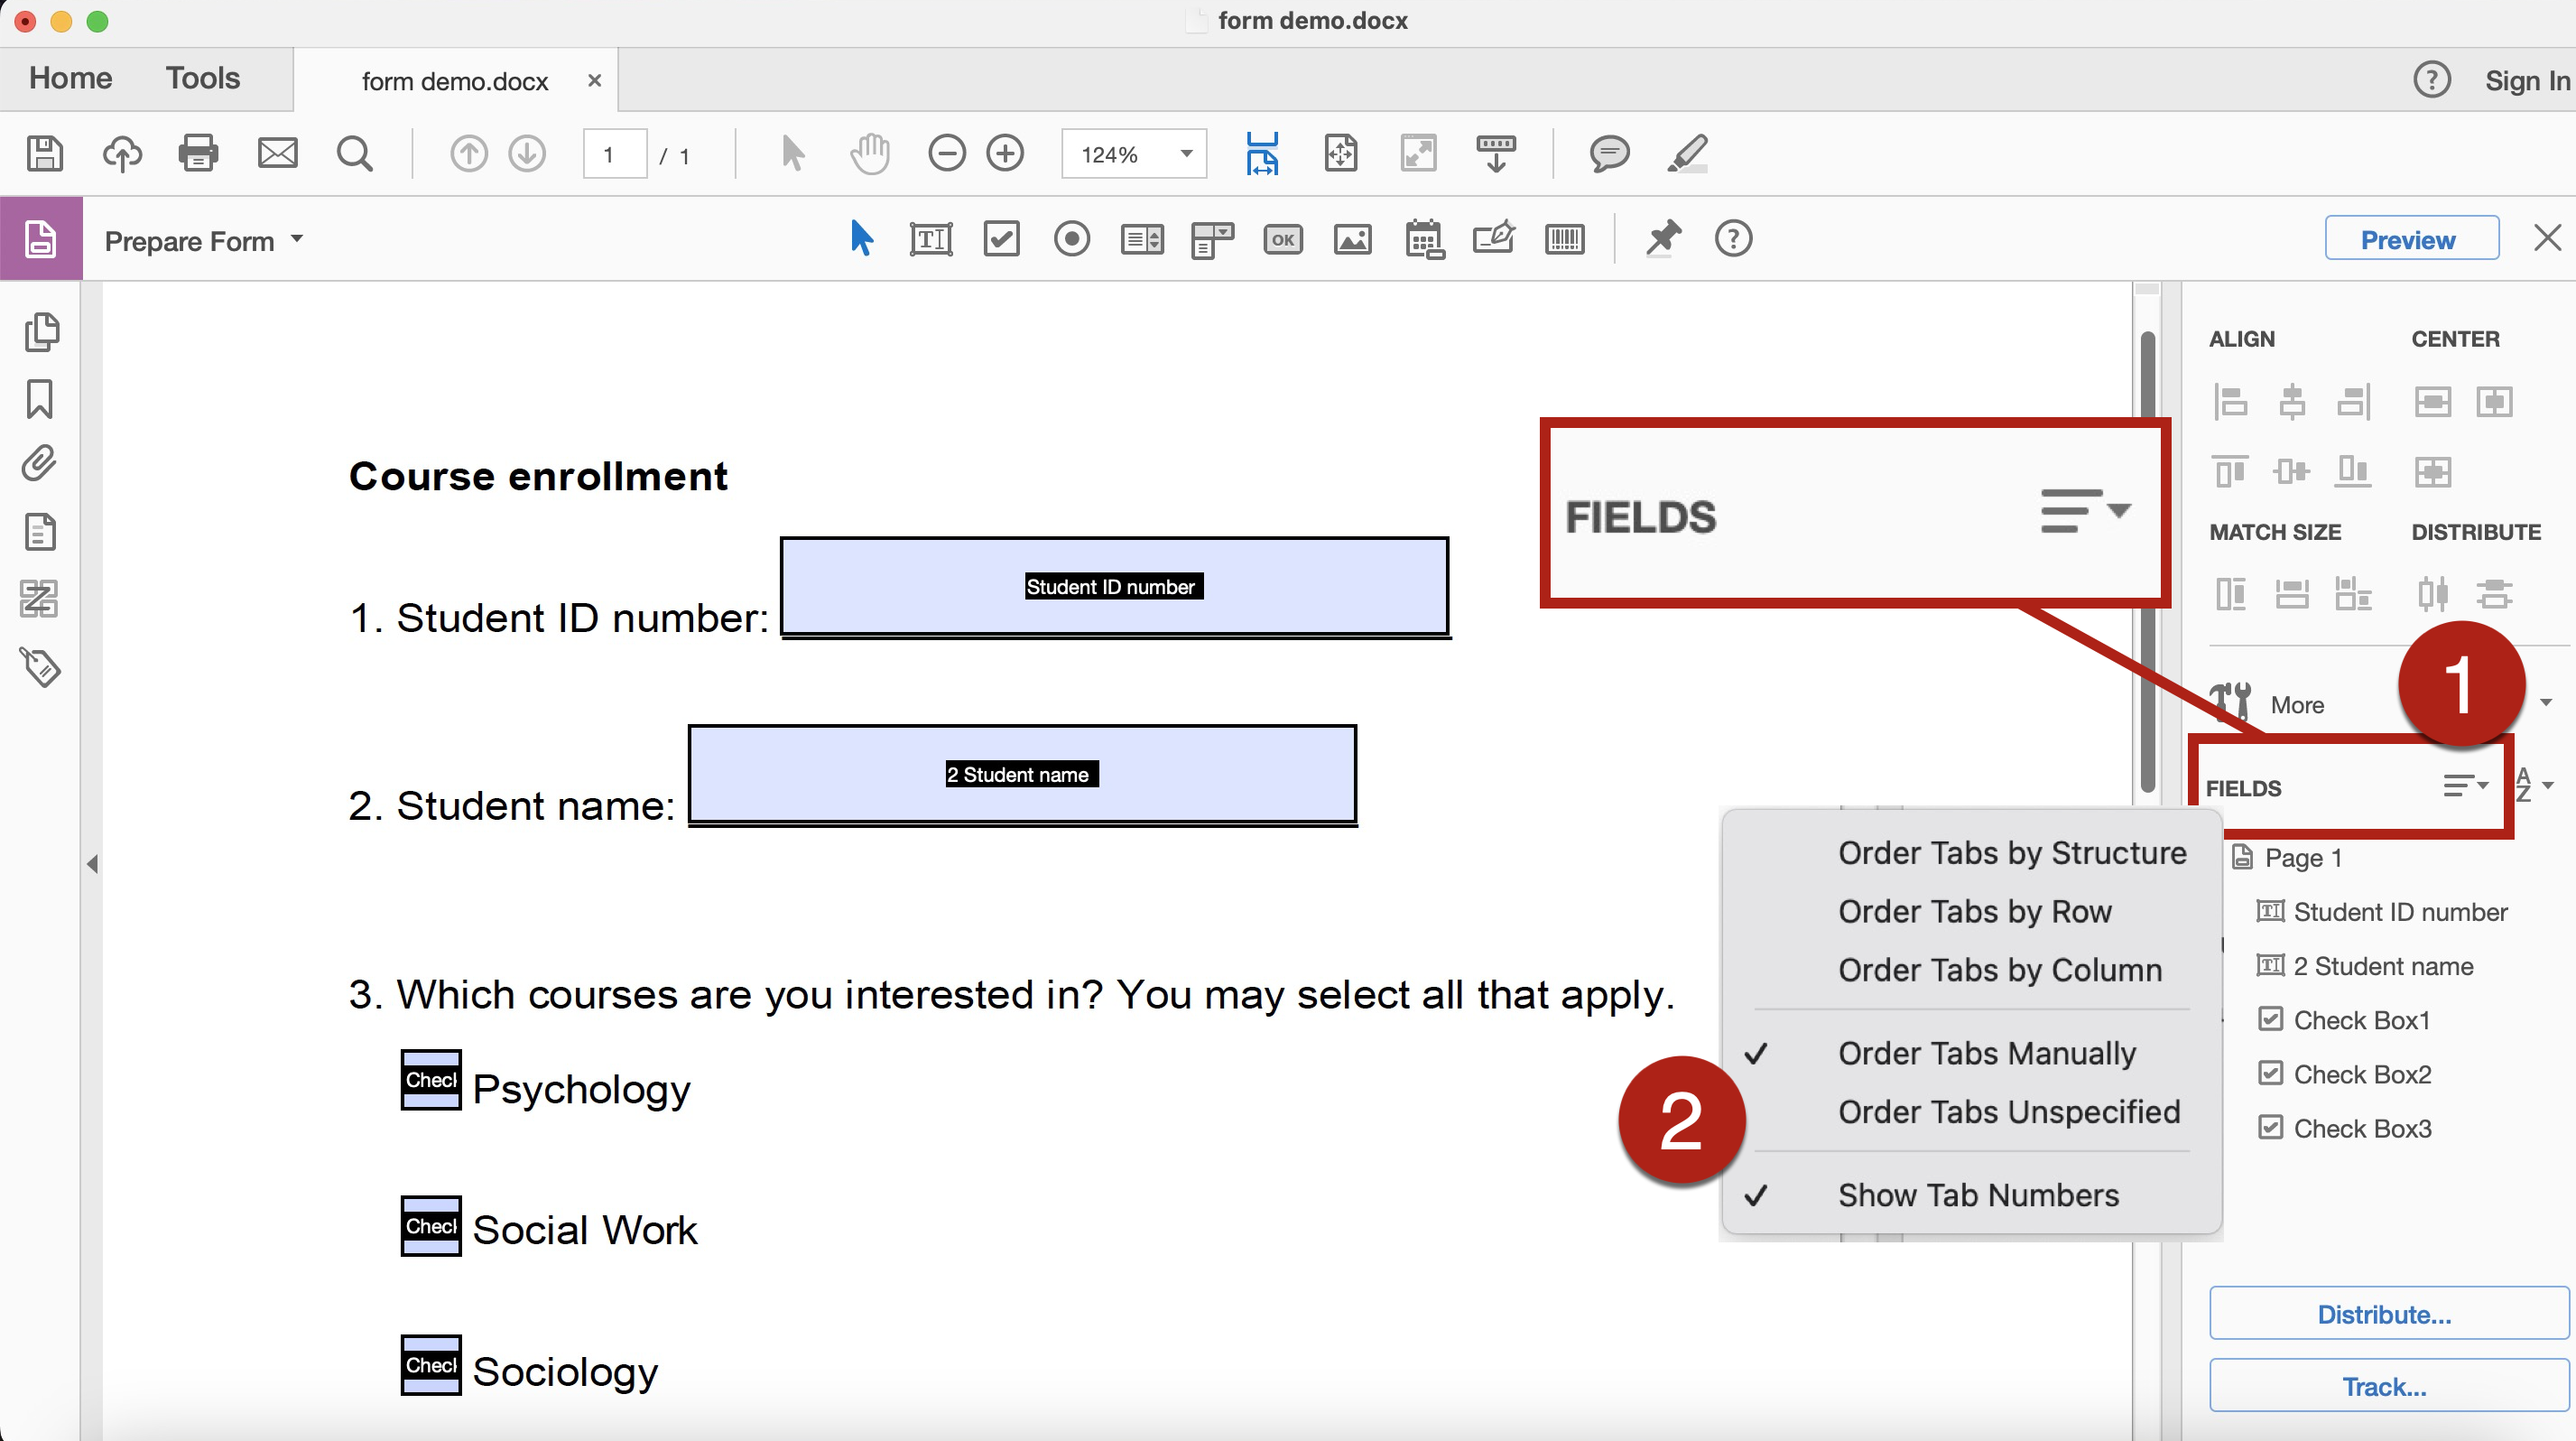
- Go to Tools > Prepare Form.
- Go to the Fields section of the right pane of the Prepare Form window. All form fields are listed in order under this Fields The order of each form field is also indicated by the number displayed at the top-left corner of the form field.
- Select the options Order Tabs Manually and Show Tab Numbers in the menu of the Fields section.
- To fix the tabbing order:
-
- Drag and drop the form field item within the Fields Panel. When you are dragging the item, a line appears to indicate where the new location will be.
- The modified order of the form field should be reflected in the change in the number displayed at the top-left corner of the form field.
- Go to the Reading Order Pane and Tags Pane to confirm the modified tabbing order done is the Fields Panel is properly applied. Fix the tags in the Reading Order Pane and Tags Pane if there is any incompatible order.
- Always make sure the content order reflected by the Reading Order Pane and Tags Pane, and visual display order is compatible. Note that the reading order accessed by screen readers must be done to the tag tree in the Tags Pane, as screen readers make use of the tag tree to access and read the document content.
- References about checking and fixing reading order of the PDF form:
- Reading Order tool for PDFs (Acrobat Pro). Adobe.
- Check and Repair the Tab Order. WebAIM.
- Repair the Content and Tag Order. WebAIM.
- Ensuring correct tab and reading order in PDF documents. World Wide Web Consortium (W3C).
- Indicate the language or languages within your document for screen readers to identify and read properly.
- References: Document and Content Language. WebAIM.
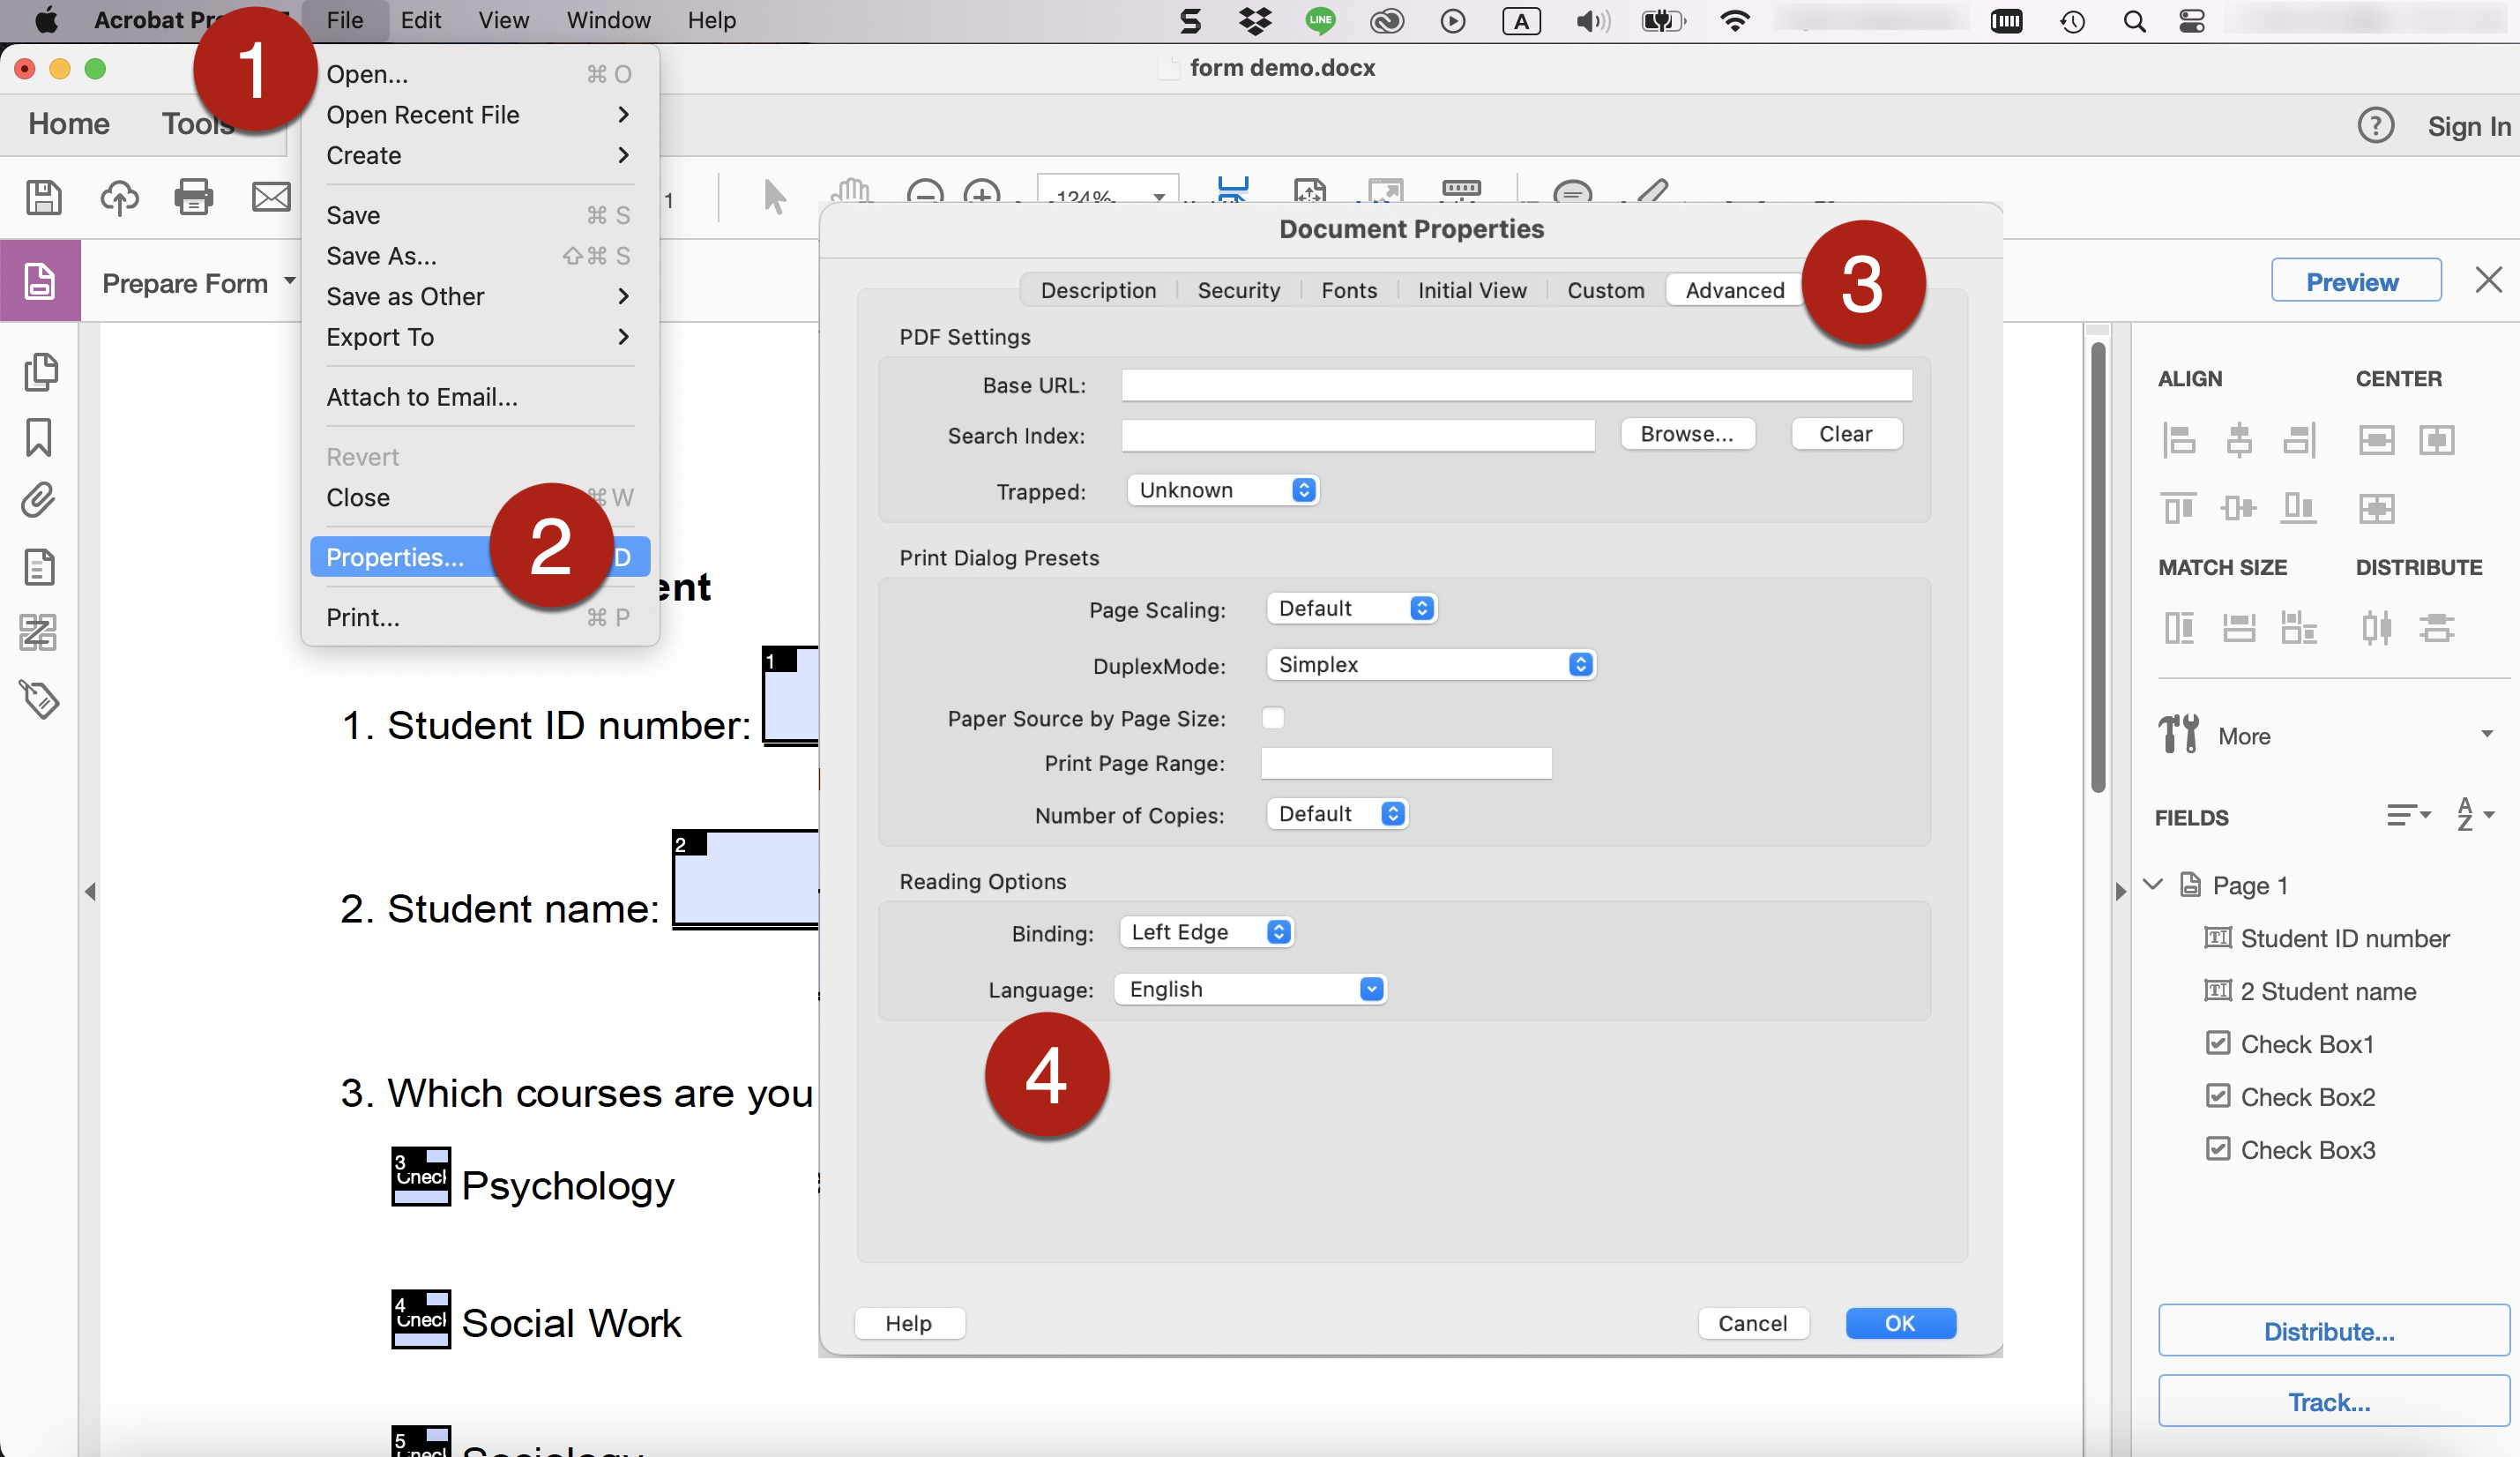
- To set the document language, go to File > Properties > Advanced > Reading Options > Language. Select the document language using the Language combo box.
- To define the language of specific part(s) of the document content:
-
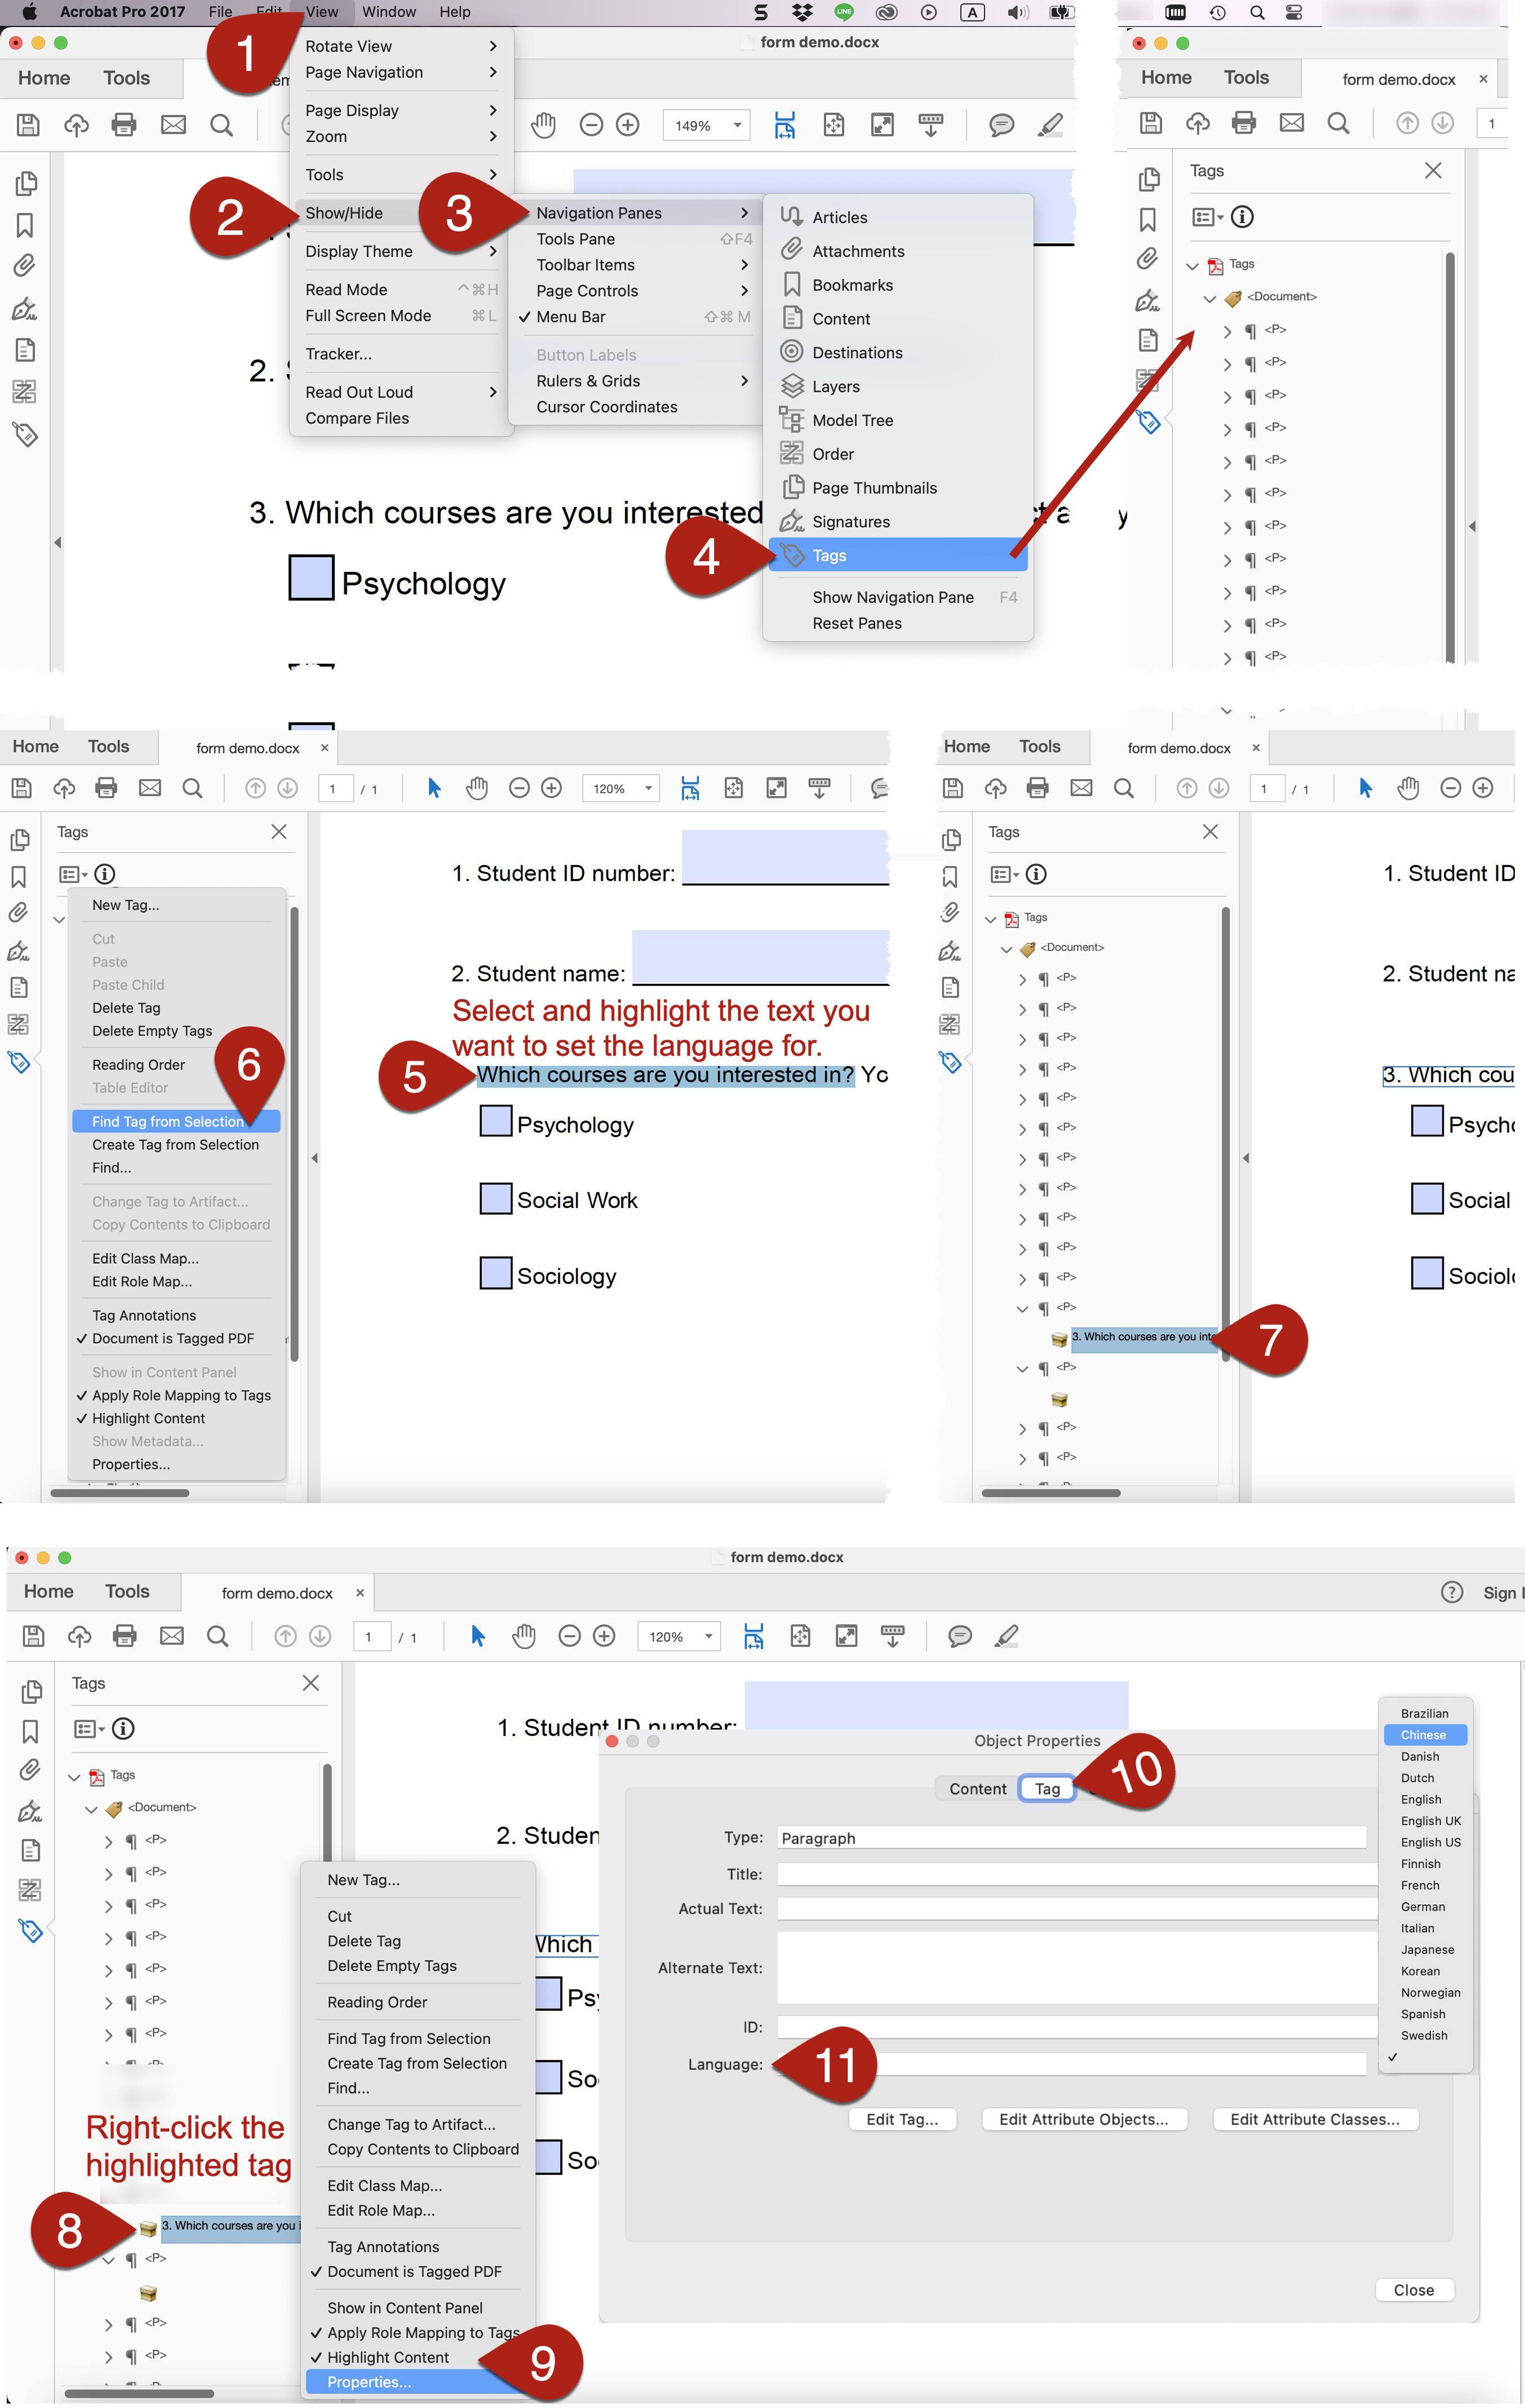
- Go to View > Show/Hide > Navigation Pane > Tags. Or right-click on the Navigation Pane > Select Tags. The Tags Pane
- Select and highlight the text you want to set the language for. Go to the Tags Pane. Select Find Tag from Selection from the Options dropdown menu.
- The tag for the selected text will be highlighted in the tag tree as shown in the Tags Pane. Right-click this highlighted tag and select Properties.
- In the Object Properties dialog pane, go to the Tag Select the corresponding language of the selected text from the dropdown menu in the Language field.
- Repeat the steps if you need to define the language for other parts of text in the document.
- Always remember to conduct accessibility full check at the end using the built-in accessibility checker in Adobe Acrobat. It could provide a brief and quick inspection on some potentially inaccessible designs of the PDF document. The Checker would provide suggestion with explanation to the corresponding issues. Fix any potentially problematic issues and re-run the accessibility full check until all items pass the check.
- The built-in accessibility checker in Adobe Acrobat would always flag Logical Reading Order and Colour Contrast in the accessibility report, by default. It serves as a reminder of the need of manual inspection on the reading order and colour contrast of the document content.
- It is important to note that passing the check does not necessarily guarantee “full accessibility” but failing the check would mean there are some inaccessible features that needs to be addressed.
- Do not solely rely on this Checker for accessibility of the PDF document. Be aware of the limitations of the built-in Accessibility Checker.
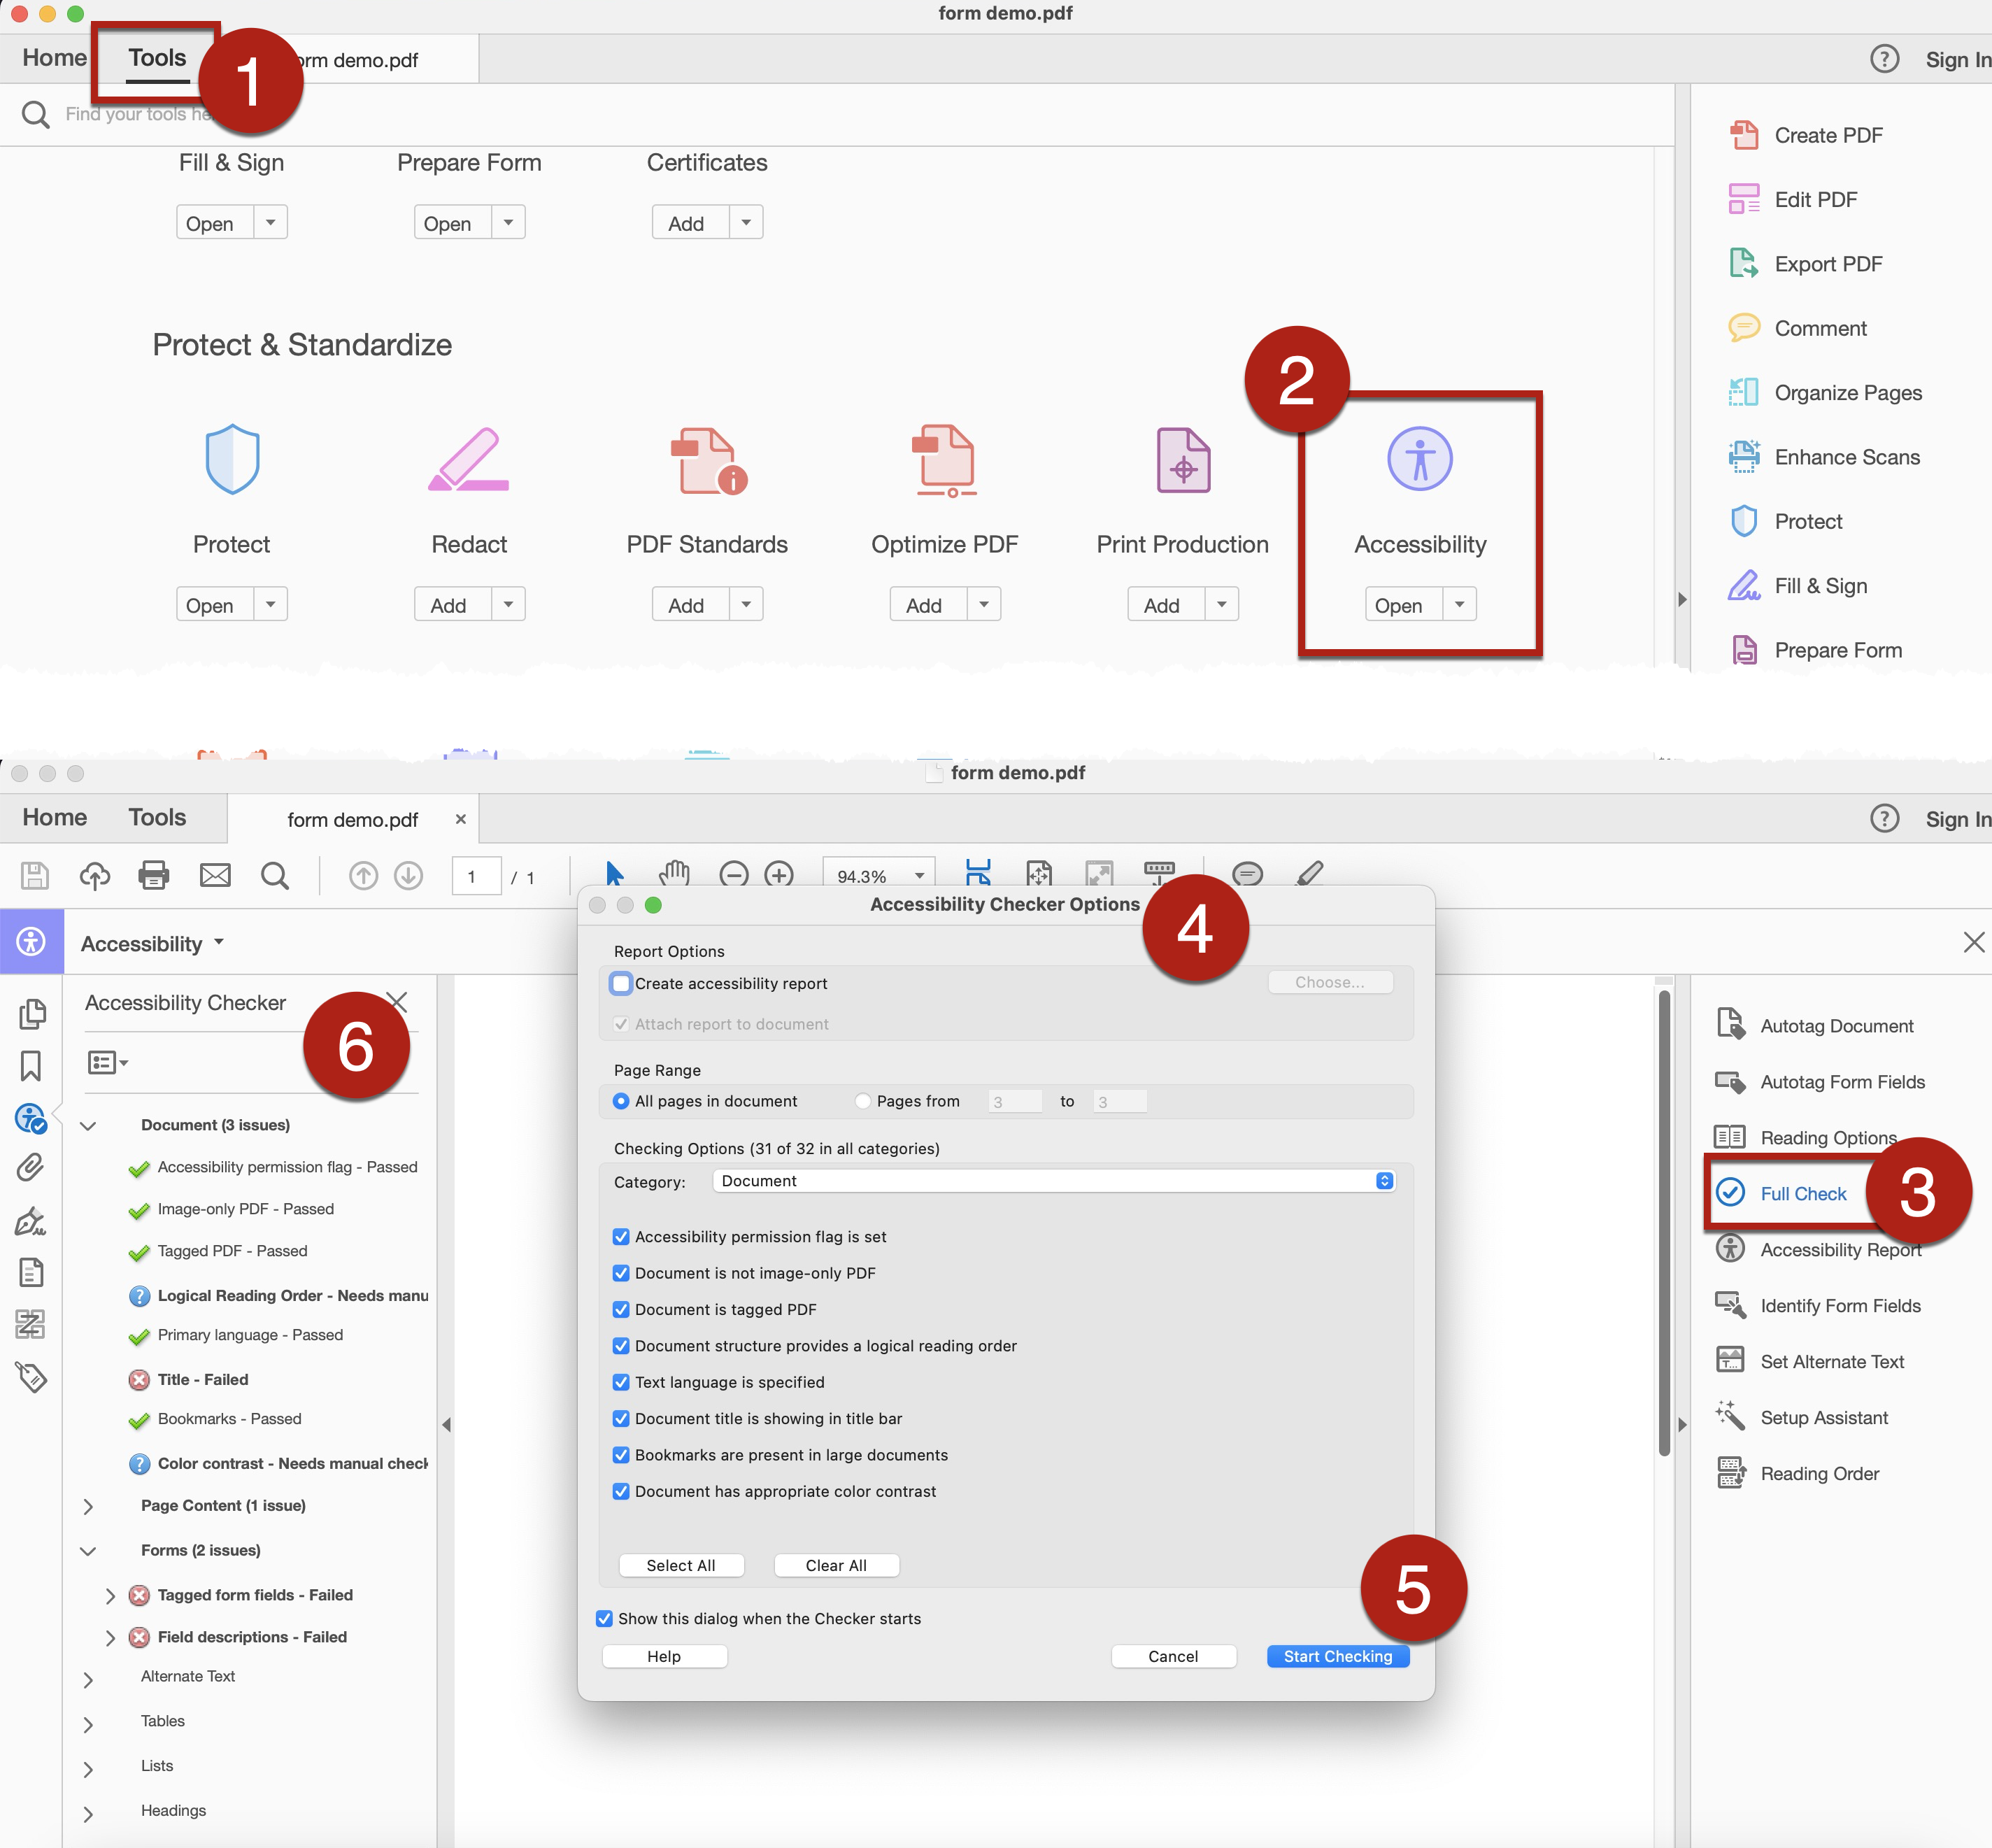
- To perform the Accessibility Full Check using the built-in accessibility checker in Adobe Acrobat:
- Go to Tools > Accessibility > Full Check. The Accessibility Checker Options Pane opens.
- In the Accessibility Checker Options Pane, select your preferred settings.
- For Report Options, indicate whether you want to save the accessibility report as an HTML file on your computer or attach the report file to the PDF.
- For Page Range, indicate whether you want to check all pages or specific page(s) of the PDF
- For Checking Options, indicate which accessibility issue(s) you want to inspect. There are in total 32 issues in 4 categories including Document; Page Content; Forms, Tables, and Lists; and Alternate Text and Headings. To perform a more comprehensive check, it is suggested to select all 32 options.
- Select Start Checking to begin the accessibility check.
- The report will then display in the Accessibility Checker panel on the left of the Adobe window. It flags any issues to be fixed or items that require manual inspection. Select any item and right-click to further select Explain. The Explain command will link to the Adobe webpage showing the detailed explanation and instructions of how to fix that inaccessibility item.
- Go through each potential problematic item and fix it.
- Afterwards, run the Check again until the items pass.