
- Always consider accessibility issues when you create the source documents in other authoring tools such as Microsoft Word or PowerPoint.
- It is generally much more flexible and easier to apply various formatting functions for accessibility starting from the initial stage of creating the source documents, compared to modifying an inaccessible source document in PDF editors.
- If the accessible formatting (such as heading styles and alternative text) is applied properly in the source documents, it could help preserve these accessible formatting in the PDF when the source documents are exported to PDF correctly.
- Use the Save As PDF option to convert the Word document or PowerPoint slides to PDF to help retain the accessible formatting of the source document.
- For Windows: Go to File > Save As. Select PDF from the menu of export file types. By default, this produces a PDF that would retain the accessible features of the document. Select Options. Check the command Document structure tags for accessibility.
- For Mac: Go to File > Save As. Select PDF from the menu of export file types. By default, this produces a PDF that would retain the accessible features of the document. Select the option Best for electronic distribution and accessibility.
- Do not use the Best for printing function to export the source documents to PDF.
- The PDF created in this way would not retain the accessible features in the source documents, e.g., the heading structure, Alt Text of graphical content, and logical reading order. It makes the resulting PDF less accessible.
- An example of scanner for mobile device is the Adobe Scan Mobile App. It allows users to scan and upload the materials to Acrobat Pro DC for further editing and accessibility settings.
- References: Converting Documents to PDFs. WebAIM.
- The very first step of creating an accessible PDF is to check whether the PDF is a “searchable PDF” and the text content in the PDF is “real”.
- If the text is real, then you may go ahead to perform other accessible formatting in PDF.
- If the text is not real, then you need to either convert the text content into real text by optical character recognition (OCR) or recreate the PDF from the source document.
- Searchable PDF means the text is searchable by shortcut keys such as Ctrl + F. “Real” text means it is fully editable or selectable. The text can be selected and/or highlighted by cursor; copied and pasted.
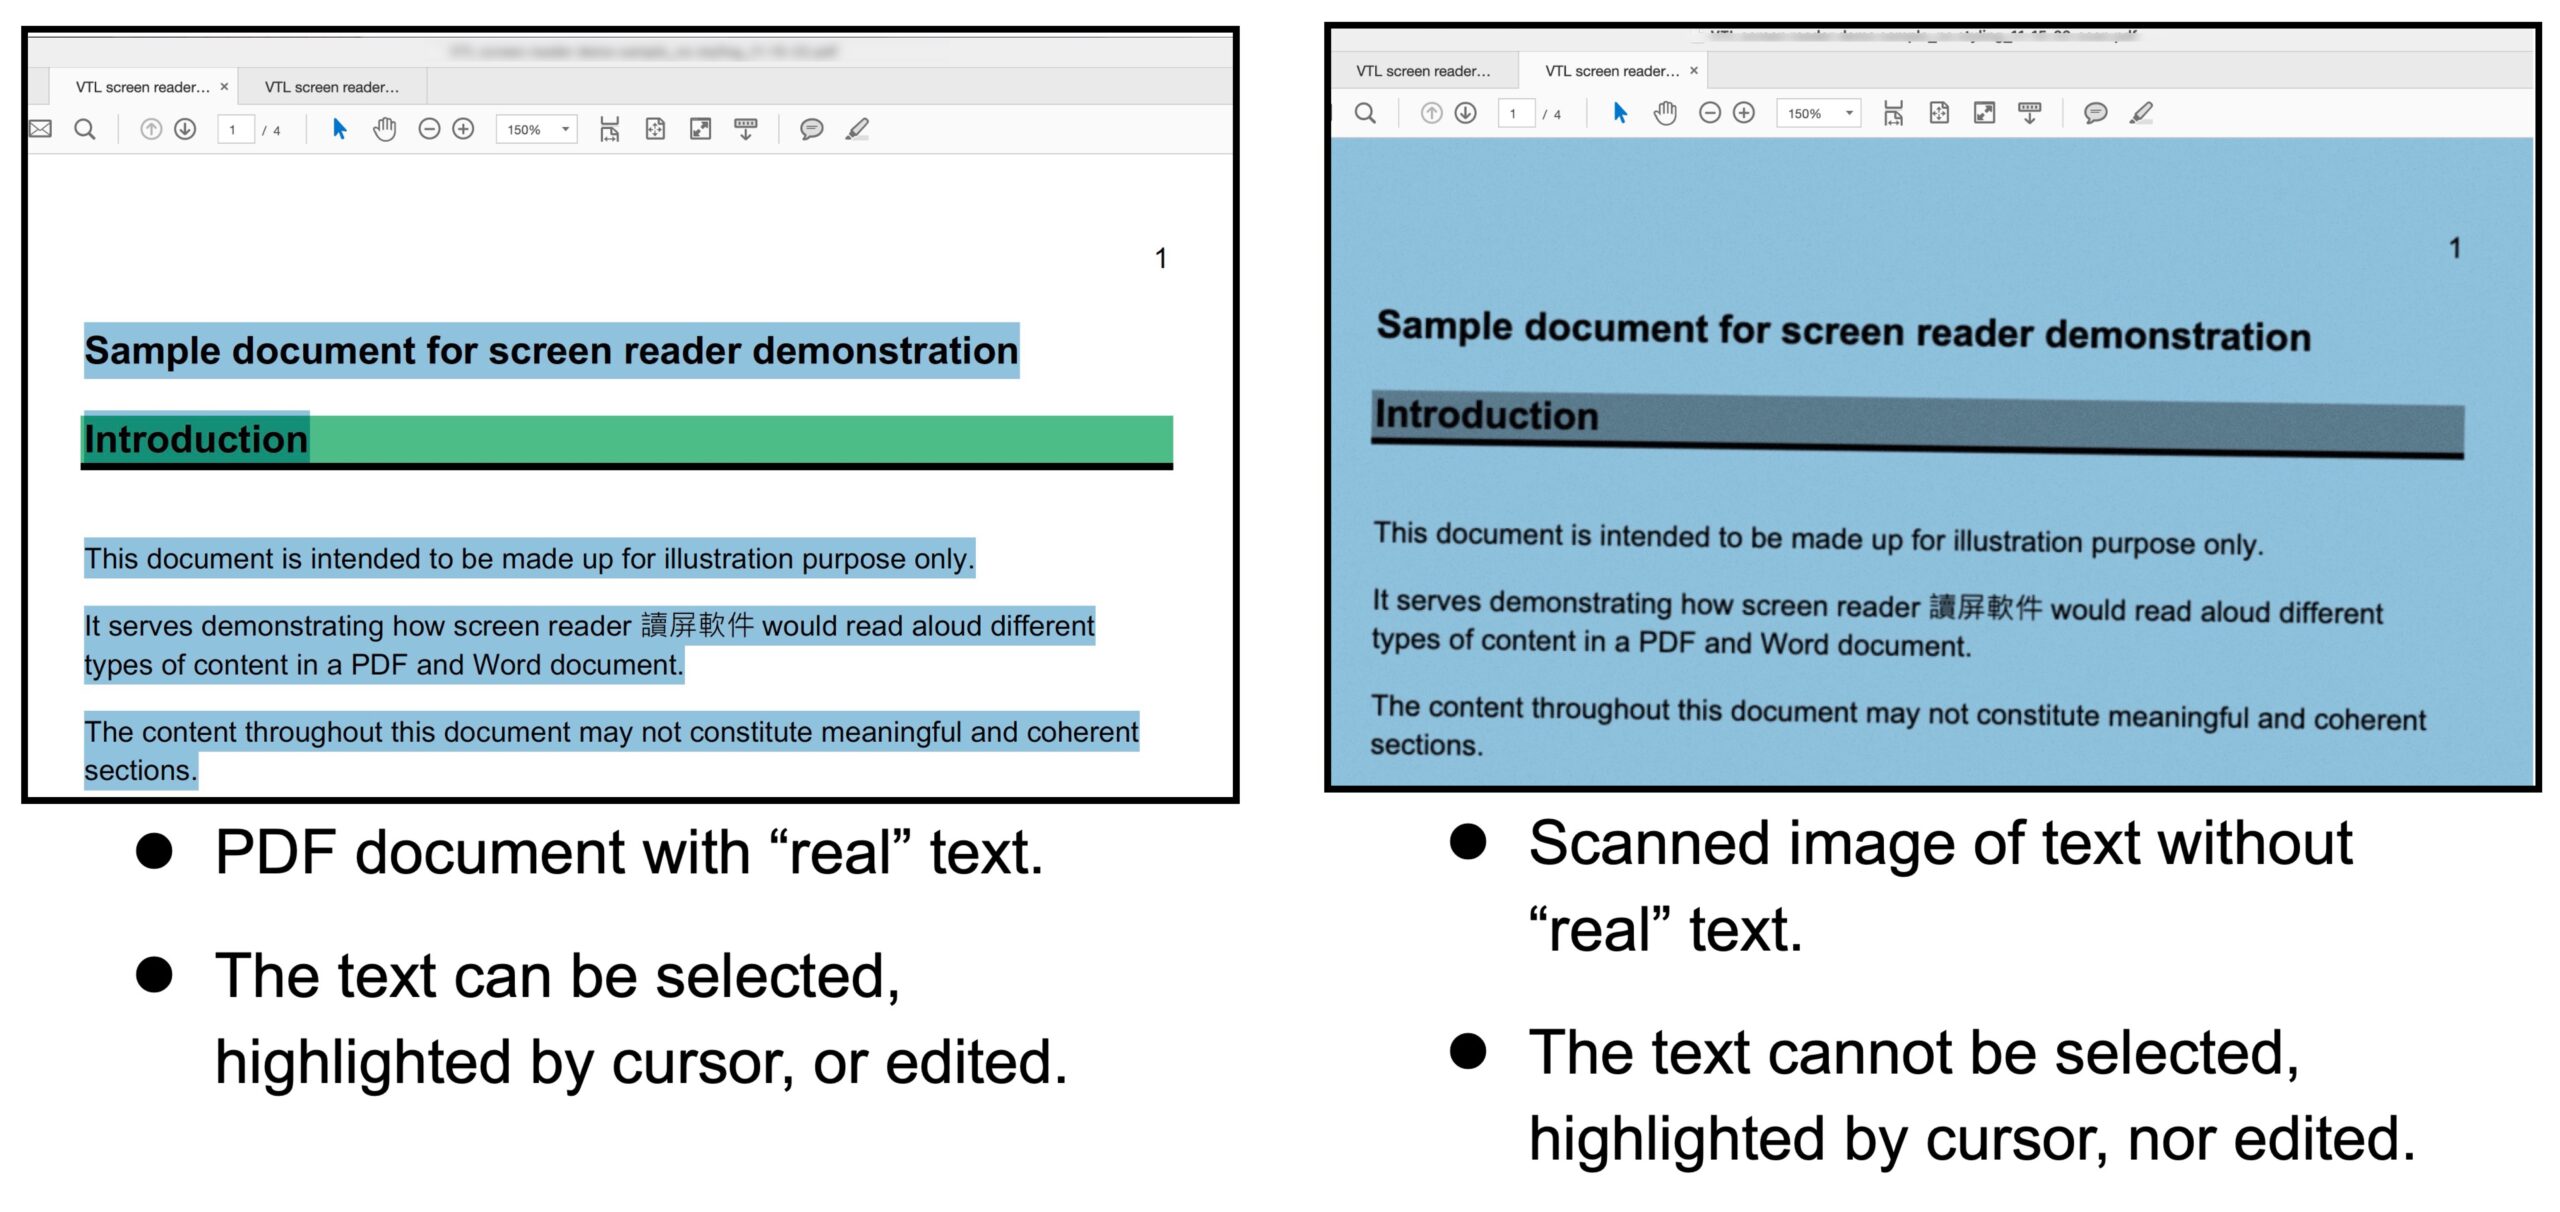
- Assistive technologies such as screen readers can only access and process the real text in searchable PDF but not image of text. Searchable PDF is indeed more accessible to all users as they can more easily select, highlight, edit, or reflow the real text content in the PDF.
- Sometimes, instructors may scan some pages in a reference book to create softcopy in PDF for students. Such image PDF is not a searchable PDF and the text content is not real. It is inaccessible to assistive technologies such as screen readers.
- Optical Character Recognition (OCR) is the process of converting images of text into “real” text that is searchable, recognizable, readable, and editable.
- To perform OCR in Adobe Acrobat Pro:
-
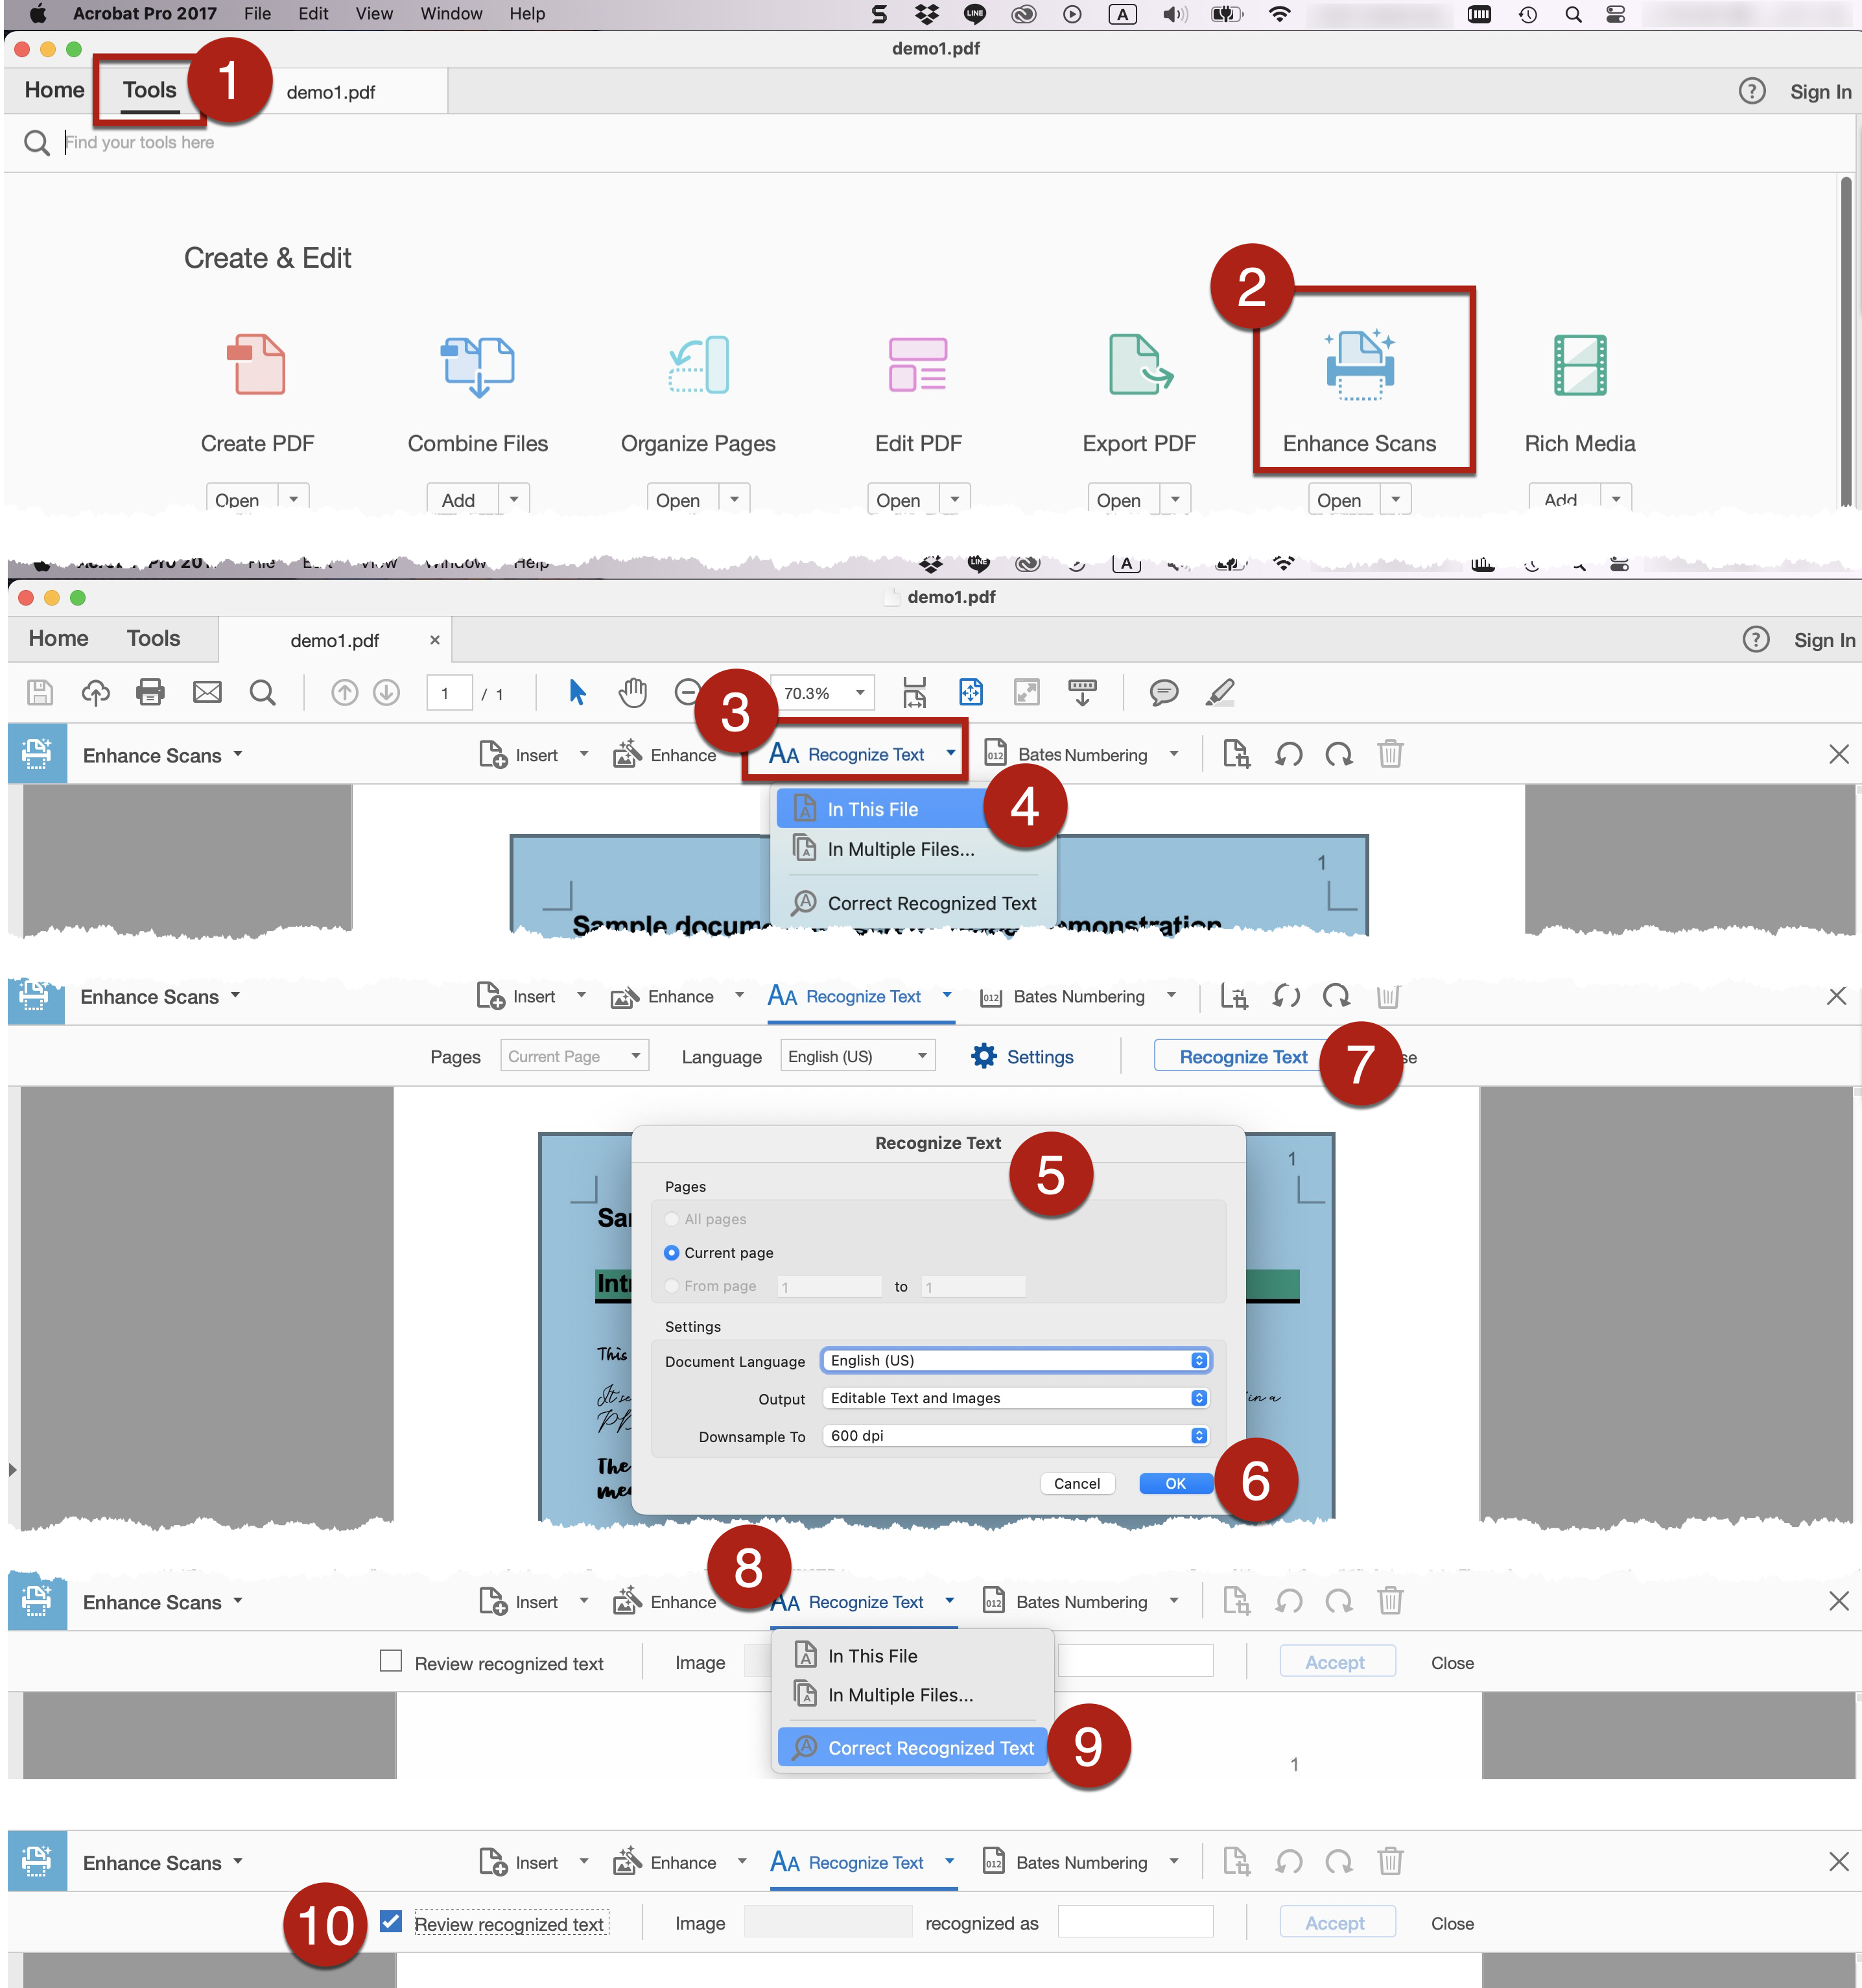
- Go to Tools > Enhance Scans or Scan & OCR > Recognize Text > In This File. Select In Multiple Files if you need to convert multiple files at the same time.
- Go to Settings > Specify the page range to be converted and document language. For the Output, select Editable Text and Images. Select OK.
- Select Recognize Text. Then OCR will begin. Note that the resulting text might not be completely correspond to the original text. The quality of the OCR depends on various factors, such as the quality of the scan and font (e.g., handwritten text might be more difficult to be accurately recognized).
- Proofread and fix the converted text in the resulting PDF. Select Recognize Text > Correct Recognized Text. Suspected characters are automatically highlighted. You may go through each suspected character one by one. Accept or fix the suspected characters as needed.
- Proofread and fix the converted text in the resulting PDF again manually.
- Avoid watermarks.
- Be mindful of the colour contrast between the watermarks and the main body text. Appropriate shade of colour and adjusting the opacity of the watermarks could help avoid mixing up the content of the watermarks and main body text.
- If watermarks are necessary, insert the watermarks from within the PDF editor. It helps ensure that watermarks can be tagged correctly for proper reading by users of assistive technologies such as screen reader.
- Do not insert the watermarks to the source documents before exporting to PDF. Including watermarks in the source documents may sometimes be mistakenly recognized as part of the main body text. This could be confusing to screen reader users because the text on the watermarks could pop out suddenly within the content of the document.
- To insert watermarks in PDF:
-
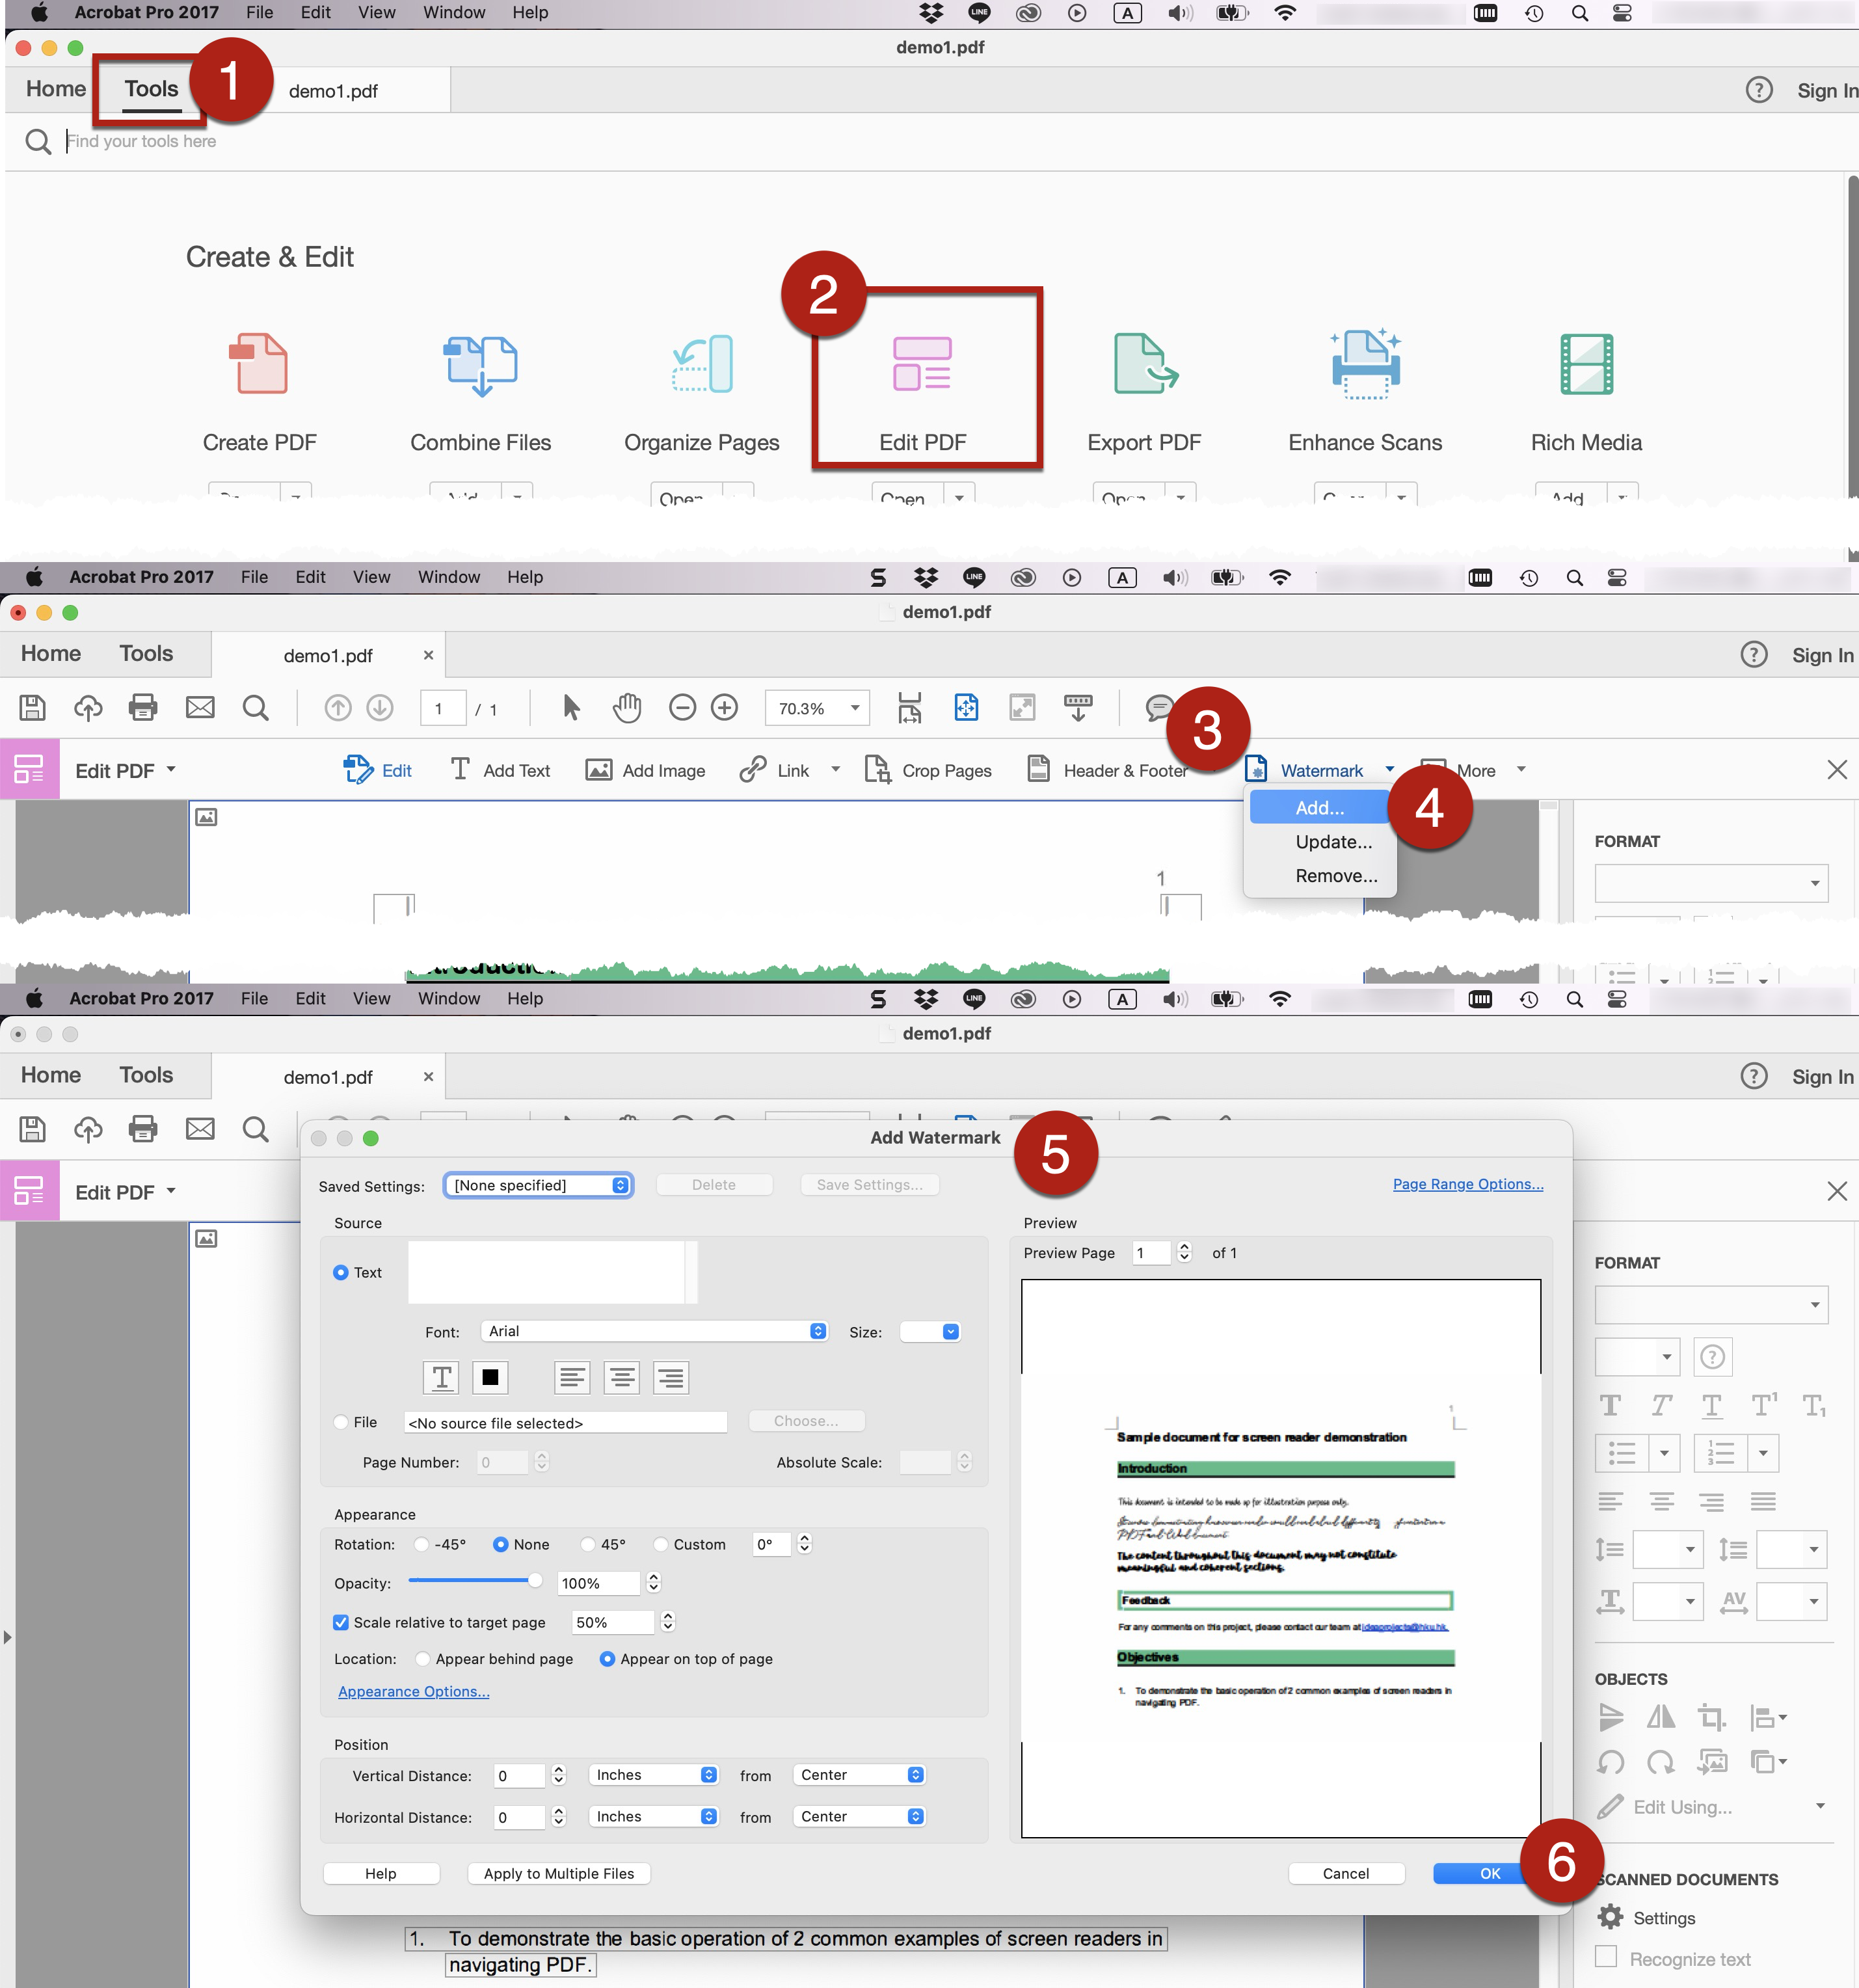
- Go to Tools > Edit PDF > Watermark > Add.
- The Add Watermark dialog box opens. There is a range of options on the appearance of the watermarks. For example, you may modify the font colour using the colour picker command and adjust the opacity of the watermarks with the opacity slider.
- Select OK.
- If the source documents are available, verify and fix the source documents to ensure proper accessible formatting and “real” text. Export this modified document to PDF properly.
- If source documents are not available, there are two examples of suggested solutions.
- Solution 1: Export the PDF to other documents editing programmes such as Microsoft Word or PowerPoint for accessible formatting. Re-export this modified document to PDF properly.
- Solution 2: Manually type the text content in Microsoft Word to create an accessible source document, then export this source document to PDF.
- Use the Save As PDF option to convert the Word document or PowerPoint slides to PDF to help retain the accessible formatting of the source document.
- For Windows: Go to File > Save As. Select PDF from the menu of export file types. By default, this produces a PDF that would retain the accessible features of the document. Select Options. Check the command Document structure tags for accessibility.
- For Mac: Go to File > Save As. Select PDF from the menu of export file types. By default, this produces a PDF that would retain the accessible features of the document. Select the option Best for electronic distribution and accessibility.
- Do not use the Best for printing function to export the source documents to PDF.
- The PDF created in this way would not retain the accessible features in the source documents, e.g., the heading structure, Alt Text of graphical content, and logical reading order. It makes the resulting PDF less accessible
- References: Converting Documents to PDFs. WebAIM.
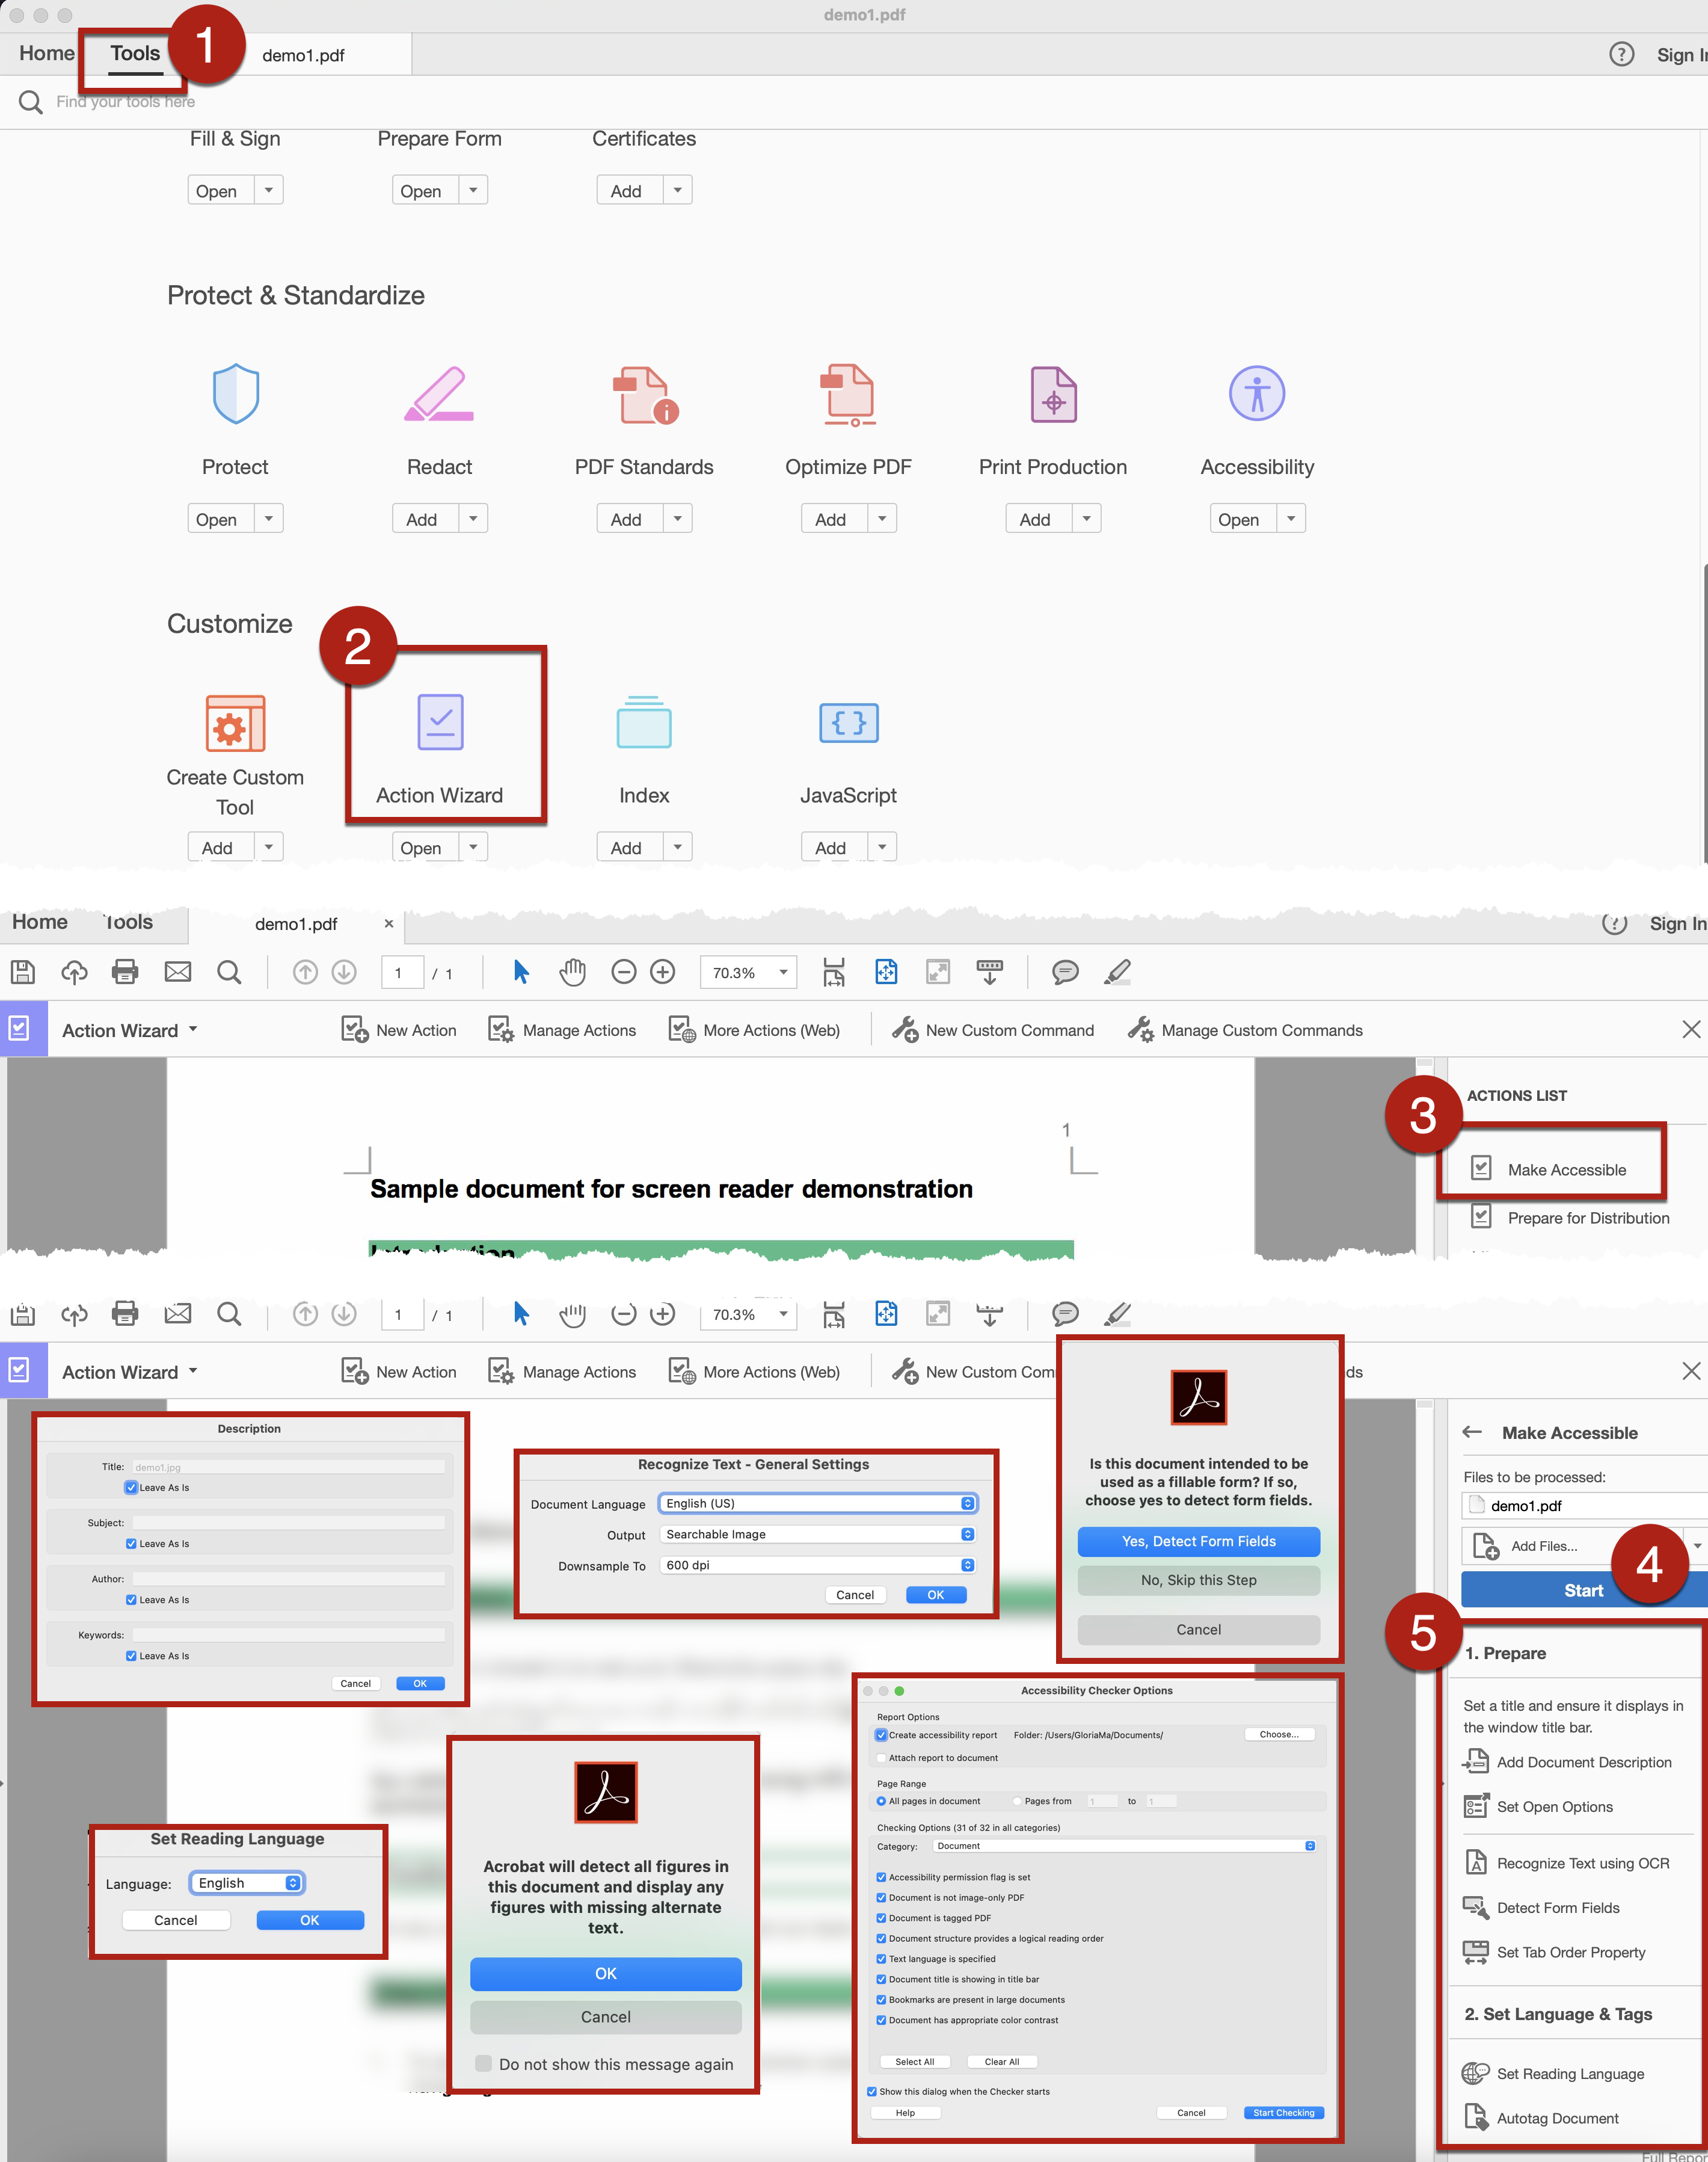
- If you are not familiar with creating accessible PDF, you may consider running the built-in Make Accessible wizard. The wizard would guide you through nine basic steps in creating an accessible PDF.
- Prepare
-
-
- Add Document Description
- Set Open Options
- Recognize Text using OCR
- Detect Form Fields
- Set Tab Order Property
-
-
- Set Language & Tags
-
-
- Set Reading Language
- Autotag Document
- Set Alternate Text
-
-
- Overall check
-
-
- Perform Full Accessibility Check
-
- To active the “Make Accessible” wizard:
-
- Go to Tools > Action Wizard > Make Accessible. The list of the nine actions appear on the right of the workspace. Click Start.
- Once you click Start, the wizard would automatically run the nine steps one by one. You just need to follow the prompts and instructions to complete the actions one by one.
- Note that the completion of these nine steps does not guarantee a fully accessible PDF. For example, you should check colour contrast as well.
- Details of the accessibility-related steps are elaborated in subsequent sections.
- Run the Accessibility Full Check at the beginning. It could provide a brief and quick inspection on some potentially inaccessible designs of the PDF document. The Checker would provide suggestion with explanation to the corresponding issues.
- To perform the Accessibility Full Check using the built-in accessibility checker in Adobe Acrobat:
-
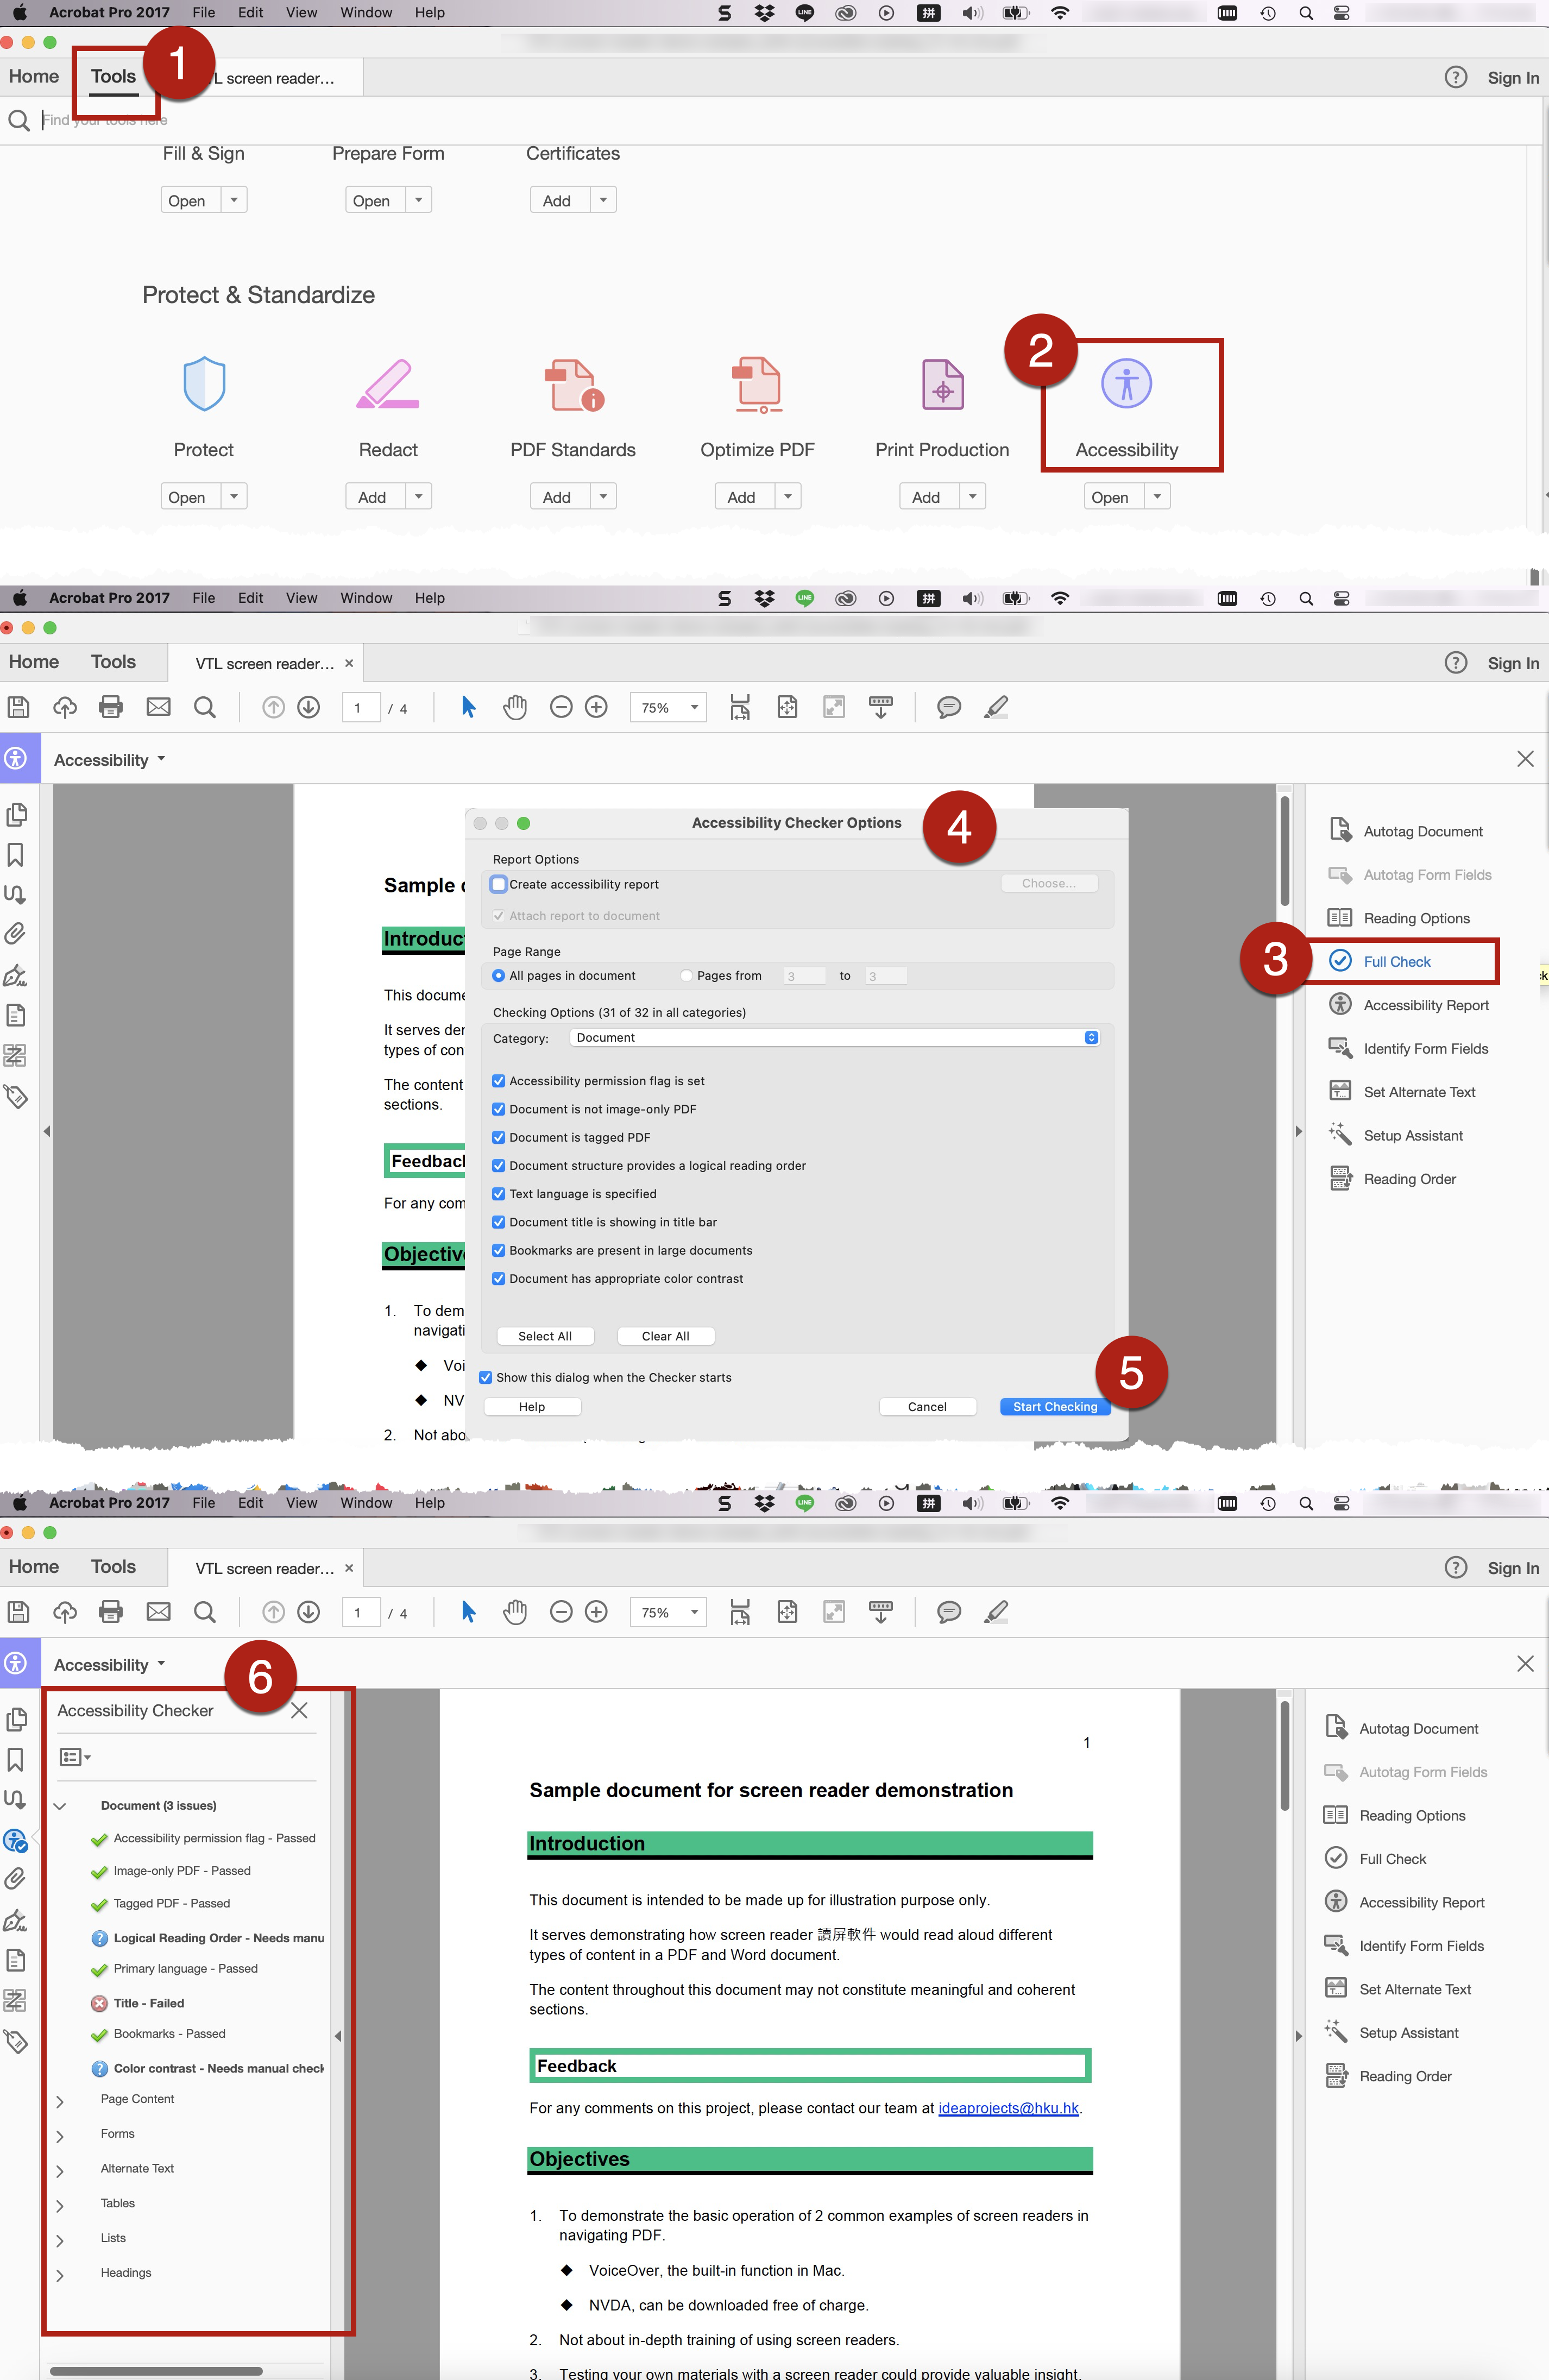
- Go to Tools > Accessibility > Full Check. The Accessibility Checker Options dialog pane opens.
- In the Accessibility Checker Options dialog pane, select your preferred settings.
-
-
- For Report Options, indicate whether you want to save the accessibility report as an HTML file on your computer or attach the report file to the PDF.
- For Page Range, indicate whether you want to check all pages or specific page(s) of the PDF
- For Checking Options, indicate which accessibility issue(s) you want to inspect. There are in total 32 issues in 4 categories including Document; Page Content; Forms, Tables, and Lists; and Alternate Text and Headings. To perform a more comprehensive check, it is suggested to select all 32 options.
-
-
- Select Start Checking to begin the accessibility check.
- The report will then display in the Accessibility Checker panel on the left of the Adobe window. It flags any issues to be fixed or items that require manual inspection. Select any item and right-click to further select Explain. The Explain command will link to the Adobe webpage showing the detailed explanation and instructions of how to fix that inaccessibility item.
- Go through each potential problematic item and fix it. Afterwards, run the Check again.
- Tags are invisible identifiers that indicate different elements in the document, such as image, hyperlink, body text and different levels of headings. The tags do not affect the visual appearance of the document.
- Paragraphs of body text: <P>
- Headings and subheadings: <H1>, <H2>, <H3>, <H4>, <H5>, <H6>
- Lists: <L>, <LI>
- Tables: <Table>, <TR>, <TH>, <TD>
- Graphics: <Figure>
- Hyperlinks: <Link>
- Decorative images: <Artifact>
- Tags are essential for screen reader users to access the PDF documents. The tags will form a logical and expandable tree structure that allows assistive technologies such as screen readers to identify each element in the PDF and read the content correctly in the intended and logical order.
- Contents of a tagged PDF document can be resized and reflowed for reading on mobile devices or magnified viewing.
- A properly tagged PDF does not necessarily mean the PDF is fully accessible. However, an untagged PDF would not be accessible.
- Use the Tags Pane to view, add, remove, reorder, edit all the tags of the PDF document.
- It is recommended to tag the source document before converting it into PDF in an authoring tool such as Microsoft Word or PowerPoint. If you have properly formatted the content structure of the source document when creating it with authoring tools, the formatted content structure would be retained when the source document is exported to PDF and automatically become the tags. However, it is always important to review the tags in the PDF and fix it if needed.
- Before you start tagging, remember to first check whether there are any pre-existing tags in the PDF document. Sometimes, it might be better to first remove all or part of the pre-existing tags, then add new tags manually, rather than fix each pre-existing wrong tag one by one.
- When you exported the source documents from other authoring tools such Microsoft Word or PowerPoint to PDF, it is possible that some formatting cannot be successfully retained.
- Sometimes, you only have the PDF documents but not the source documents. For example, you want to make the PDF of a journal article accessible to your students who use screen reader. These PDF documents may or may not contain proper tags.
- To check the tagging structure of the PDF:
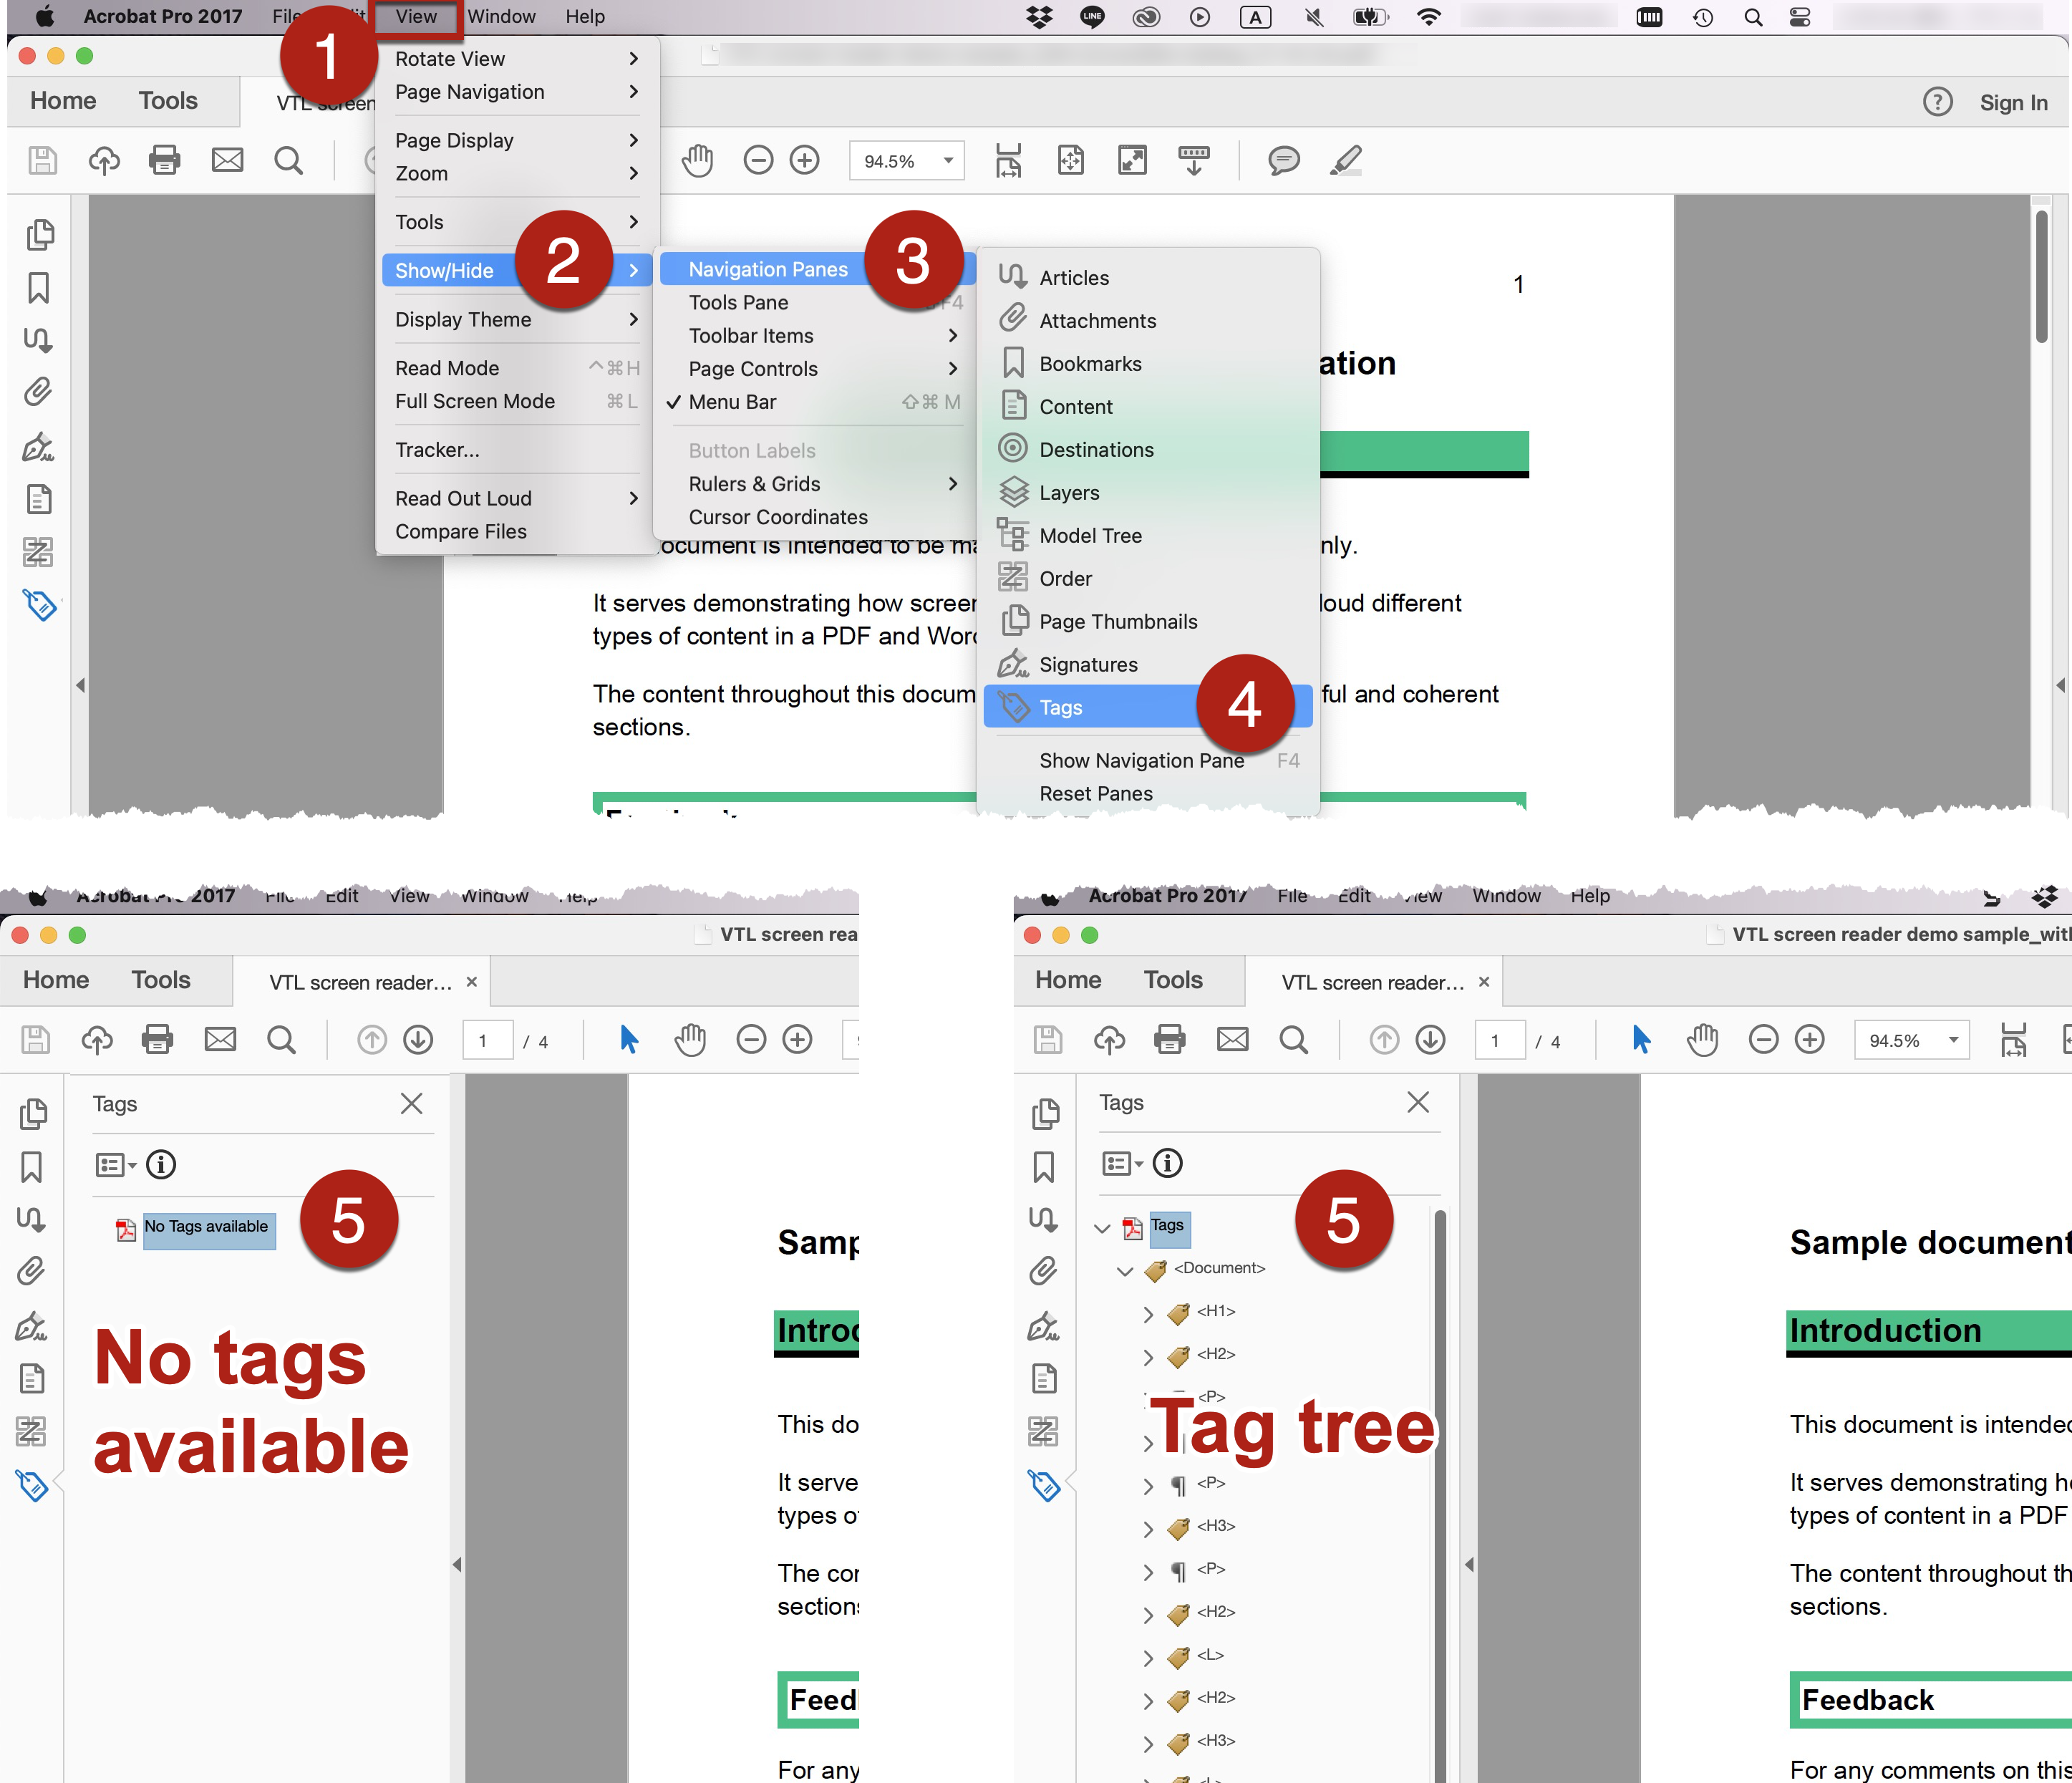
- Go to View > Show/Hide > Navigation Pane > Tags. Or right-click on the Navigation Pane > Tags. The Tags Pane
- If you see the message No tags available in the Tags Pane, it means this PDF does not have any pre-existing tags, i.e., an “untagged PDF”. It indicates the need to add tags to the PDF.
- If you see an expandable tree-like structure in the Tags Pane, then the document contains a pre-existing tagging structure. It indicates the need to further review and fix both the types and reading order of all the tags. Add, or remove any tags, and/or fix any wrong or missing tags.
- For an untagged PDF, first, you need to mark it as a tagged PDF before tagging begins.
- Go to View > Show/Hide > Navigation Pane > Tags. Or right-click on the Navigation Pane > Tags. The Tags Pane For an untagged PDF, you should see No Tags available in the Tags Pane.
- Select Create Tags Root from the Options dropdown menu. The No tags available will change to Tags.
- Select and click Document is Tagged PDF from the Options dropdown menu. Afterwards, a tick should appear besides the command text Document is Tagged PDF.
- Go to Files > Properties > Description > Advanced. Make sure the Tagged PDF item indicates Yes.
- Then, you can begin to assign tags to this PDF document by either built-in auto-tagging function or adding tags manually. It is important to note that you must manually review and edit the auto-added tags.
- To auto-tag a PDF:
- Method 1: Go to Tools > Accessibility > Autotag Document.
- Method 2: Go to View > Show/Hide > Navigation Pane > Tags. Or right-click on the Navigation Pane > Tags. The Tags Pane Select Add Tags to Document from the Options dropdown menu.
- The system automatically analyzes the content of the document to identify each page element, the hierarchical structure, and the intended reading order of each page. Then, tags are added. The tag tree is constructed and shown in the Tags Pane reflecting the document content structure.
- However, the auto-tags are not always accurate. The system may not always correctly interpret the document structure and reading order, especially when the document contains complex page elements. Some of the examples of complex elements are closely spaced columns, irregular text alignment, non-fillable form fields and tables without borders. A poorly tagged document may be produced with improperly combined elements or out-of-sequence tags and confusing reading order.
- Always review the resulting tag tree and reading order after using the Autotag Document Manually fix individual tags and/or reading order if needed.
- Make sure the very first and top tag is <Document>.
- Go to View > Show/Hide > Navigation Pane > Tags. Or right-click on the Navigation Pane > Tags. The Tags Pane
- Select Document from the dropdown menu in the Type Select OK.
- The <Document> tag will appear below the Tags in the Tags Pane.
- Add the rest of the tags under this <Document>.
- To add individual tag manually using the Tags Pane:
- Go to View > Show/Hide > Navigation Pane > Tags. Or right-click on the Navigation Pane > Tags. The Tags Pane
- Click the root element <Tags> of the tag tree.
- Select and highlight the target content in the document to be tagged.
- Select Create Tag from Selection from the Options dropdown menu in the Tags Pane. Select the suitable type of tag that corresponds to the highlighted content. Select OK.
- A new tag is formed and appears in the tag tree. Click and drag the tag under the top element <Document> tag in the tag tree.
- To move the tag to another location in the tag tree, select the icon of the tag. Drag the tag to the desired location. When you are dragging the tag, a line appears to indicate where the new location will be.
- To add individual tag manually using the Reading Order Pane:
- Go to View > Show/Hide > Navigation Pane > Reading Order. Or right-click on the Navigation Pane > Reading Order. The Reading Order Pane
- Click the root element <Tags> of the tag tree.
- The Reading Order Panel displays.
- Select either Page content order or Structure types.
- Draw a rectangle around the target section of the content to be tagged.
- Select corresponding content type in the Reading Order Panel to add the tag, such as Heading 1 and Figure.
- The rectangle becomes a gray box that encloses the selected content. The top left corner of the rectangle will display the name of the assigned tag in a small white box.
- If you selected Page content order in step 4, the tag name will be numbers that corresponds to the order you added this tag, e.g., 1, 2, 3.
- If you selected Structure types in step 4, the tag name will be the type of tag instead of numbers, e.g., p, H1.
- You may switch the selection of Page content order and Structure types
- Tag the different parts of the content in the intended reading order.
- Repeat procedures 6 to 9 to add tags to the rest of the content.
- Note that some tag options are not available in the Reading Order Pane (e.g., Hyperlink, List, List Item, Table Header), you need to create the tag manually in the Tags Pane
- As you add the tags to the document, the list of tags will display in the Reading Order Pane in the order of you added the tags.
- As you add the tags to the document, the list of tags will also display in the Tags Pane showing the types of tags.
- To modify individual tag manually in the Tags Pane:
- Go to View > Show/Hide > Navigation Pane > Tags. Or right-click on the Navigation Pane > Tags. The Tags Pane
- Expand the root element <Tags> to view the tag tree. Look for the tag you want to edit. Right-click the tag and select Properties from the dropdown menu. The Object Properties dialog pane opens.
- In the Object Properties dialog pane, edit the type of the tag by choosing the appropriate option from the dropdown menu in the Type Modify other fields as needed. References about the types of page elements:
- Standard PDF tags in Adobe Acrobat (the last section on the page of “Edit document structure with the Content and Tags panels (Acrobat Pro)”)
- Overview of the PDF tags
- Click Close. The target tag should now be modified as intended and shown in the tag tree.
- Check for and delete any unnecessary empty tags which does not contain any contents. Screen readers may read these empty tags as “blank”.
- Always keep saving the PDF from time to time while you are adding tags. Be patient and careful during tagging. Tagging a lengthy document with complicated content may require long time and many efforts. Saving the PDF document from time to time could minimize mess-up and the need to re-do the tagging due to any unexpected programme crash.
- Useful resources:
- Overview of Reading Order tool in Adobe Acrobat. Adobe.
- Add & Change tags. WebAIM.
- Reading Order Tool. WebAIM.
- Create and modify PDF tags in Acrobat
- Overview of the PDF tags
- Using List tags for lists in PDF documents. World Wide Web Consortium (W3C).
- Using Adobe Acrobat Pro’s Table Editor to repair mistagged tables. World Wide Web Consortium (W3C).
- Providing headings by marking content with heading tags in PDF documents. World Wide Web Consortium (W3C).
- Hiding decorative images with the Artifact tag in PDF documents. World Wide Web Consortium (W3C).
- Make sure the PDF content order accessed by different users and methods is logical as intended and compatible. It ensures that different users would be able to access and understand the document content in the same order.
- Visual display order.
- Reading order accessed by assistive technologies such as screen readers.
- Keyboard navigation order accessed by keyboard users (e.g., the TAB key).
- Content order, e.g., when users reflow or zoom the PDF document, or view the document using mobile devices with relatively smaller screen.
- Check the reading order by going through the PDF document with screen readers. Fix the order using the Tags Pane, as screen readers make use of the tag tree to access and read the document content. Examples of screen readers:
- Narrator in Windows, built-in voiceover function in Windows.
- VoiceOver on Mac, built-in voiceover function in Mac.
- NVDA, screen reader that can be downloaded free of charge; available for computers running Microsoft Windows 7 SP1 and later.
- NVDA add-on developed by the Hong Kong Blind Union with a Chinese speech engine.
- Do not use the built-in Read Out Loud function in Adobe Acrobat Pro for testing the reading order and accessibility. It may work differently from assistive technologies such as screen readers.
- Check the tabbing order accessed by keyboard users by going through the PDF document using only the keyboard, such as the TAB
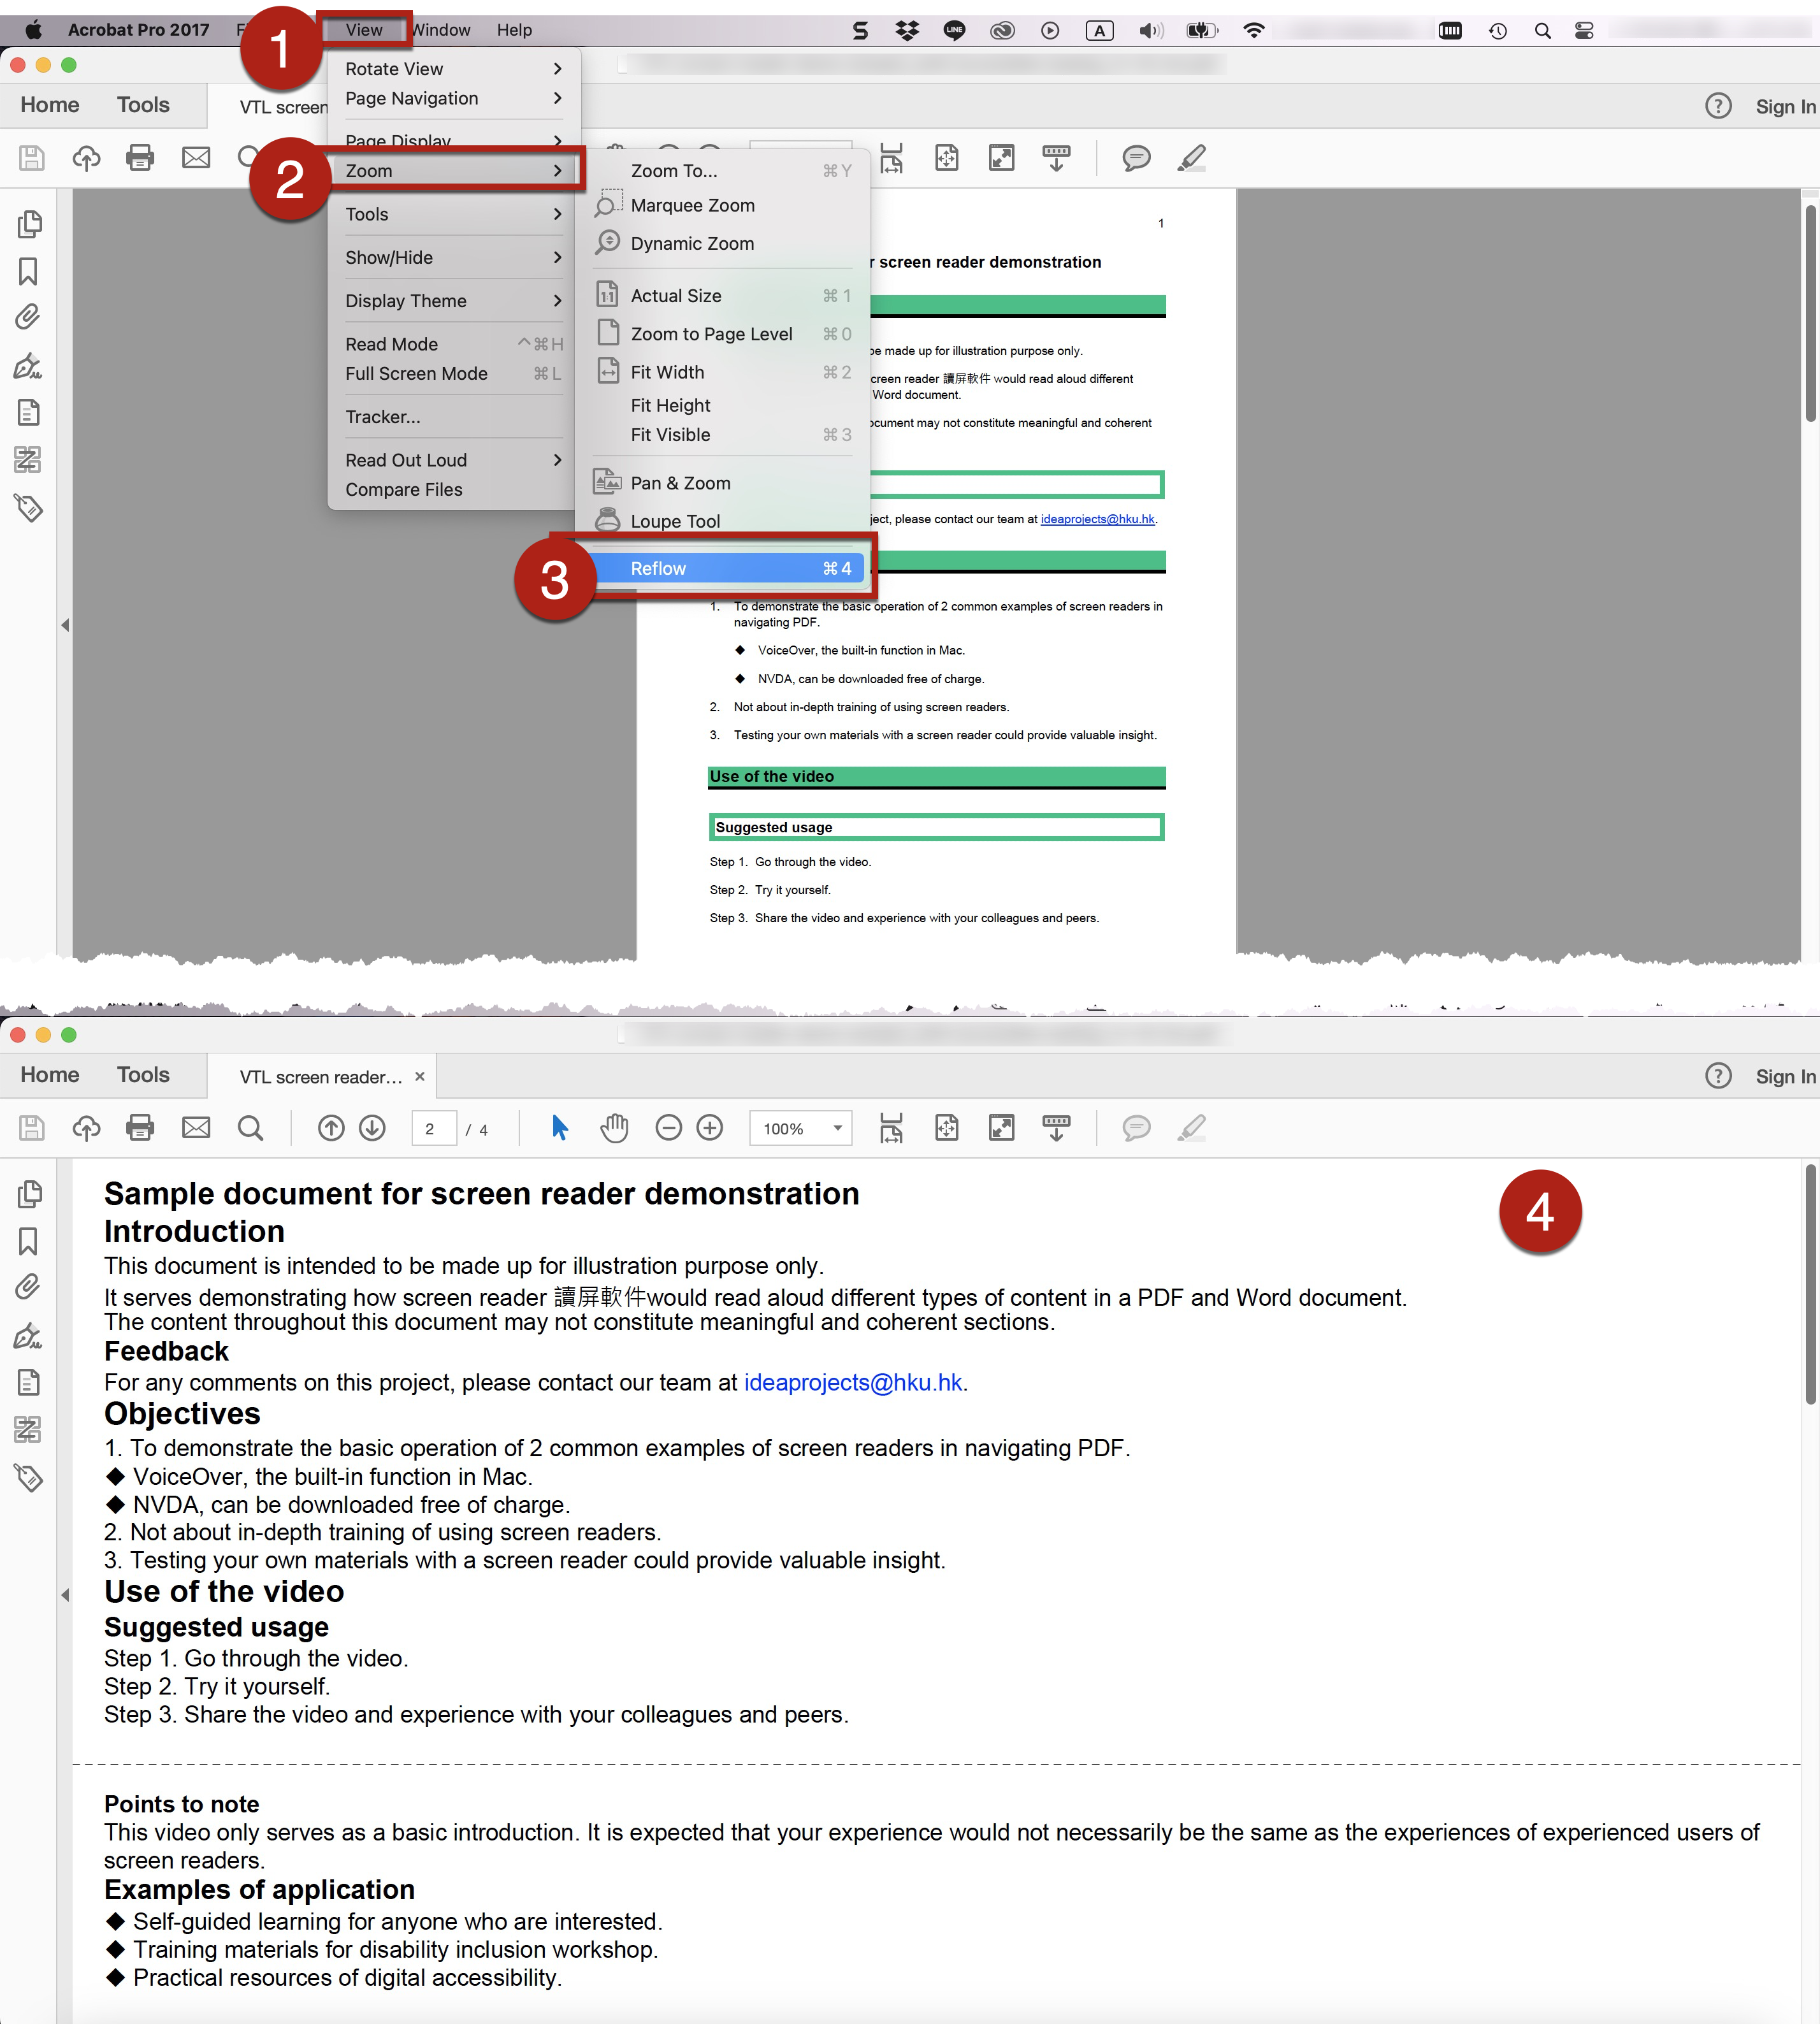
- Check the content order with reflowed PDF. Go to View > Zoom > Reflow.
- To repair problematic reading order, make use of both the Reading Order Pane and the Tags Pane.
- It is important to manually fix the order using the Tags Pane, as screen readers make use of the tag tree to access and read the document content. Do not only modify the content using the Reading Order Pane.
- Always make sure the content order reflected by the Reading Order Pane matches the order reflected by the Tags Tree. The order of elements in the Reading Order pane and the order of the Tag Tree need to match the reading order of the document for a consistent reading of the document. Some technologies such the reflow function or the Read Out Loud function may read the document based on the Reading Order Pane.
- After fixing the reading order, verify it again using screen readers, the TAB key, and the reflow function, as described above, respectively.
- To repair problematic reading order using the Reading Order Pane:
- Go to View > Show/Hide > Navigation Pane > Reading Order.
- Or right-click on the Navigation Pane > Select Reading Order.
- Or go to Tools > Accessibility > Reading Order.
- The Reading Order Pane Select Page content order.
- Each of the tagged content in the document is enclosed by a gray box. The top left corner of the gray box displays the number (e.g., 1, 2, 3…) in a small white box that corresponds to the reading order of that tagged content in the page.
- To move the content element to another location, select the icon of the content element in the Reading Order Pane. Drag the element to the desired location. When you are dragging the element, a line appears to indicate where the new location will be.
- The number shown in the gray box will be changed to reflect the modified content order.
- Go to View > Show/Hide > Navigation Pane > Reading Order.
- To repair problematic reading order using the Tags Pane:
-
- Go to View > Show/Hide > Navigation Pane > Tags. Or right-click on the Navigation Pane > Select Tags.
- Click and drag the tags to the correct position. Besides fixing the order the content tags in the tag tree, make sure the required nested structure of some tags are retained for proper recognition by screen readers.
- To move the tag to another location in the tag tree, select the icon of the tag. Drag the tag to the desired location. When you are dragging the tag, a line appears to indicate where the new location will be.
- After modifying the order of tags, verify the tag order of the whole tag tree again by going through the tag tree from the top sequentially using the down-arrow
- References:
- Reading Order Tool. WebAIM.
- Repair the Content and Tag Order. WebAIM.
- Reading Order tool overview. Adobe.
- Ensuring correct tab and reading order in PDF documents. World Wide Web Consortium (W3C).
- Alternative text (“Alt Text”) concisely describes the content and the purposes of the graphical content in brief phrases or 1-2 sentences.
- Alt Text enables screen reader users to understand graphical content. When screen readers recognize an image with Alt Text, screen readers will read “Image” or “Graphic” followed by reading the associated Alt Text. Sighted users generally do not see the Alt Text.
- If you have the source documents of the PDF, it is always good to add Alt Text to the graphical content in the source documents using the corresponding authoring tools, such as Microsoft Word or PowerPoint. Then, check whether the Alt Text is properly inserted in the exported PDF. Finally, tag the graphical content in PDF.
- To input Alt Text in PDF:
-
- Tag all images in the PDF document properly.
-
-
- Assign the <Figure> tag to graphical content.
- Assign the <Background/Artifact> tag to decorative graphical content. It hides the image from screen readers.
-
-
- Input the Alt Text for each tagged images using either the Accessibility Tool or the Tags Pane.
- To input Alt Text for tagged images using the Accessibility Tool:
-
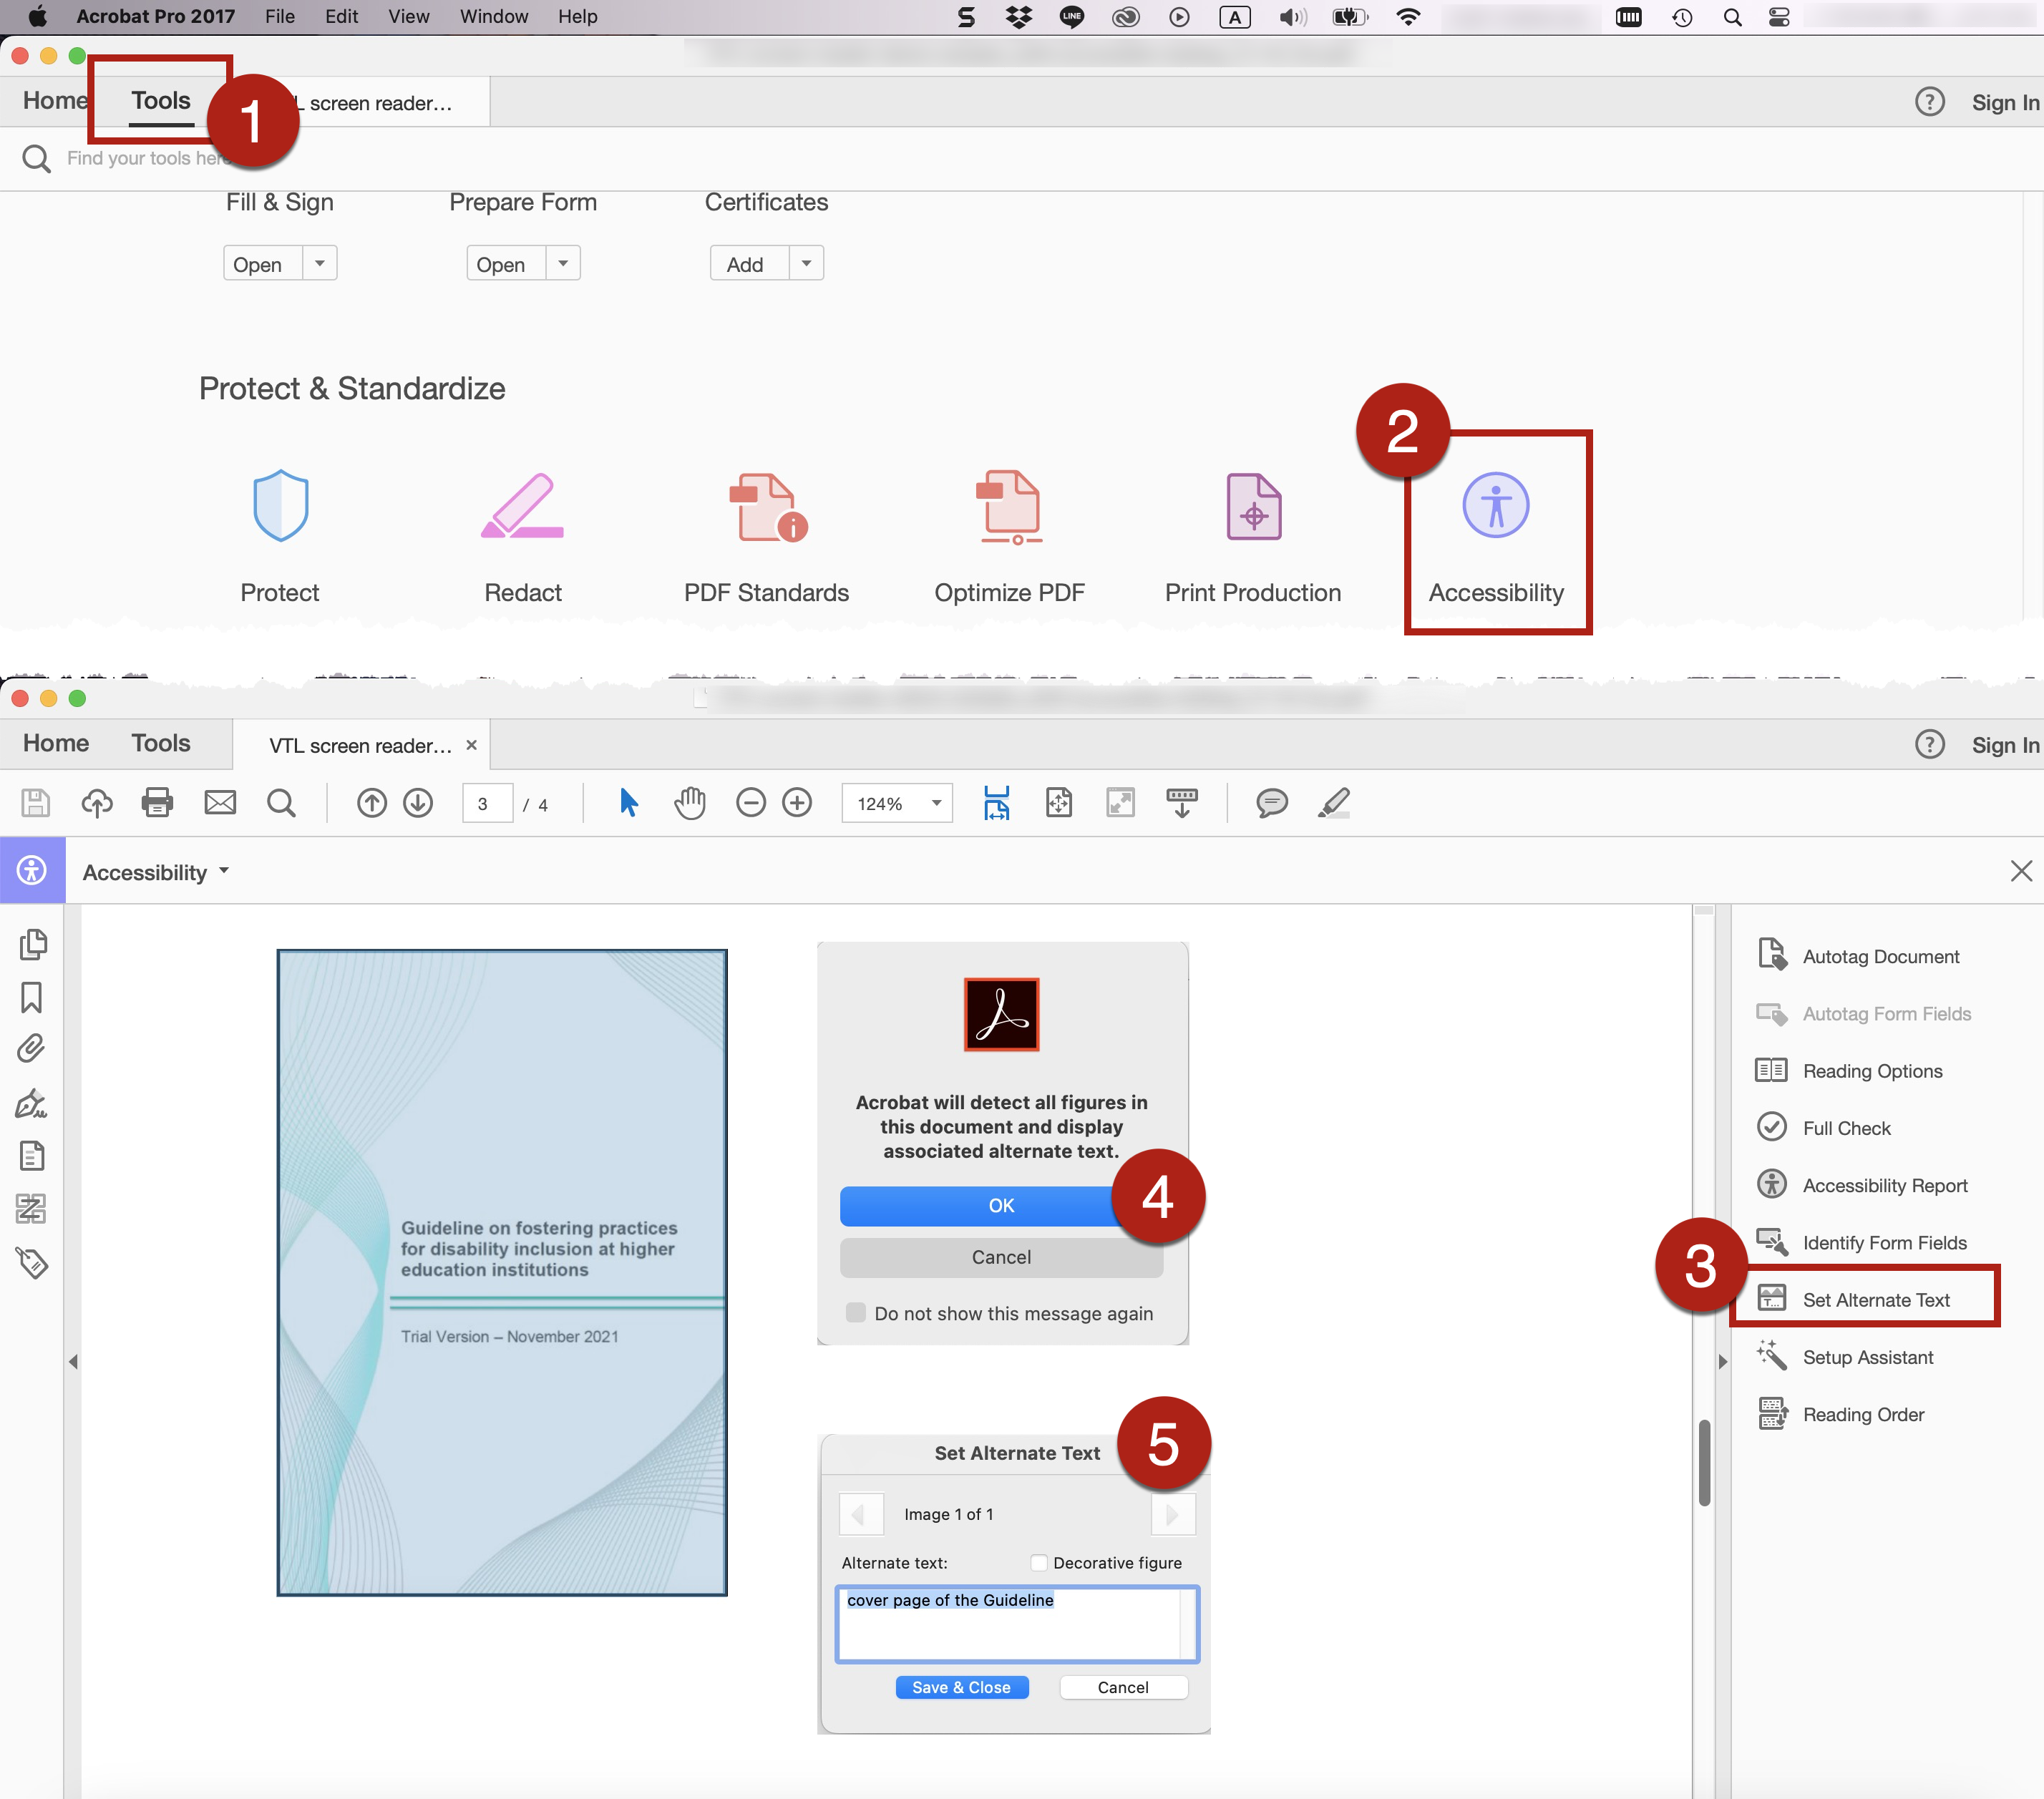
- Go to Tools > Accessibility > Set Alternate Text.
- A pop-up message Acrobat will detect all figures in this document and display associated alternate text shows up. Click OK to proceed.
- The Set Alternate Text dialog pane appears. The dialog pane will go through and highlight each figure in the document one by one.
- Input the Alt Text in the field of Alternate text in the dialog pane. Select the option Decorative figure for decorative content and you no need to input Alt Text.
- After inputting the Alt Text for the first figure, click the right-arrow icon to move to the next figure. When you finish inputting the Alt Text for all figures, select Save & Close.
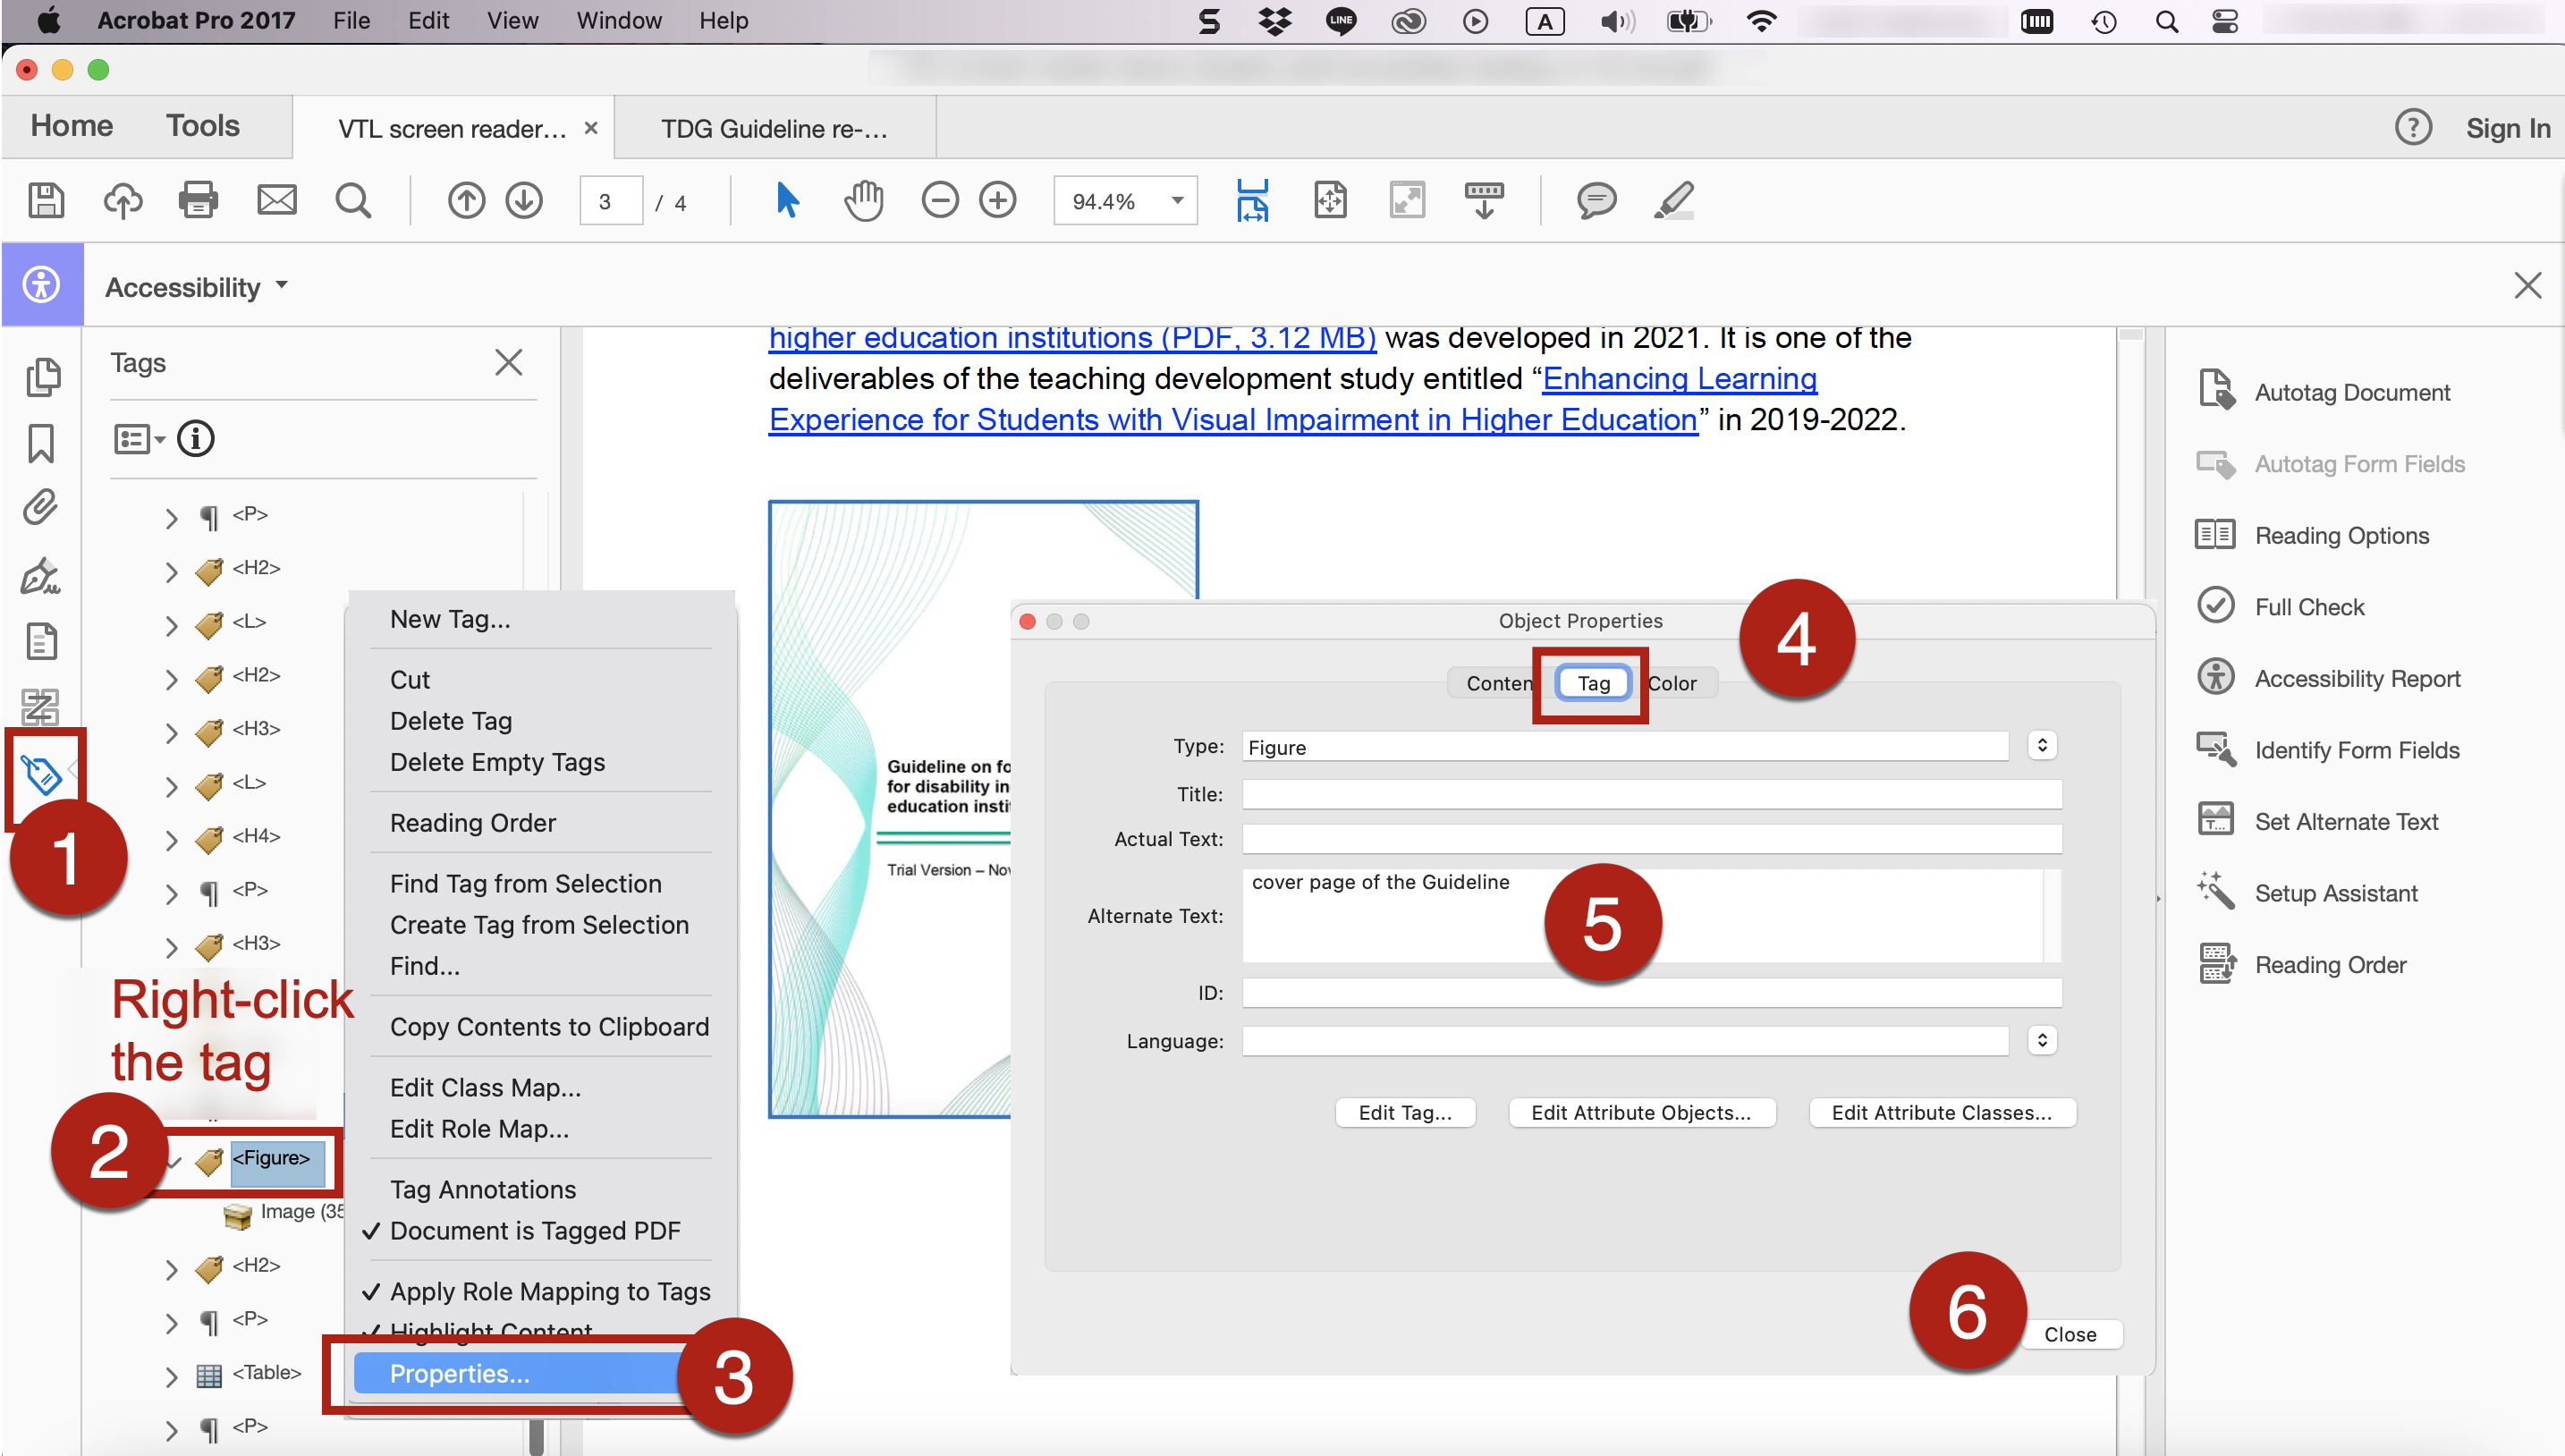
- To input Alt Text for tagged images using the Tags Pane:
-
- Go to View > Show/Hide > Navigation Pane > Tags. Or right-click on the Navigation Pane > Select Tags. The Tags Pane
- Expand the root element <Tags> to view the tag tree. Look for the tag of the target figure. Right-click the tag and select Properties from the dropdown menu. The Object Properties dialog pane opens.
- Go to the Tag tab of the Object Properties dialog box. Input the Alt Text in the field of Alternate text in the dialog pane. Click Close.
- In general, no need to begin the Alt Text with phrases such as “Picture of…” or “Image of…”
- When screen readers recognize an image with Alt Text, screen readers will read “Image” or “Graphic” followed by reading the associated Alt Text.
- Include the informative text embedded within the graphical content in the Alt Text.
- Be aware that hyperlinks in the Alt Text cannot be activated or presented by link text.
- Use punctuation such as periods to end the Alt Text. Otherwise, screen readers may mix up the Alt Text and the main body text that follows. It may confuse the users.
- Graphical content that are purely for visual decorative purposes, for formatting purposes (such as stylistic borders), repetitively used, or do not provide meaningful information do not require Alt Text.
- For any acronym in the Alt Text and/or image description to be read aloud letter-by-letter (such as “I” – “D” – “E” – “A”) instead of as a word (such as “IDEA”), the letters in the acronym should be spaced out (such as “I D E A”) to enable assistive technologies such as screen readers to read it letter-by-letter.
- Further guidelines for writing Alt Text and image descriptions:
- Alternative Text. WebAIM.
- Documentation Screen Captures. Pennsylvania State University.
- Flowcharts & Concept Maps. Pennsylvania State University.
- Image Description Guidelines (Art, Chemistry, Diagrams, Flow Charts, Formatting & Layout, Graphs, Maps, Mathematics, Page Layout, Tables, Text-only images). The DIAGRAM Center.
- Best Practices for Accessible Images. California State University, Northridge.
- Effective Practices for Description of Science Content within Digital Talking Books. The WGBH National Center for Accessible Media. It covers guidelines for writing image descriptions for bar chart, line graph, Venn diagram, scatter plot, table, pie chart, flow chart, standard diagrams or illustrations, and complex diagrams or illustrations.
- NWEA Image Description Guidelines for Assessments (PDF; 5.6 MB). The Carl and Ruth Shapiro Family National Center for Accessible Media at WGBH (NCAM). It cover discussion about challenges and guidelines for writing image descriptions for a variety of images, charts, and graphics targeted to the assessment of reading, language usage, science, and mathematics.
- Excerpts from the NBA Tape Recording Manual, Third Edition. National Braille Association. Instruction and examples of describing complex images.
- References:
- Alternative text, PDF Accessibility. WebAIM.
- Applying text alternatives to images with the Alt entry in PDF documents. World Wide Web Consortium (W3C).
- Hiding decorative images with the Artifact tag in PDF documents. World Wide Web Consortium (W3C).
- Make sure to check colour contrast. Content with sufficient colour contrast is easier for everyone to read. Content without sufficient colour contrast would be inaccessible to some users, particularly:
- People who are colour blind;
- People with visual impairment;
- People viewing the slides through monitors in bright sunlight or glare;
- People viewing the slides through a projector display in a well-lit venue.
- Make use of software applications to check colour contrast. There is a number of colour contrast checkers that are free-of-charge.
- Colour contrast is checked against the Web Content Accessibility Guidelines (WCAG) using these checkers. Enter the colours of the background and foreground (e.g., text), respectively. These checkers generally allow multiple methods of entering colours, such as the colour picker tool, RGB colour codes, or hex colour codes. The colour picker is particularly useful to users who are unfamiliar with colour codes. Then, the checkers will tell whether this colour combination would fulfil or fail the colour contrast requirements based on the WCAG Guidelines. If it fails, then it might suggest that we need to consider changing the colour of either the background or the foreground colours, or both. Otherwise, this colour combination might not be visually accessible to some readers. After we change the colours, re-do the check, until you get a combination that fulfils the accessibility requirement.
- Examples of colour contrast checkers that are free-of-charge:
- WebAIM Contrast Checker: An online checker.
- WebAIM Link Contrast Checker: An online checker. It helps check the colour contrast between the link text, the surrounding body text, and the background colour.
- Colour Contrast Analyser (CCA) from TPGi: It needs to be downloaded onto your computer, available for both Windows and Mac. It also provides a Color Blindness Simulator.
- Adobe Colour Contrast Analyzer: An online checker. You may input the text colour and background colour values or upload a screenshot of your project to pick the colours you want to check for contrast. It will also recommend colours that would give better contrast. In the Accessibility Tools tab of the Adobe Colour Contrast Analyzer, apart from general colour contrast checker, you can choose the Colour Blind Safe Checker to check whether the colour theme or palette would be accessible for people with colour blindness.
- Ensure sufficient colour contrast between the link text and its surrounding body text. Ensure the colours of the not-yet-visited hyperlinks and visited hyperlinks show sufficient contrast against the background colours, respectively.
- An example of online checker for link texts: WebAIM Link Contrast Checker.
- Check whether the coloured content are properly displayed in grayscale. It is useful and important practice because many students would print out materials as handouts in black-and-white.
- Examples of colour filters for checking grayscale display:
- Windows Built-in colour filters: Go to Start > Settings > Ease of Access > Colour Filters. Switch on the toggle for colour filters.
- Mac Built-in colour filter: Go to Apple menu > System Preferences > Accessibility > Display > Select Colour Filters > Select Enable Colour Filters > Select Grayscale in the dropdown menu. Then the grayscale filter will be applied to the entire screen.
- Try selecting the other colour filters in the dropdown menu to view the document in simulated colour blindness situations. Fix any parts in the document that do not present the intended meanings under colour filters.
- Examples of colour filters for checking grayscale display:
- Do not use “colour-on-colour” background and text, such as light blue text on dark blue background.
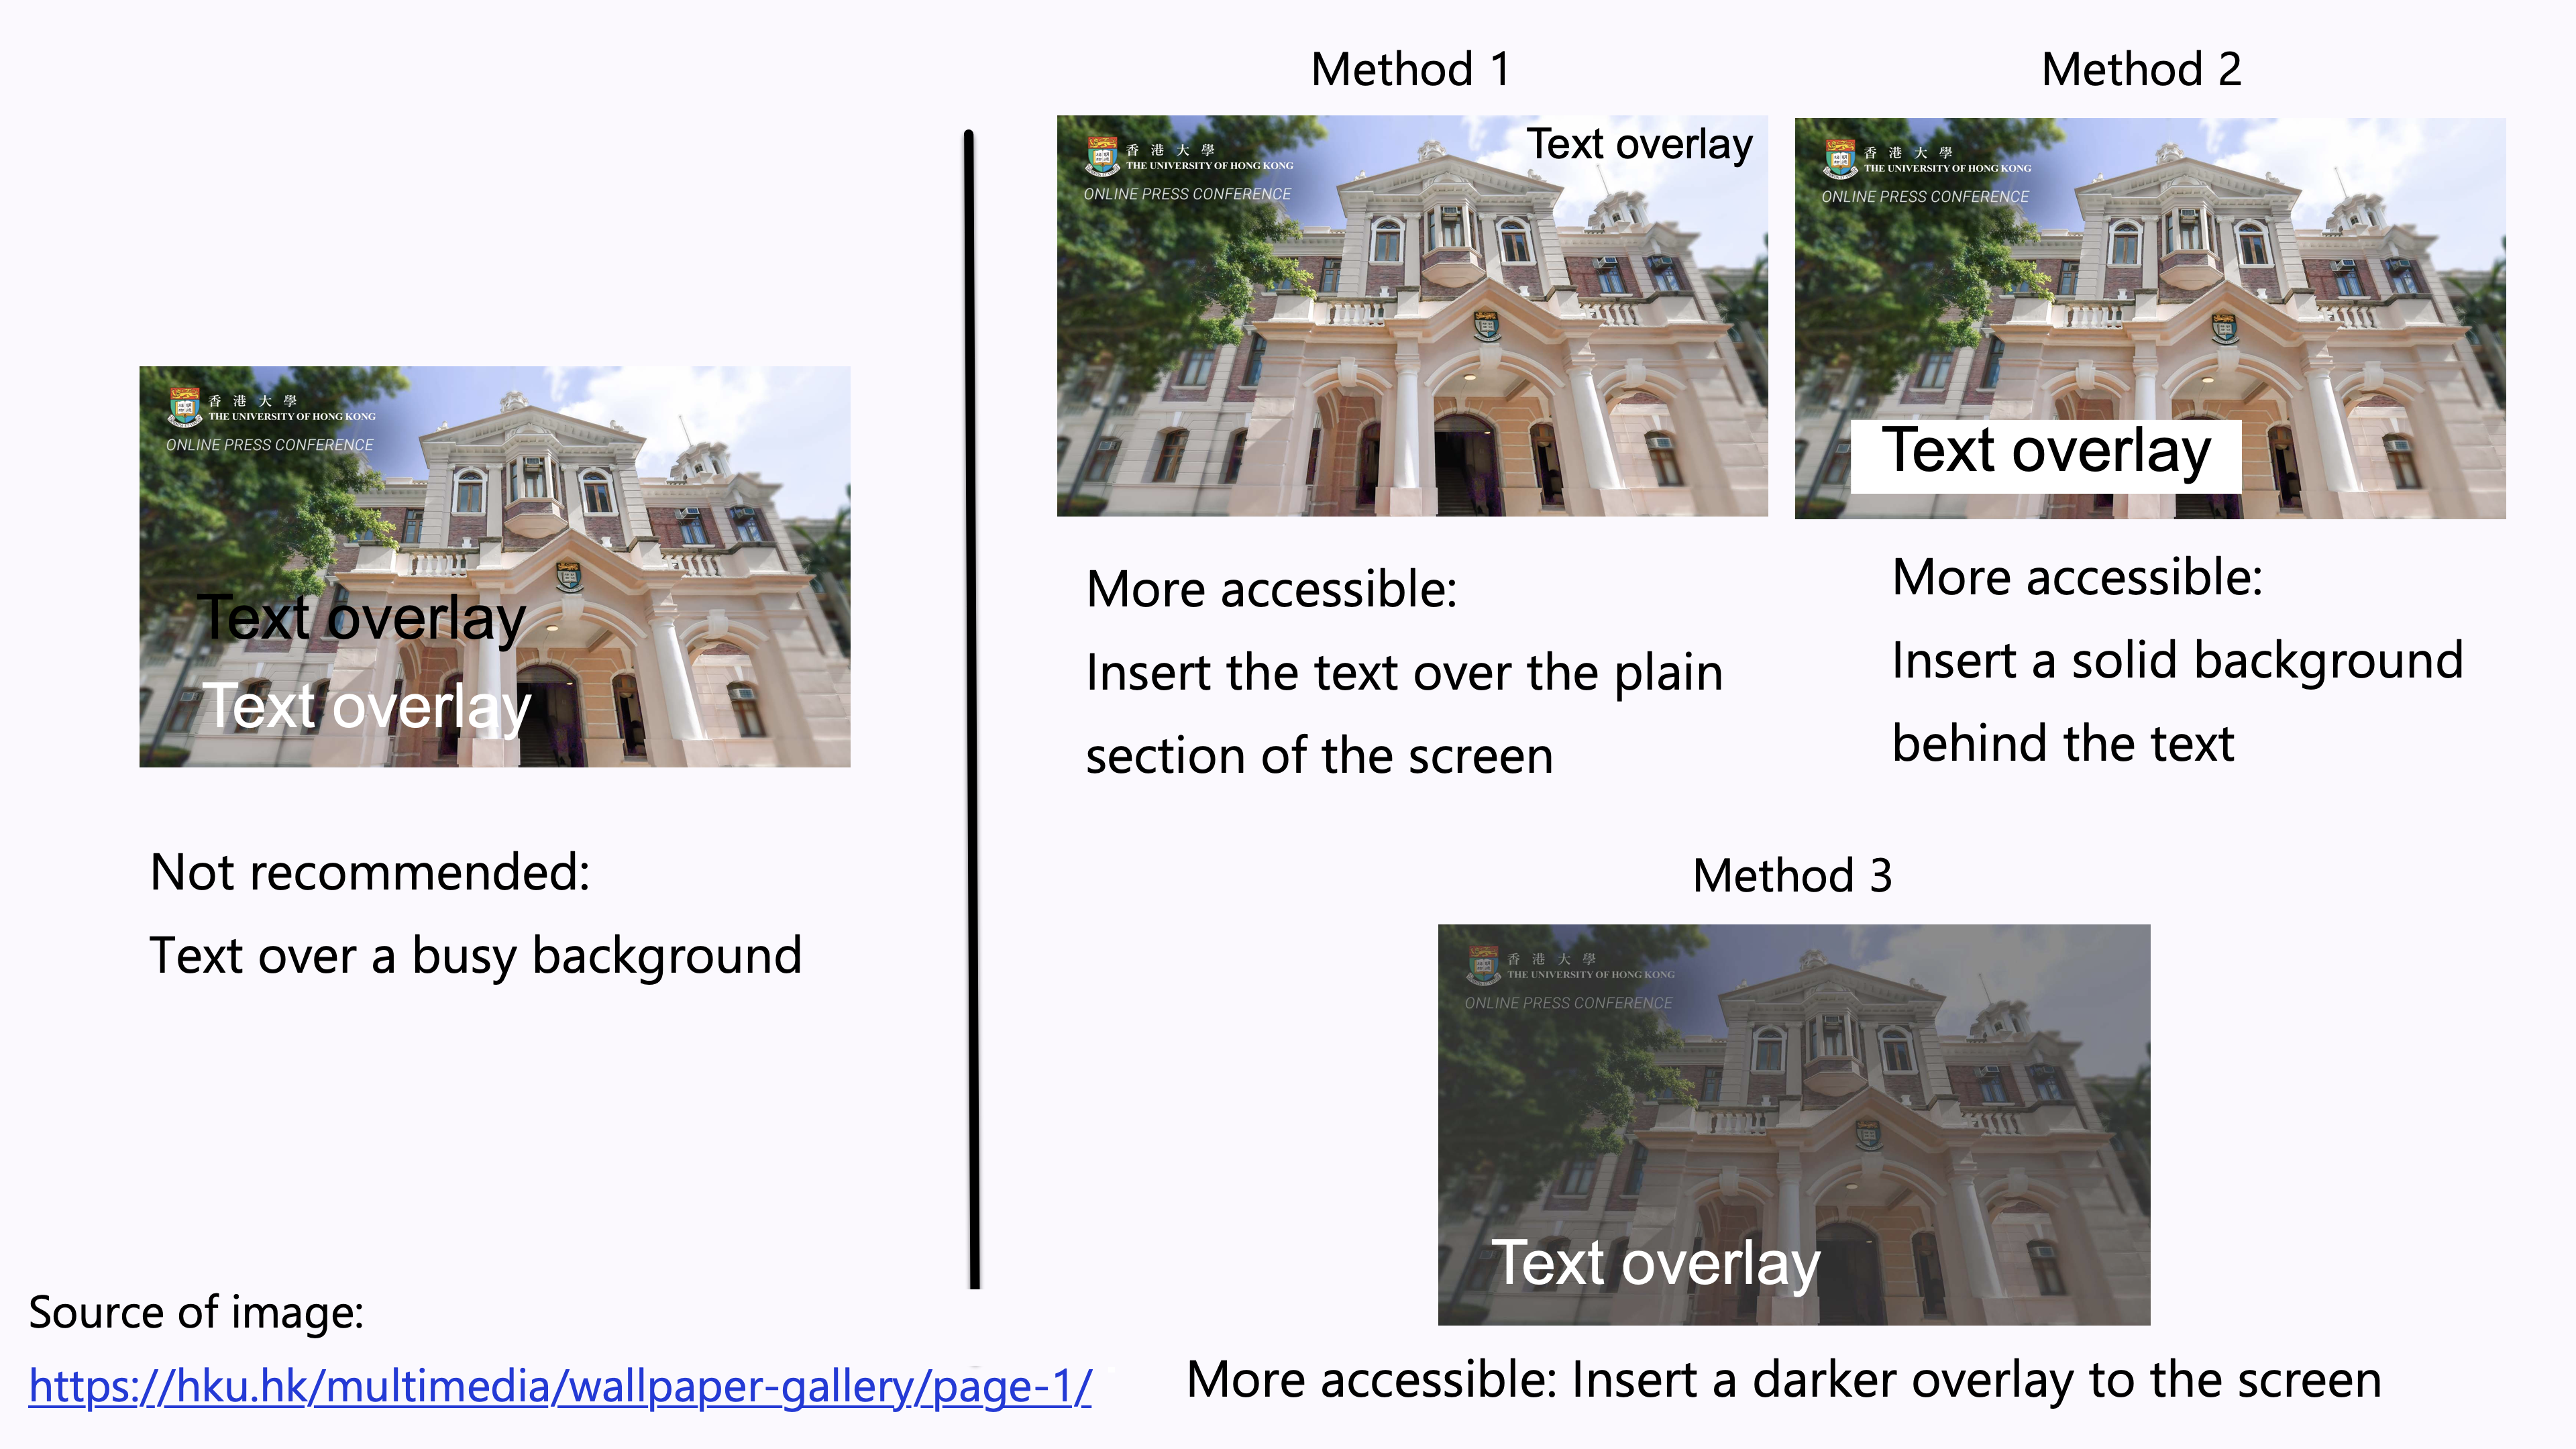
- Avoid overlay text on a busy background.
- Images usually consist of a wide range of colours. It could be difficult to ensure sufficient contrast between the colours in the background image and the text. It is difficult to read the overlaid text.
- Examples of increasing the accessibility of the text overlay:
- Method 1: Insert the text over the plain section of the photo. Ensure sufficient colour contrast between that section and the text.
- Method 2: Insert a solid background behind the text. Ensure sufficient colour contrast between the solid background and the text.
- Method 3: Insert a darker overlay to the image to increase the colour contrast between the background and the text.
- People with colour blindness, low contrast sensitivity, or some visual impairment, may have difficulty distinguishing between certain colours. Therefore, using colour as the only visual cue to convey important information could hinder understanding of the document content.
- For example, a red “X” and a green “X” are used to represent “Compulsory lecture” and “Optional class” in the table, respectively. However, some users such as people with colour blindness may be unable to differentiate the red “X” and the green “X”. Users who print out the slides in grayscale may also be unable to differentiate the colours.
- To enhance accessibility, use multiple visual cues to present information to enhance accessibility to wider range of users, especially graphics, tables, and charts, such as colour, pattern fill, line style (e.g., solid, or dotted lines), data labels, text description, and/or legend.
- Example 1: Use both colour and descriptive text in the table, such as “Compulsory lecture” and “Optional class”, respectively.
- Example 2: Use colour, pattern, and text labels, to identify each pie section of pie charts. Put the text labels near or directly on the corresponding pie section to enable readers to understand the chart clearly. Do not put all the text labels below the chart.
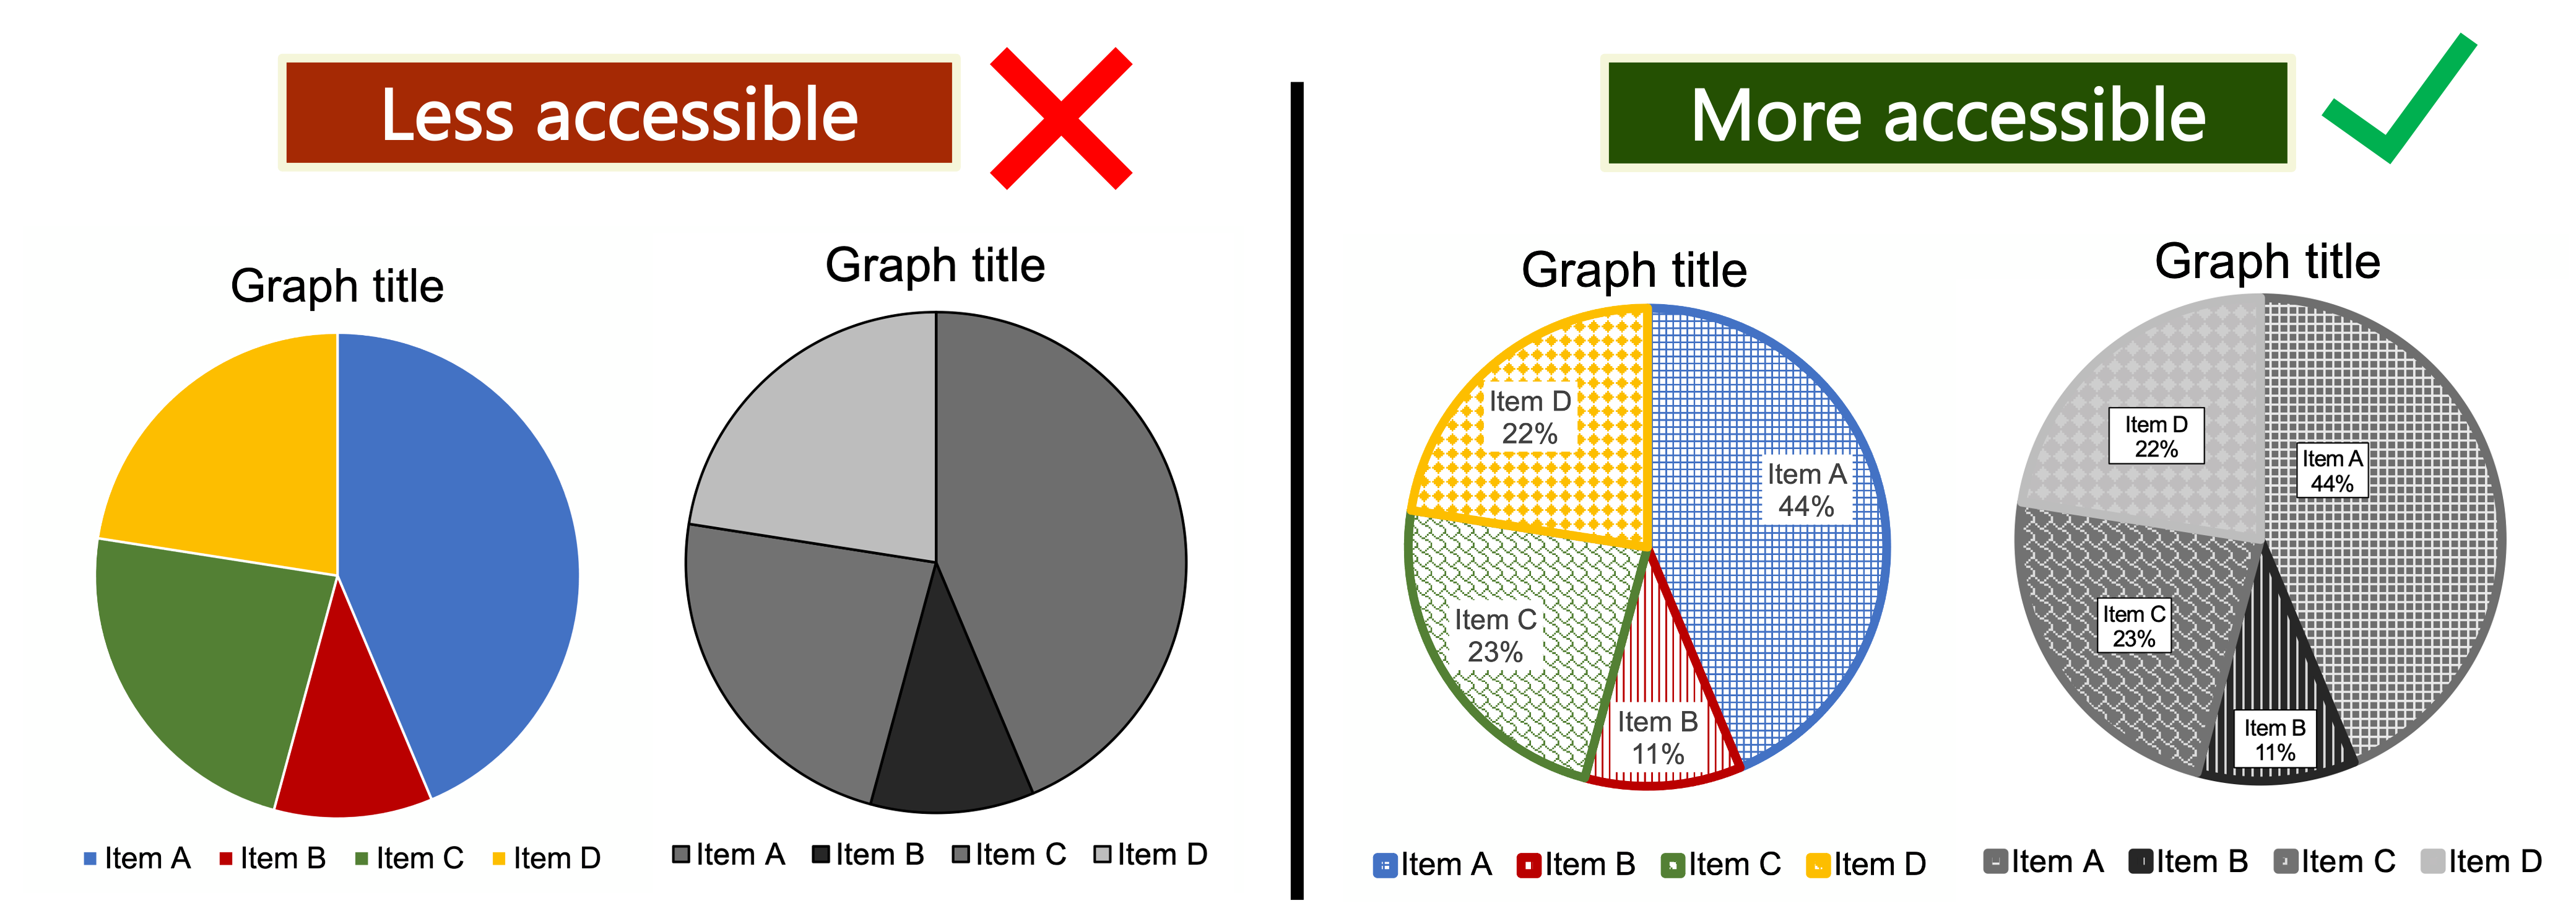
- References: Charts & Accessibility. Pennsylvania State University
- More examples of using multiple visual cues to present information in a more accessible way.
- Edit the file information, such as title, author, and keywords, of the document. It could facilitate users to identify and search the document.
- Document title could be different from the file name. The document title can be a descriptive and brief version of the file name. Users can choose to display the document title instead of file names in the PDF window. If a user opens multiple PDF files at the same time, the descriptive title of each document can help users differentiate and browse between the different PDF files more easily.
- Keywords could make it easier for users to search for a file, e.g., course codes and names for the PDF of lecture notes.
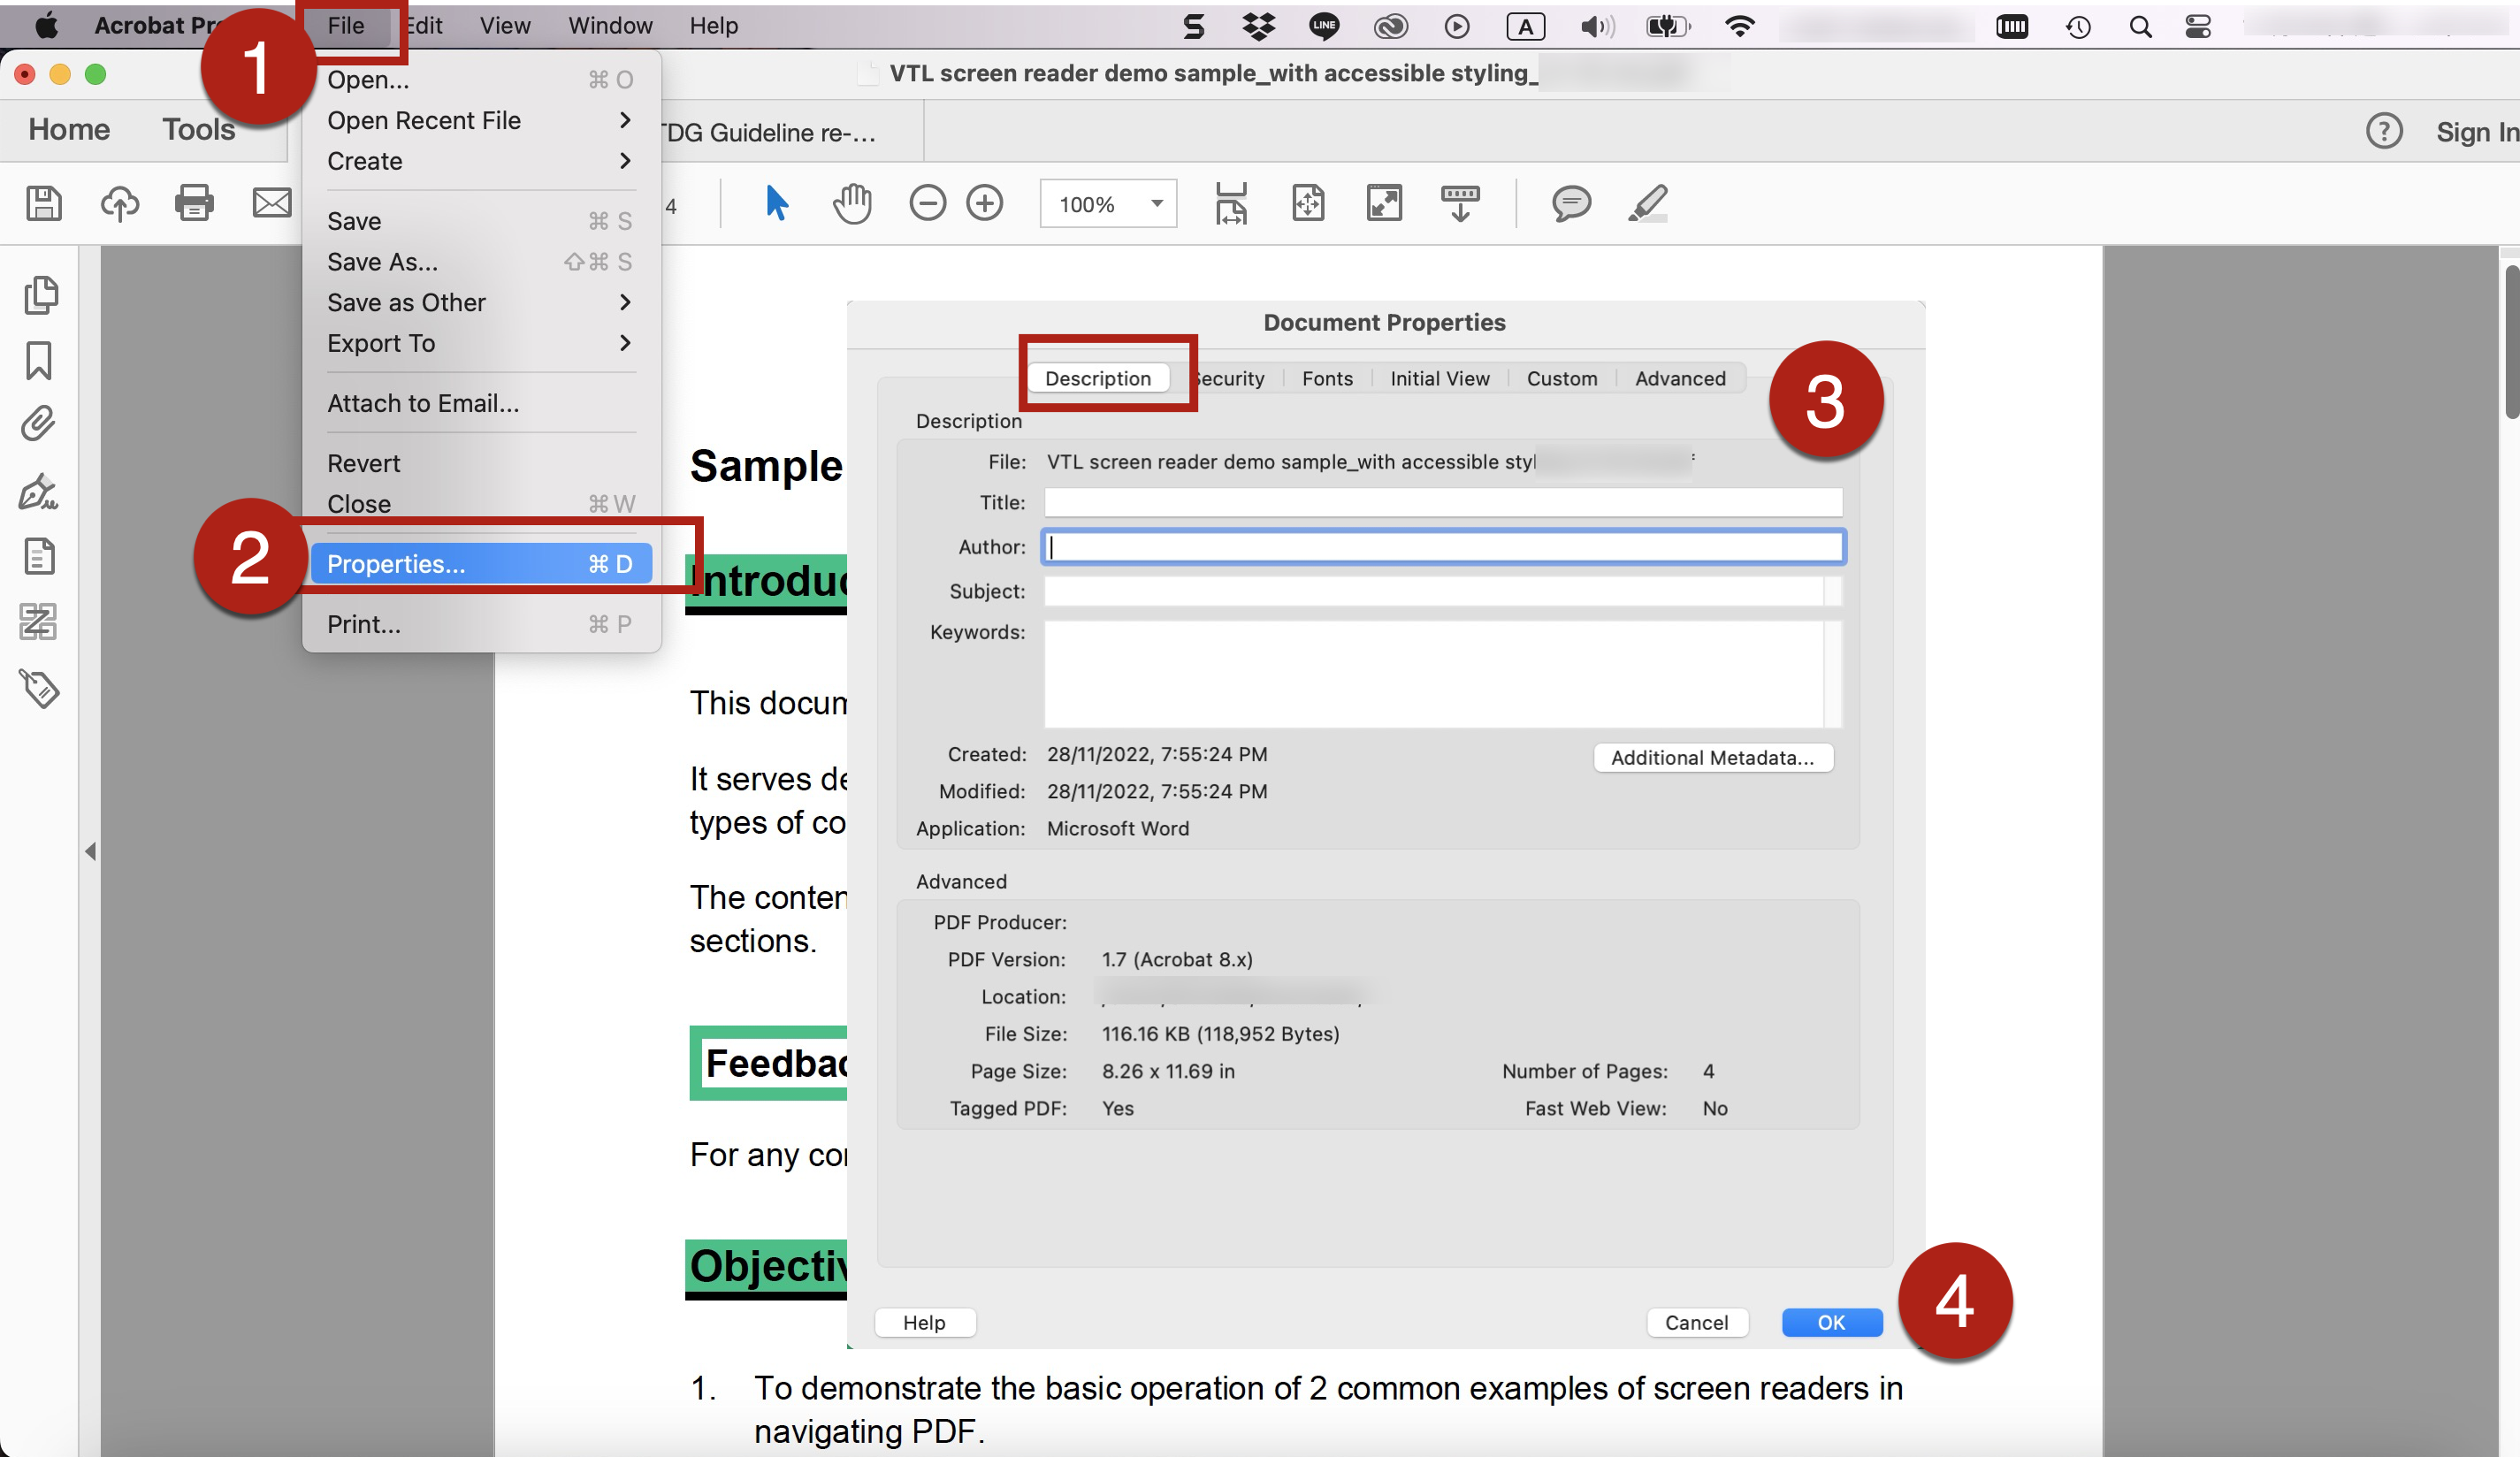
- To edit the document information:
- Go to File > Properties > Description. Input the file information in the corresponding fields in the Properties dialog box.
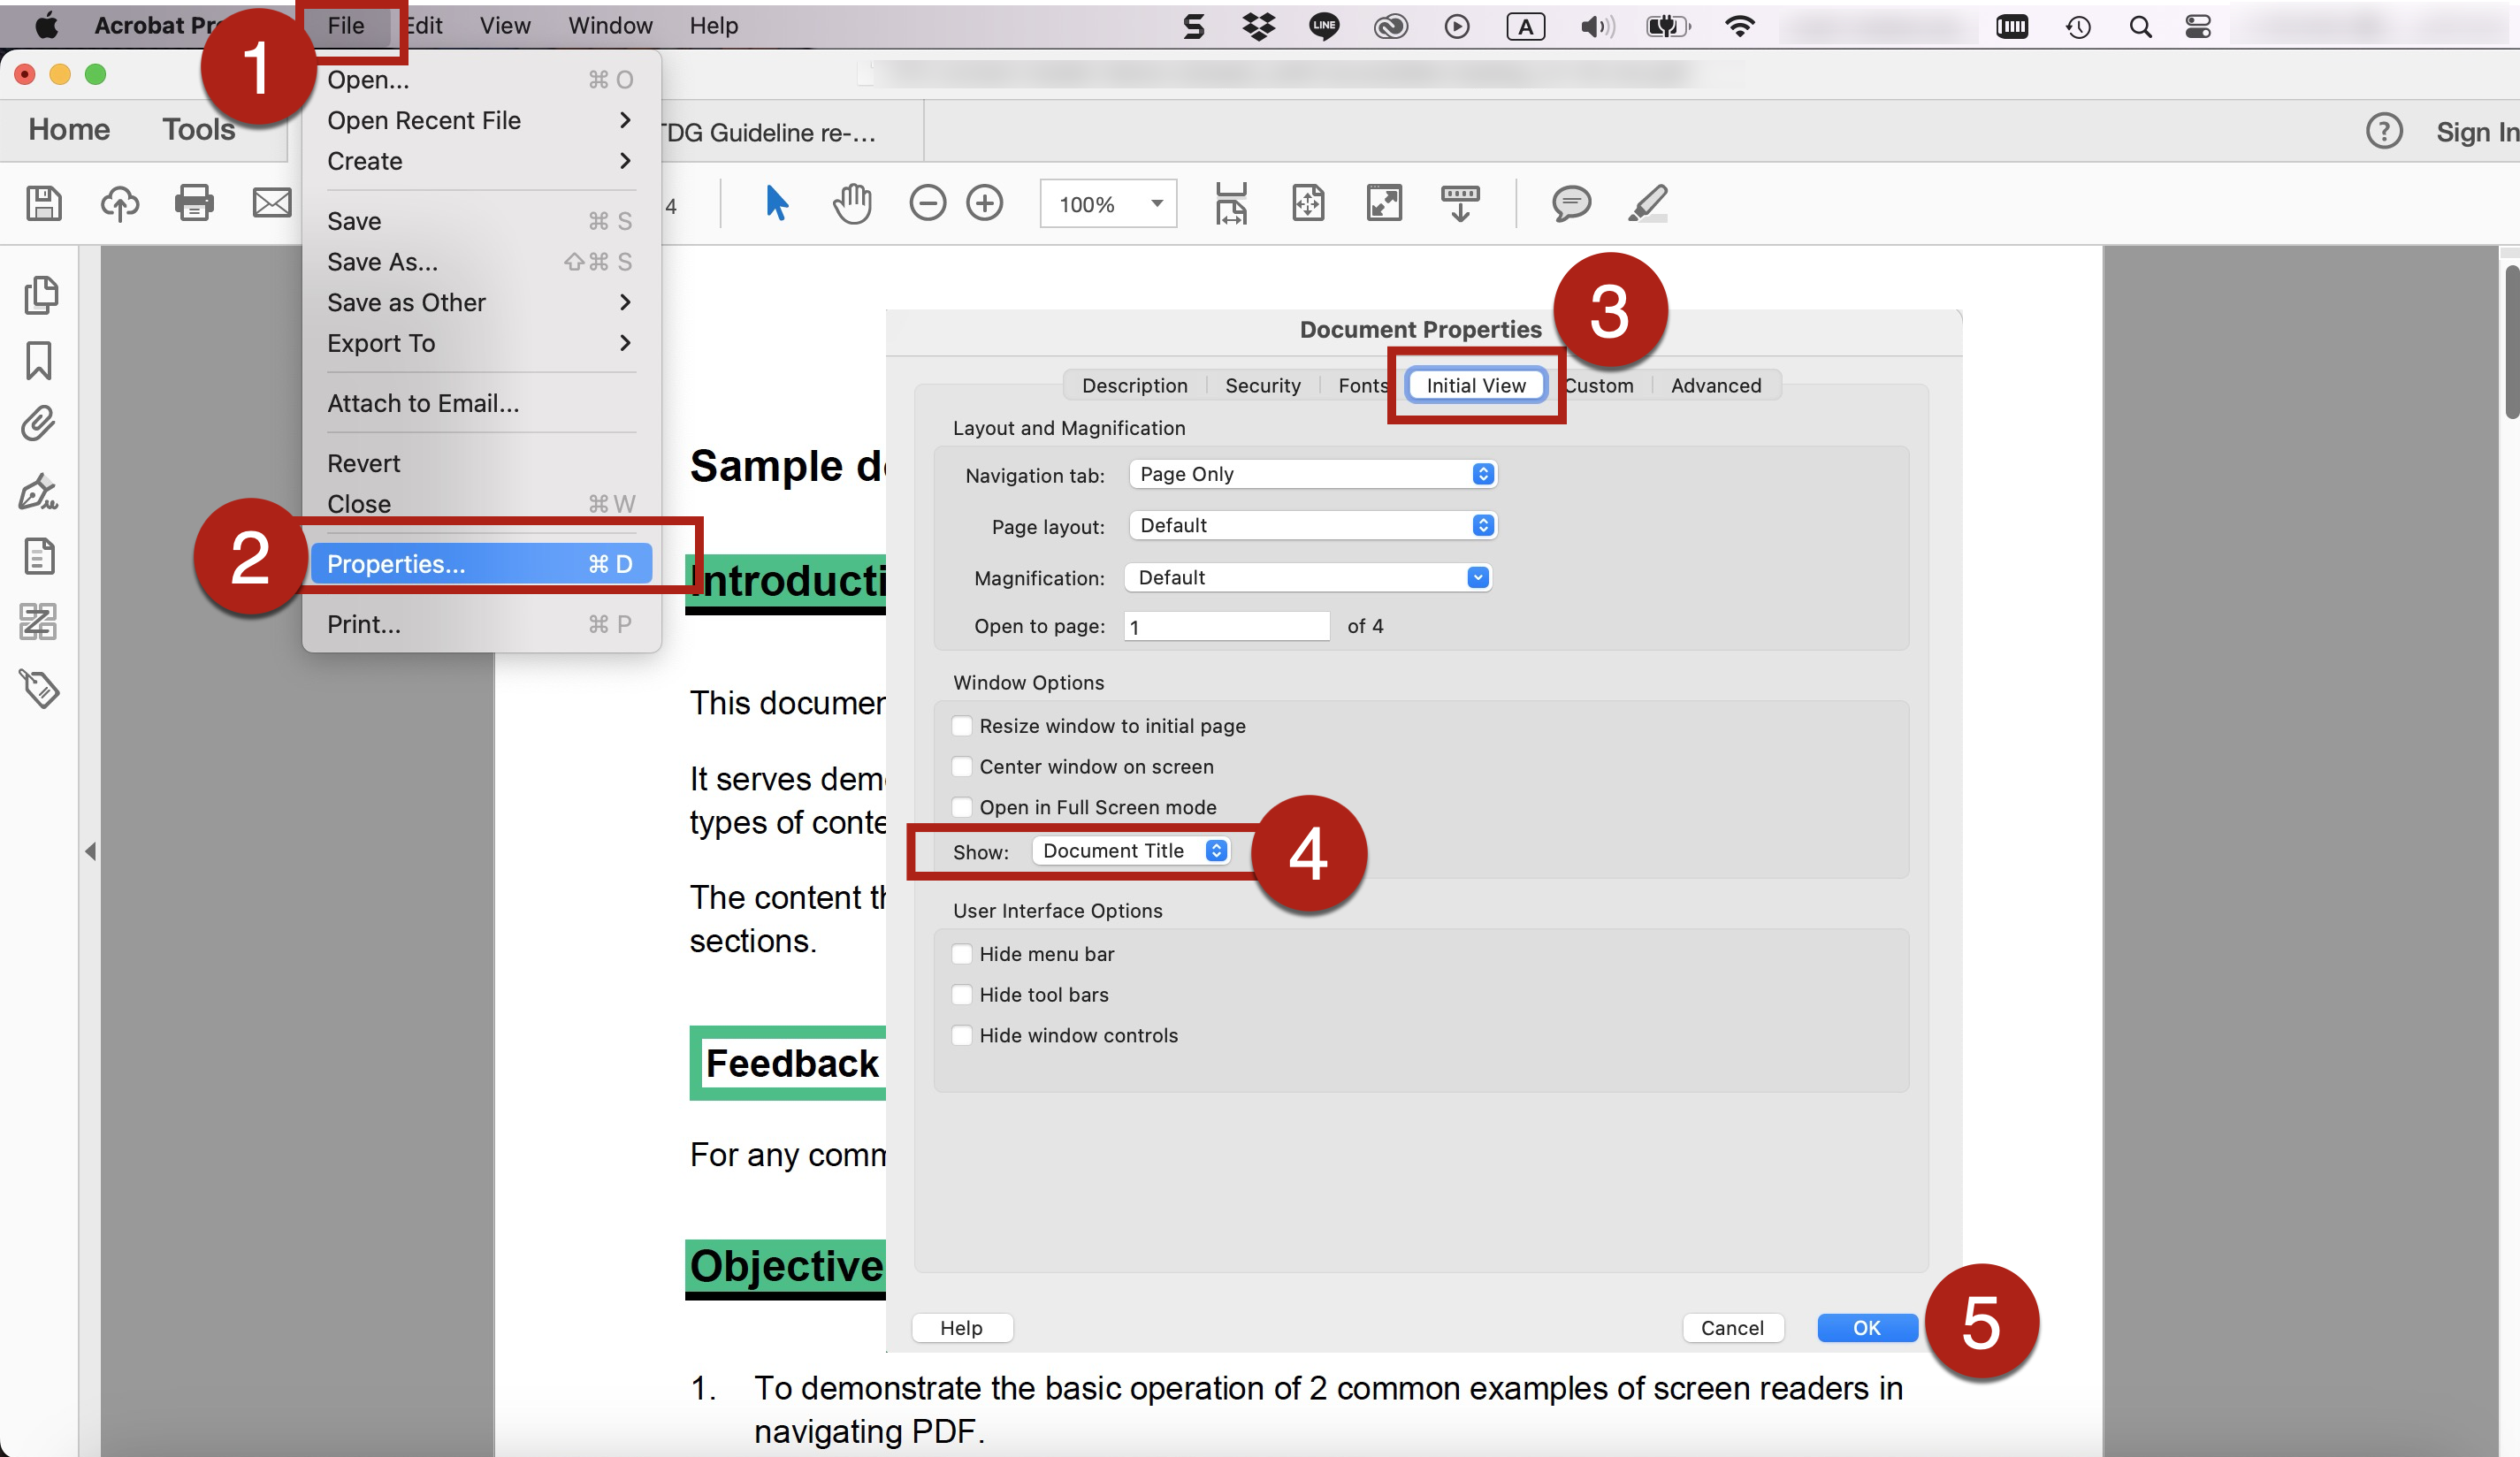
- To display the document title instead of file names in the PDF window:
- Go to File > Properties > Initial View > Window Options > Show. Select Document Title instead of File Name in the dropdown menu of Show.
- References: Specifying the document title using the Title entry in the document information dictionary of a PDF document. World Wide Web Consortium (W3C).
- Indicate the language or languages within your document for screen readers to identify and read properly.
- References: Document and Content Language. WebAIM.
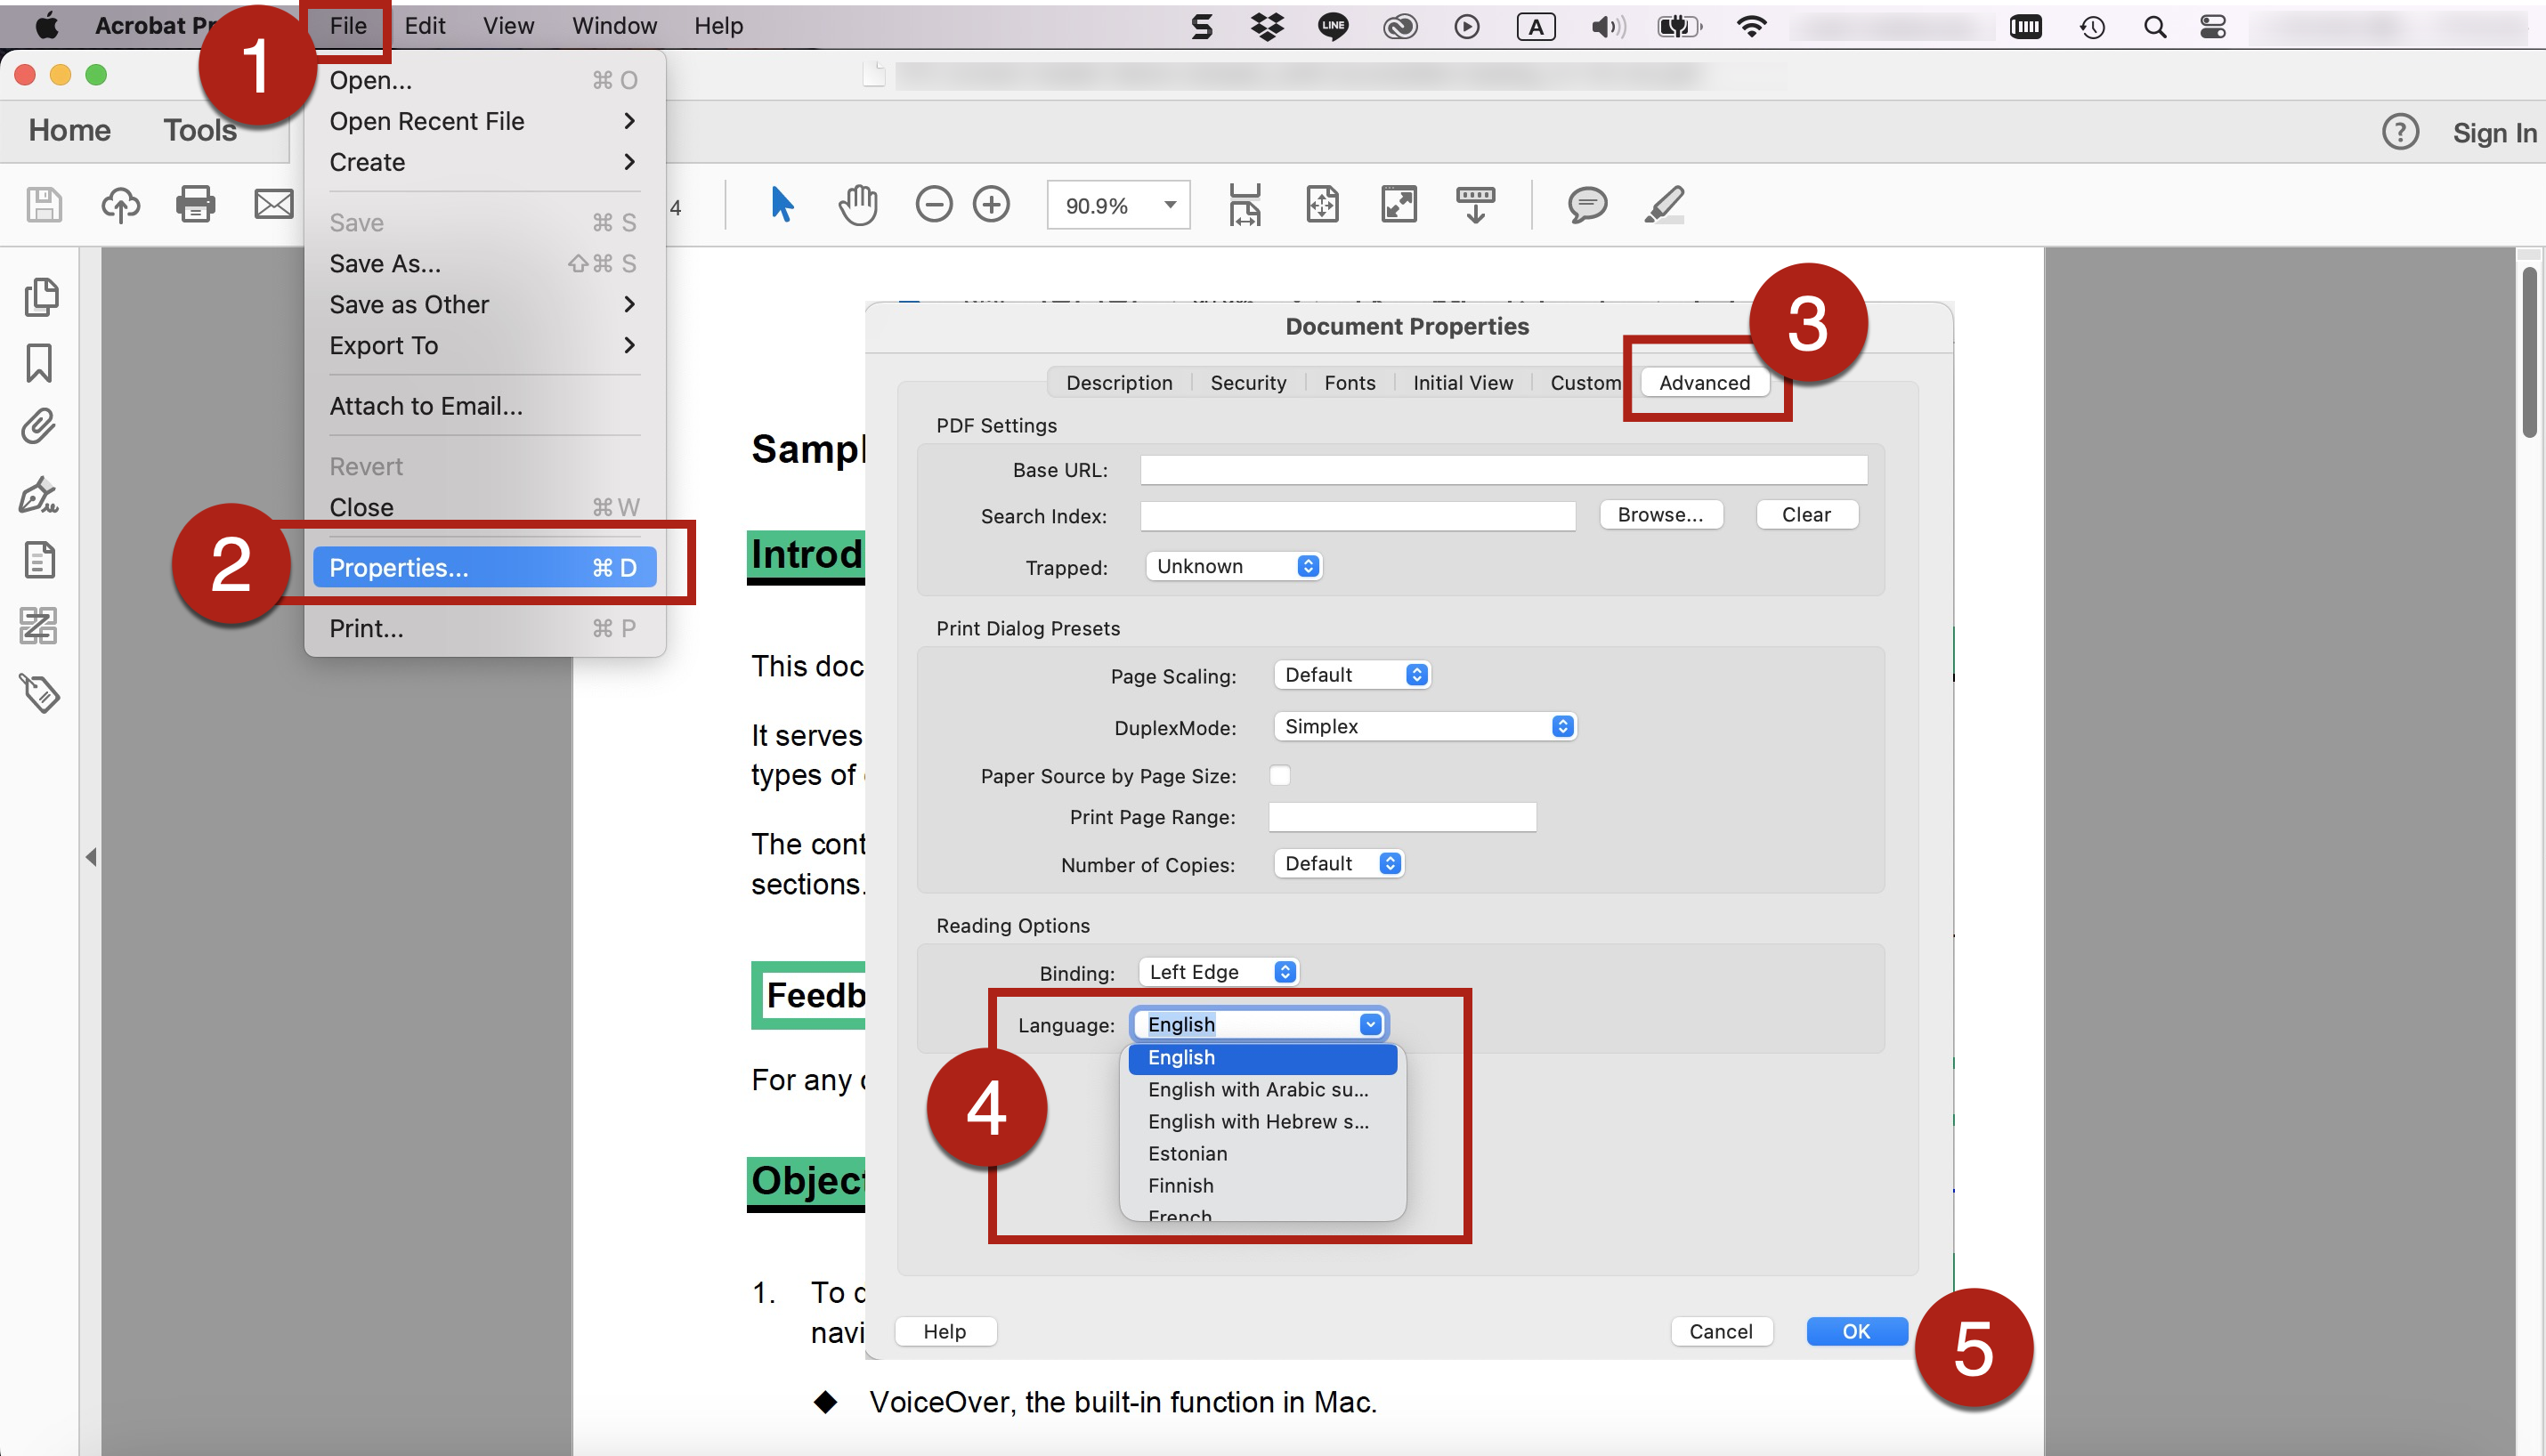
- To set the document language:
- Go to File > Properties > Advanced > Reading Options > Language. Select the document language using the Language combo box.
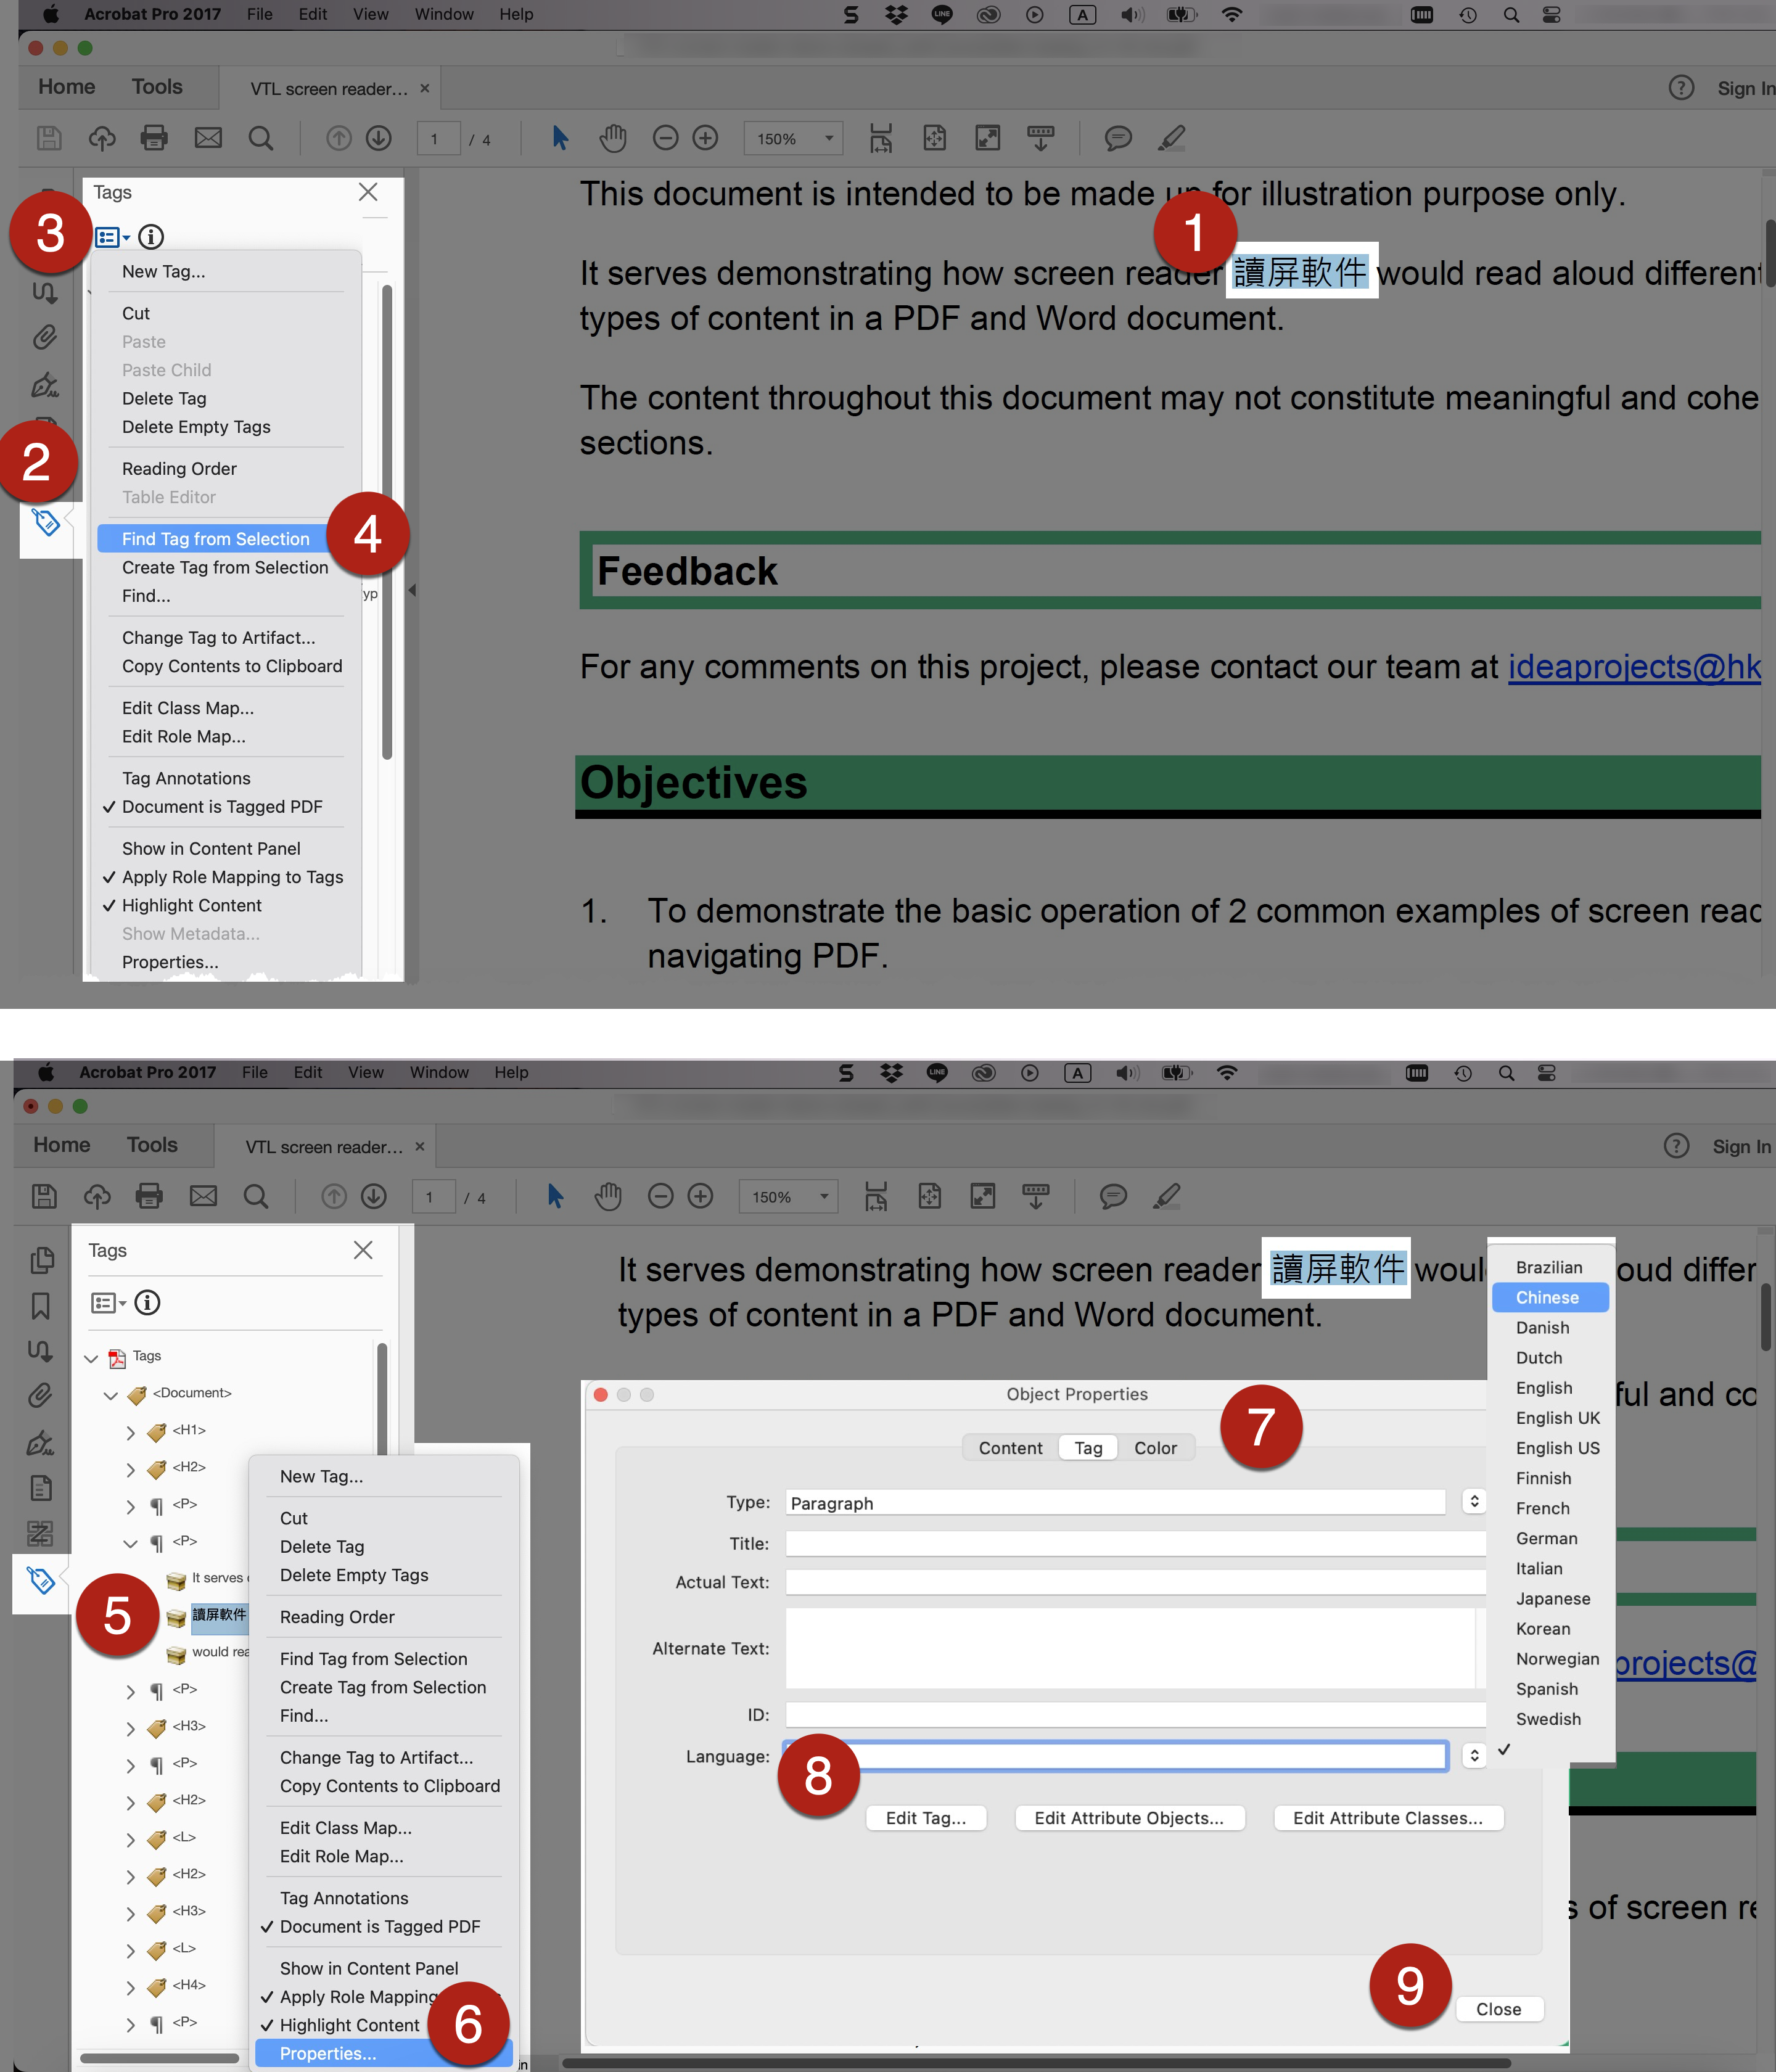
- To define the language of specific part(s) of the document content:
-
- Select and highlight the text you want to set the language for.
- Go to the Tags Pane. Select Find Tag from Selection from the Options dropdown menu.
- The tag for the selected text will be highlighted in the tag tree as shown in the Tags Pane. Right-click this highlighted tag and select Properties.
- In the Object Properties dialog pane, go to the Tag Select the corresponding language of the selected text from the dropdown menu in the Language field.
- Repeat the steps if you need to define the language for other parts of text in the document.
- When a document has too many pages, it could be difficult for users to navigate the document and locate the content they want.
- Adding bookmarks in PDF provide hyperlinks that allow users to go to designated page or section of the document. Bookmarks would be useful for every user to navigate the document and locate the content they want. Bookmarks are particularly useful for users of assistive technologies such as screen readers as they can jump through different pages or sections of the document.
- Bookmarks are sometimes the same as the table of contents for some PDF documents. Such bookmarks can provide an overview of the content structure of the document that benefit the readability for all users. It would facilitate users with cognitive disabilities to understand the document structure and navigate the content.
- The built-in accessibility checker in Adobe Acrobat would flag the lack of bookmarks for documents with 21 or more pages. While this is the standard adopted by Adobe Acrobat, it is always good to consider adding bookmarks for documents even with less than 21 pages. Always consider the complexity of the content structure and the needs of your target readers.
- To add each bookmark item one by one manually:
-
- Click the Bookmarks icon on the Navigation Pane to open the Bookmarks Pane.
- Scroll to the page or particular section in the document where you want to insert the bookmark.
-
-
- To bookmark text, drag to select it. The selected text becomes the label of the new bookmark. You can edit the label.
- If you would want to bookmark a single image, click in the image or drag a rectangle around the image.
- If you would only want to bookmark a portion of an image, drag a rectangle around the portion.
-
-
- In the Bookmarks Pane, click the icon of New Bookmark. A new bookmark is created and shown in the Bookmarks Pane. Or you may press Ctrl+B on the keyboard after highlighting the target content to be made as bookmark.
- Input a descriptive name for each the bookmark item.
- Select the Bookmark item under which you want to place the new Bookmark. If you do not select a Bookmark, the new Bookmark is automatically added at the end of the list.
- If you want to create a hierarchical structure of Bookmarks, you can drag a Bookmark item to make it nested under another Bookmark
- To add a group of Bookmark items at the same time:
-
- Click the Bookmarks icon on the Navigation Pane to open the Bookmarks Pane.
- Select New Bookmarks from Structure from the Options dropdown menu in the Bookmarks Pane. The Structure Elements dialog pane opens.
- Select the element(s) that you want to use to create the Bookmarks items from the Structure Elements dialog pane. Note that this depends on whether you have properly assigned tags to the different content elements in the PDF document.
-
-
- If you have properly defined the heading structure in the source documents (such as Word documents) and tagged the heading structure in the exported PDF, the table of contents can be created as bookmarks wit hyperlinks to the corresponding sections.
-
-
- Select OK.
- New bookmarks are created and shown in the Bookmarks Pane.
- Input a descriptive name for each the bookmark item.
- If you want to create a hierarchical structure of Bookmarks, you can drag a Bookmark item to make it nested under another Bookmark item.
- References:
- Page thumbnails and bookmarks in PDFs in Adobe Acrobat. Adobe.
- Creating bookmarks in PDF documents. World Wide Web Consortium (W3C).
- PDF document can be restricted to be copied, printed, extracted, commented on, or edited. However, these security settings may prevent assistive technologies such as screen readers from accessing the document. Screen readers may need to copy or extract the text from the PDF document before converting it to speech for the users. If there is no security settings on the PDF document, it may allow relatively greater flexibility to all users.
- If security control and restricted editing are necessary, make sure the security settings are compatible with accessibility to assistive technologies such as screen readers. Allow access to the document content by assistive technologies such as screen readers.
- Consider not imposing restriction on downloading of the PDF document. Sometimes, assistive technologies users may need to download the PDF and access the PDF on their local devices. Some web browsers may not be accessible to assistive technologies users for reading PDF. Some assistive technologies users may need to copy the document from the PDF and access them using other readers
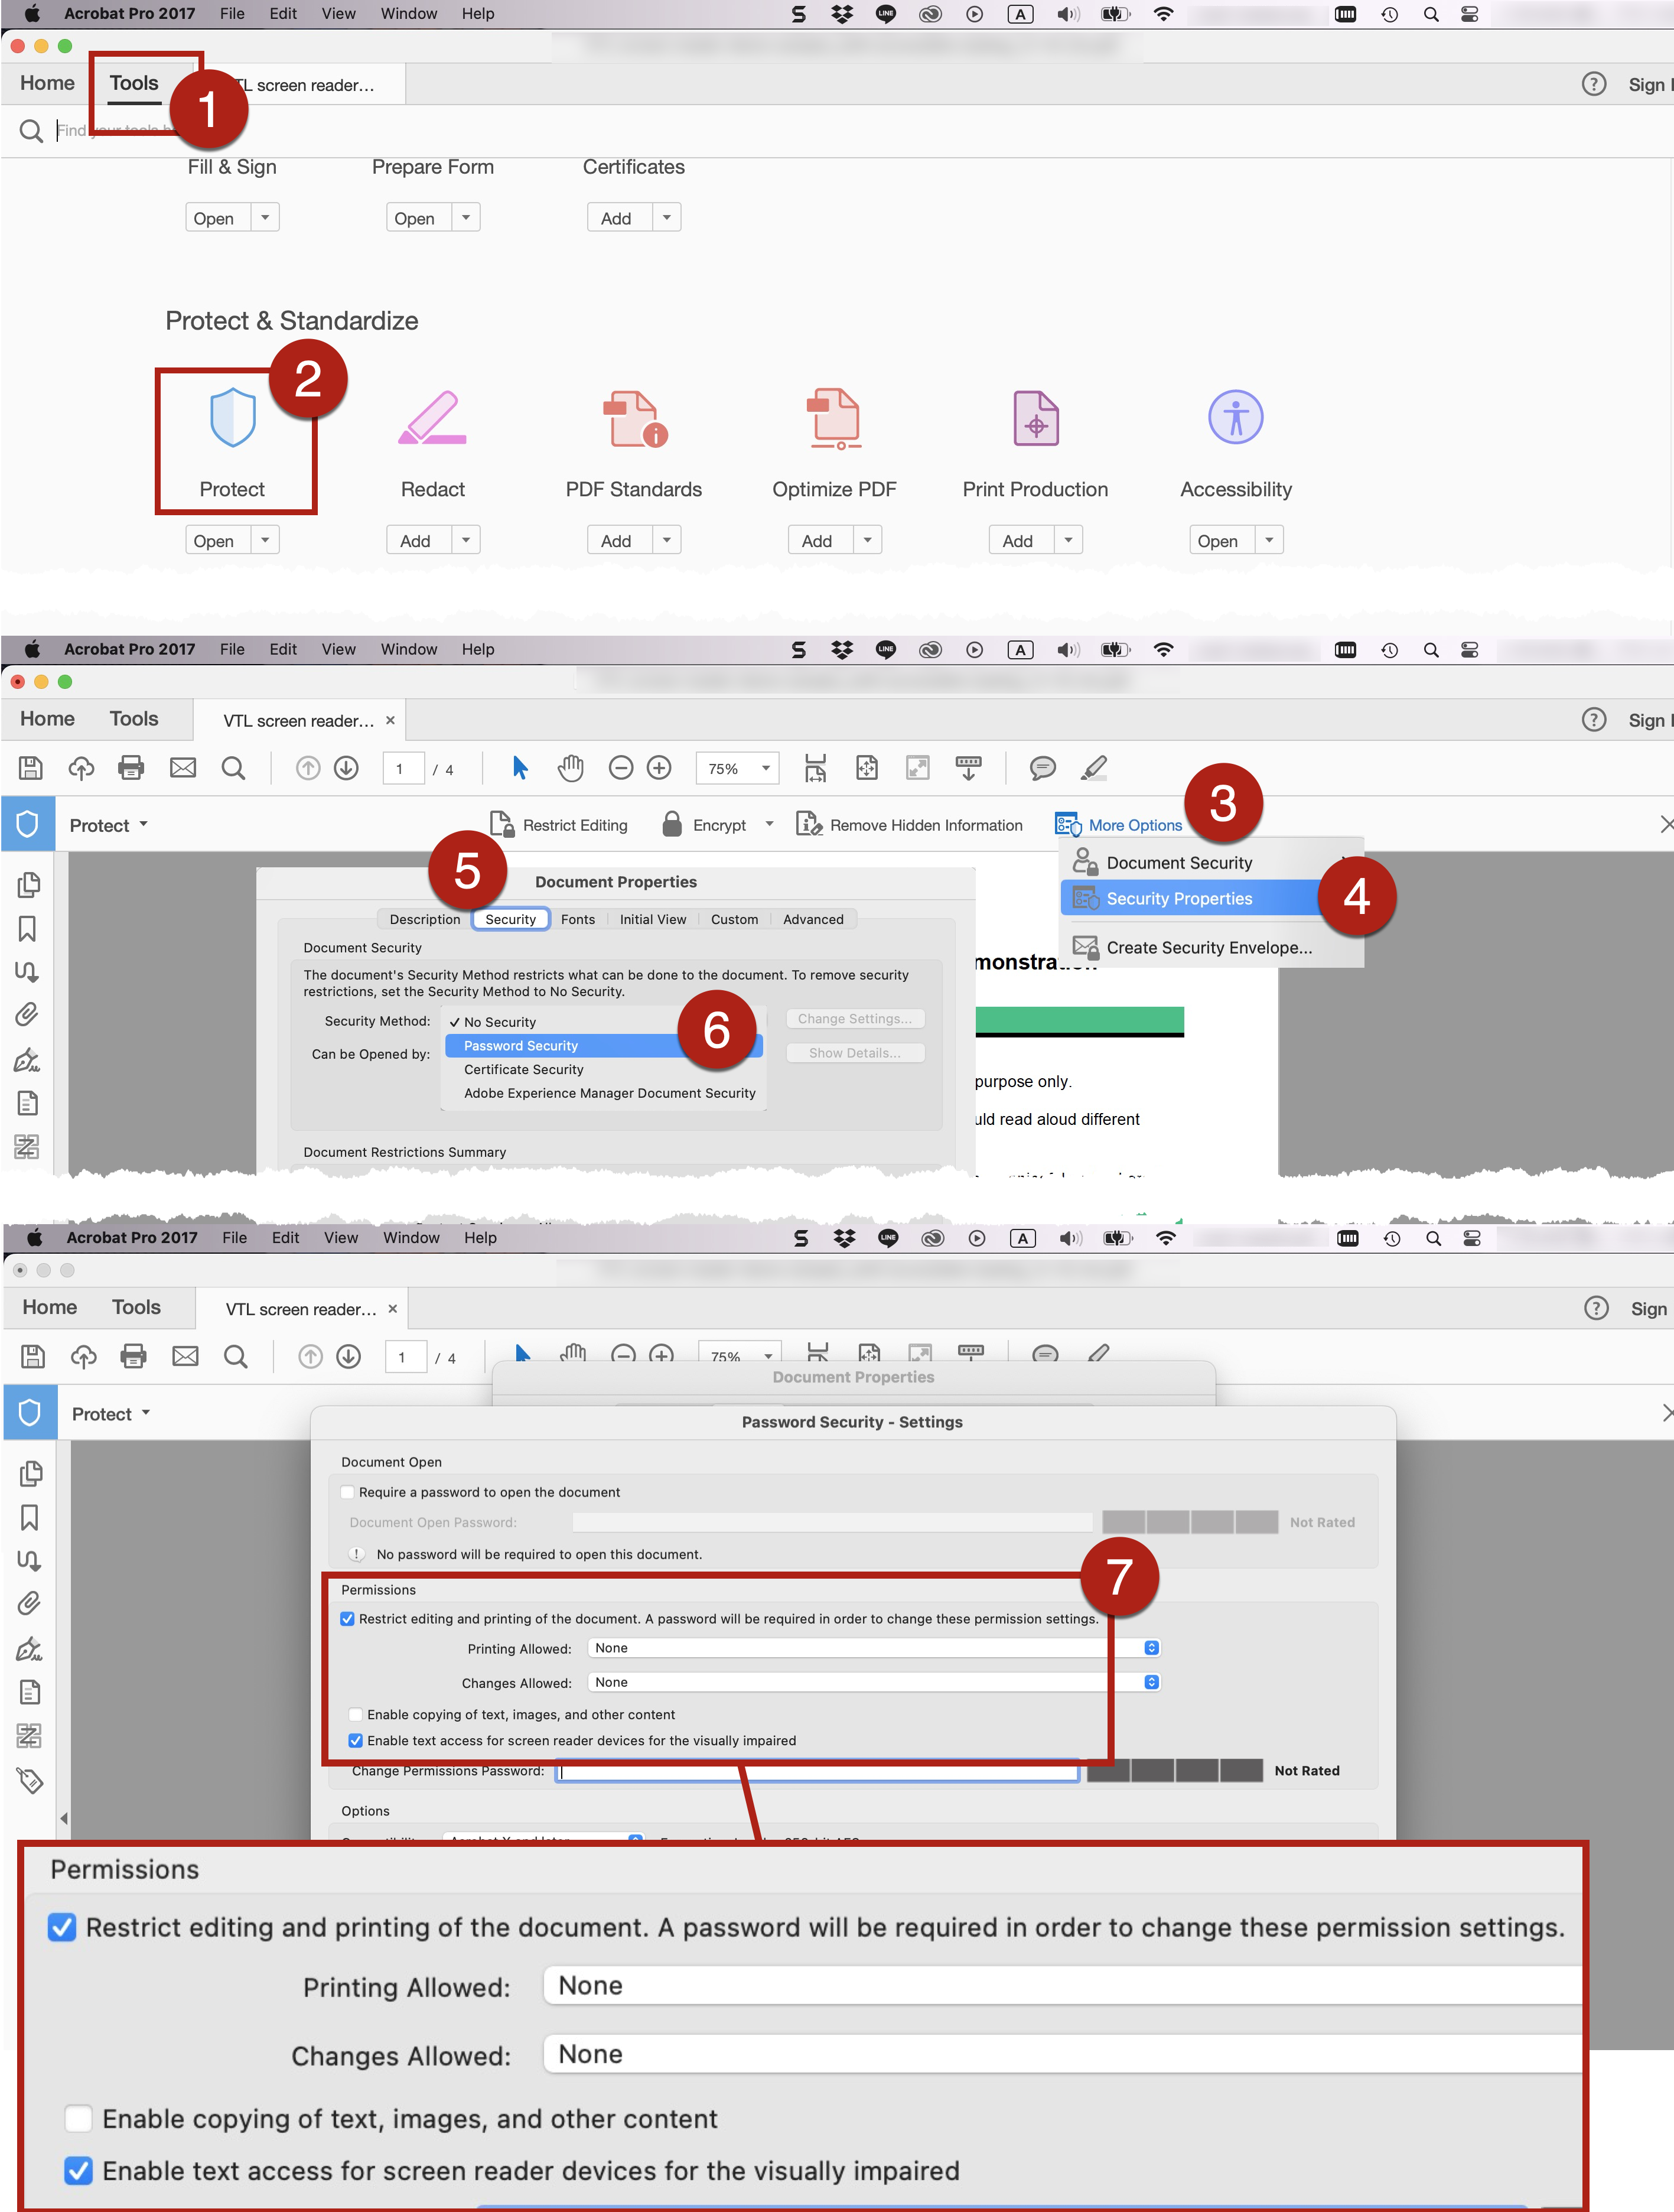
- To check and/or modify the security settings of the PDF document:
- Go to Tools > Protect > More Options > Security Properties. The Document Properties Dialog Pane opens.
- Go to Security > Security Method.
- Select No Security if you do not need to set any security restriction on the PDF.
- Select Password Security from the dropdown menu if you want to set security restriction on the PDF. The Password Security Settings dialog pane opens.
- In the Permissions section, if you select the option Restrict editing and printing of the option, make sure you also select the option Enable text access for screen reader devices for the visually impaired. This is an essential setting as it at least permits text access for screen readers.
- However, it does not allow users to copy or extract the document’s contents. This option is available only for high encryption.
- Consider also selecting the option Enable Copying Of Text, Images, And Other Content.
- Select OK.
- References: Securing PDFs with passwords in Adobe Acrobat. Adobe.
- Besides the initial accessibility check at the beginning stage of document editing, always remember to conduct follow-up accessibility full check and at the end using the built-in accessibility checker in Adobe Acrobat. Fix any potentially problematic issues and re-run the accessibility full check until all items pass the check.
- The built-in accessibility checker in Adobe Acrobat would always flag Logical Reading Order and Colour Contrast in the accessibility report, by default. It serves as a reminder of the need of manual inspection on the reading order and colour contrast of the document content.
- Do not solely rely on this Checker for accessibility of the PDF document. Be aware of the limitations of the built-in Accessibility Checker.
- It is important to note that passing the check does not necessarily guarantee “full accessibility” but failing the check would mean there are some inaccessible features that needs to be addressed.
- To perform the Accessibility Full Check using the built-in accessibility checker in Adobe Acrobat:
-
- Go to Tools > Accessibility > Full Check. The Accessibility Checker Options dialog pane opens.
- In the Accessibility Checker Options dialog pane, select your preferred settings.
-
-
- For Report Options, indicate whether you want to save the accessibility report as an HTML file on your computer or attach the report file to the PDF.
- For Page Range, indicate whether you want to check all pages or specific page(s) of the PDF
- For Checking Options, indicate which accessibility issue(s) you want to inspect. There are in total 32 issues in 4 categories including Document; Page Content; Forms, Tables, and Lists; and Alternate Text and Headings. To perform a more comprehensive check, it is suggested to select all 32 options.
-
-
- Select Start Checking to begin the accessibility check.
- The report will then display in the Accessibility Checker panel on the left of the Adobe window. It flags any issues to be fixed or items that require manual inspection. Select any item and right-click to further select Explain. The Explain command will link to the Adobe webpage showing the detailed explanation and instructions of how to fix that inaccessibility item.
- Go through each potential problematic item and fix it. Afterwards, run the Check again.