Enhancing accessibility of PowerPoint
Table of Contents

Introduction
- Slideshows that are accessible would enable users of assistive technologies such as screen readers to process the information easily and logically. Accessible layout and content are easier to follow and benefit all users.
- In this section, we use Microsoft PowerPoint for MacOS version 16.64 to illustrate a set of essential principles for creating accessible slideshows. The principles follow the general sequence of steps in creating slideshows; and are not exhaustive. The sets of commands may be slightly different across computer systems (such as MacOS and Windows) but the general ideas still apply.
- It is important to note that software and computer programmes are constantly and rapidly developing along with changing accessibility functions. Statements on this page about the accessibility-related functions of the programmes and operating systems may no longer represent their current status.
- It is always good to communicate with students, understand their learning and access needs, and modify the teaching and learning materials in response to their needs accordingly.
Overview of suggested practices
- Slide layout
-
- Begin with using built-in slide layout templates.
- Select appropriate slide themes.
- Customize slide layout and theme using Slide Master.
- Give each slide a descriptive and unique title.
- Content structure
-
- Ensure logical reading order of the slide items.
- Create lists using built-in numbered or bulleted lists.
- Inclusive content
-
- Be mindful of inclusive language and disability representation.
- Text formatting
-
- Use readable text and appropriate font style.
- Use of tables
-
- Do not use tables for layout formatting.
- Use PowerPoint’s built-in functionality to insert tables.
- Always specify the header row of a table.
- Use of colour
-
- Ensure sufficient colour contrast.
- Do not use colour as the sole visual cue.
- Audio-visual content
-
- Provide alternative text (“Alt Text”) for graphics.
- Provide accessible video and audio.
- Avoid animations or flashing objects.
- Hyperlinks
-
- Use descriptive link text for hyperlinks.
- Accessibility check
-
- Use built-in Accessibility Checker to fix potential issues.
- Presentation delivery
-
- Use simple slide transition.
- Use the PowerPoint subtitles option.
- File Sharing
-
- Use Outline View to check and export text content.
- Set document languages.
- Edit file information and properties.
- Convert to PDF by “Save As” instead of “Print to PDF”.
Slide layout
- Begin with using the built-in default slide layout templates in PowerPoint that suit your content.
-
- These layout templates have been created with basic accessible design, so it could help you build an accessible PowerPoint easier and quicker.
- With slide title on each slide.
- With pre-formatted and different “placeholders”, where a “placeholder” is the container on the slide for different content such as text, graphics, tables, or video.
- With default bullet points and numbered lists for text.
- These built-in placeholders on the slide templates would be recognized by assistive technologies such as screen readers. They would appear in the Outline View. It is important because the text content appeared in the Outline View can be directly exported as an accessible formatted text for users’ reference.
- These layout templates have been created with basic accessible design, so it could help you build an accessible PowerPoint easier and quicker.
- Do not begin with a blank slide or add placeholders (such as text boxes, images) to the slide manually.
- Placeholders (such as text boxes, images) manually added to the slides may be ignored by screen readers. They will not appear in the Outline View or exported from the Outline View.
- Avoid manually adding text boxes. Content in these text boxes may not be identified or read aloud by screen readers.
- Customize slide layout using the Slide Master.
- For example, if you want to add additional text boxes that are not present in the original slide layout, you may add the text boxes by inserting Placeholders in the Slide Master. Refer to the sub-section about customizing slide layout and theme using the Slide Master in this Toolkit for more information on how to edit the Slide Master.
- Do not insert the repetitive information to every slide, e.g., university logos or course code for lecture notes. Screen readers read out this information repeatedly which could be confusing and annoying.
- Use templates to present repetitive information that needs to be displayed on every slide.
- Open the Slide Master. Insert the repetitive information to the Master Layout as part of the layout template as decorative images, slide background, etc., accordingly. It will then display in every slide. However, it would not be recognized by screen readers or read out this repetitive information when going through every slide. Sometimes, you may consider adding “hidden text” about the repetitive information on the first slide for screen readers to access and read out once.
- To add “hidden text”, a possible way is to use “colour-on-colour” background and text, such as white text on white background.
- Use simple themes. Complicated themes may hinder readability.
- Be aware that not all built-in theme templates in PowerPoint are created with accessible designs.
- Customize slide theme using the Slide Master.
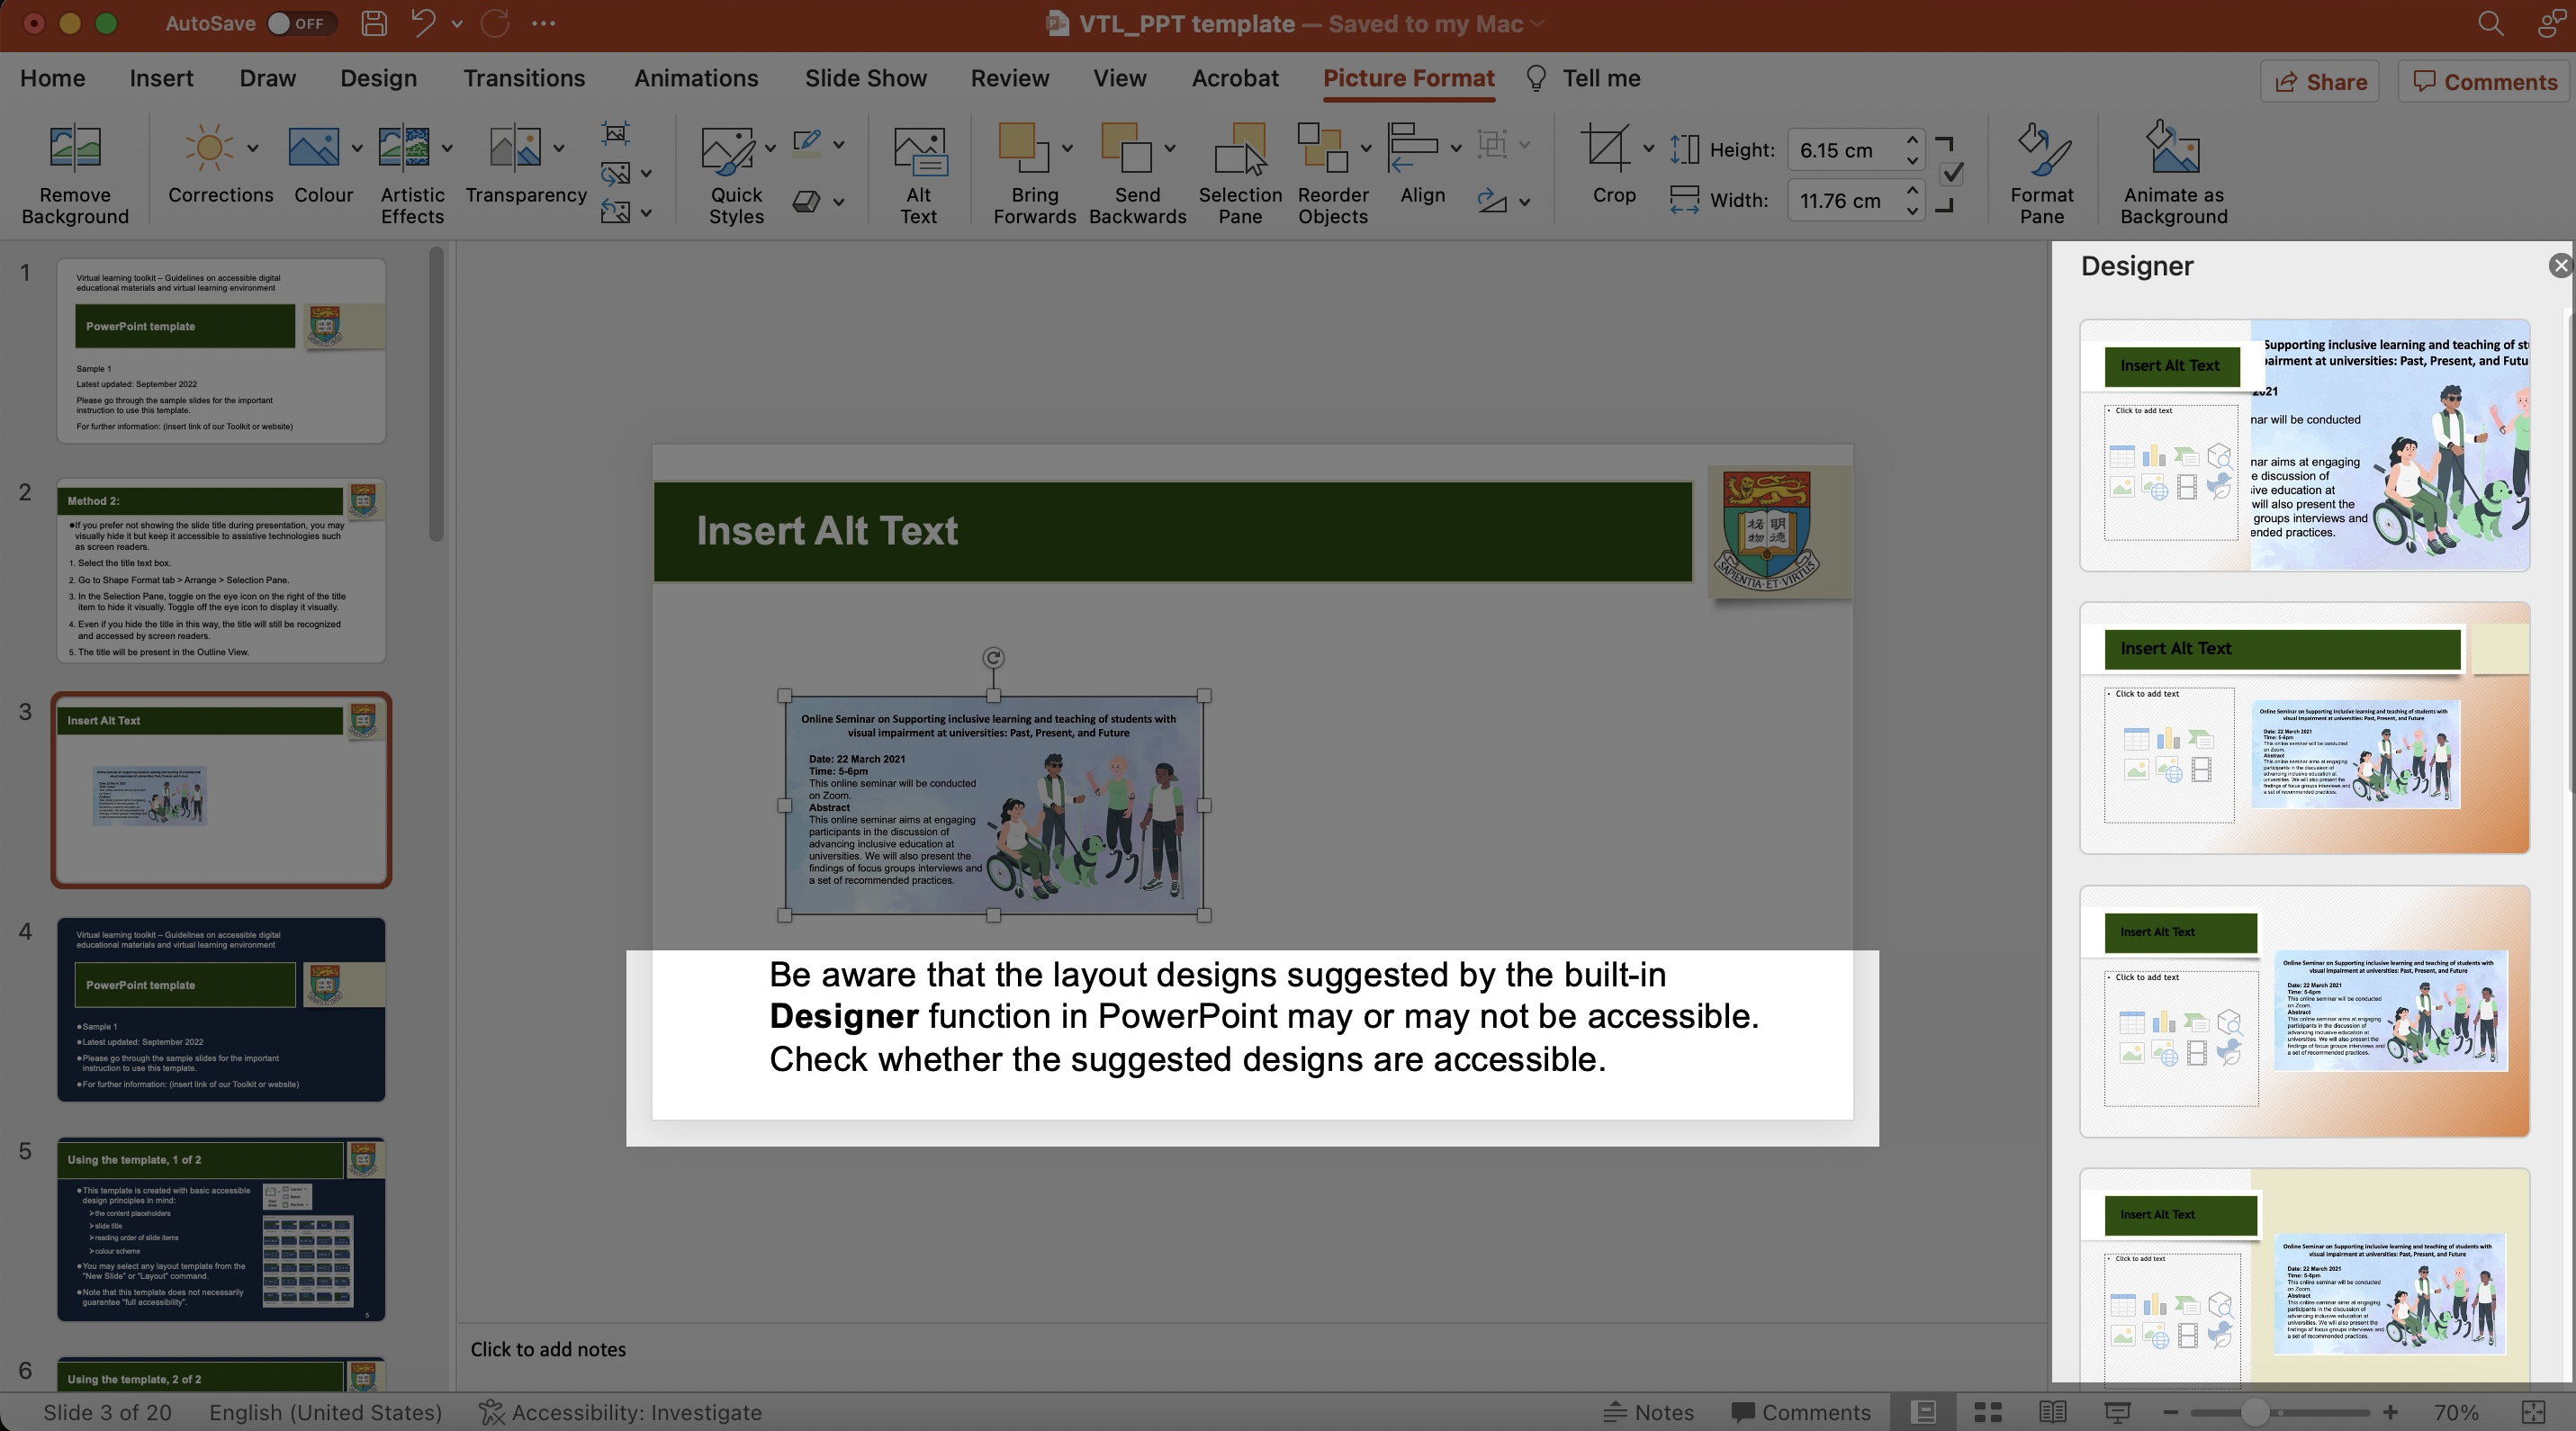
- Be aware that the layout designs suggested by the built-in Designer function in PowerPoint may or may not be accessible. Check whether the suggested designs are accessible.
- Modify or create customized slide layout and themes using the Slide Master. It helps you create accessible slide layout and themes that suit your desired content and needs while keeping proper heading structure and reading order.
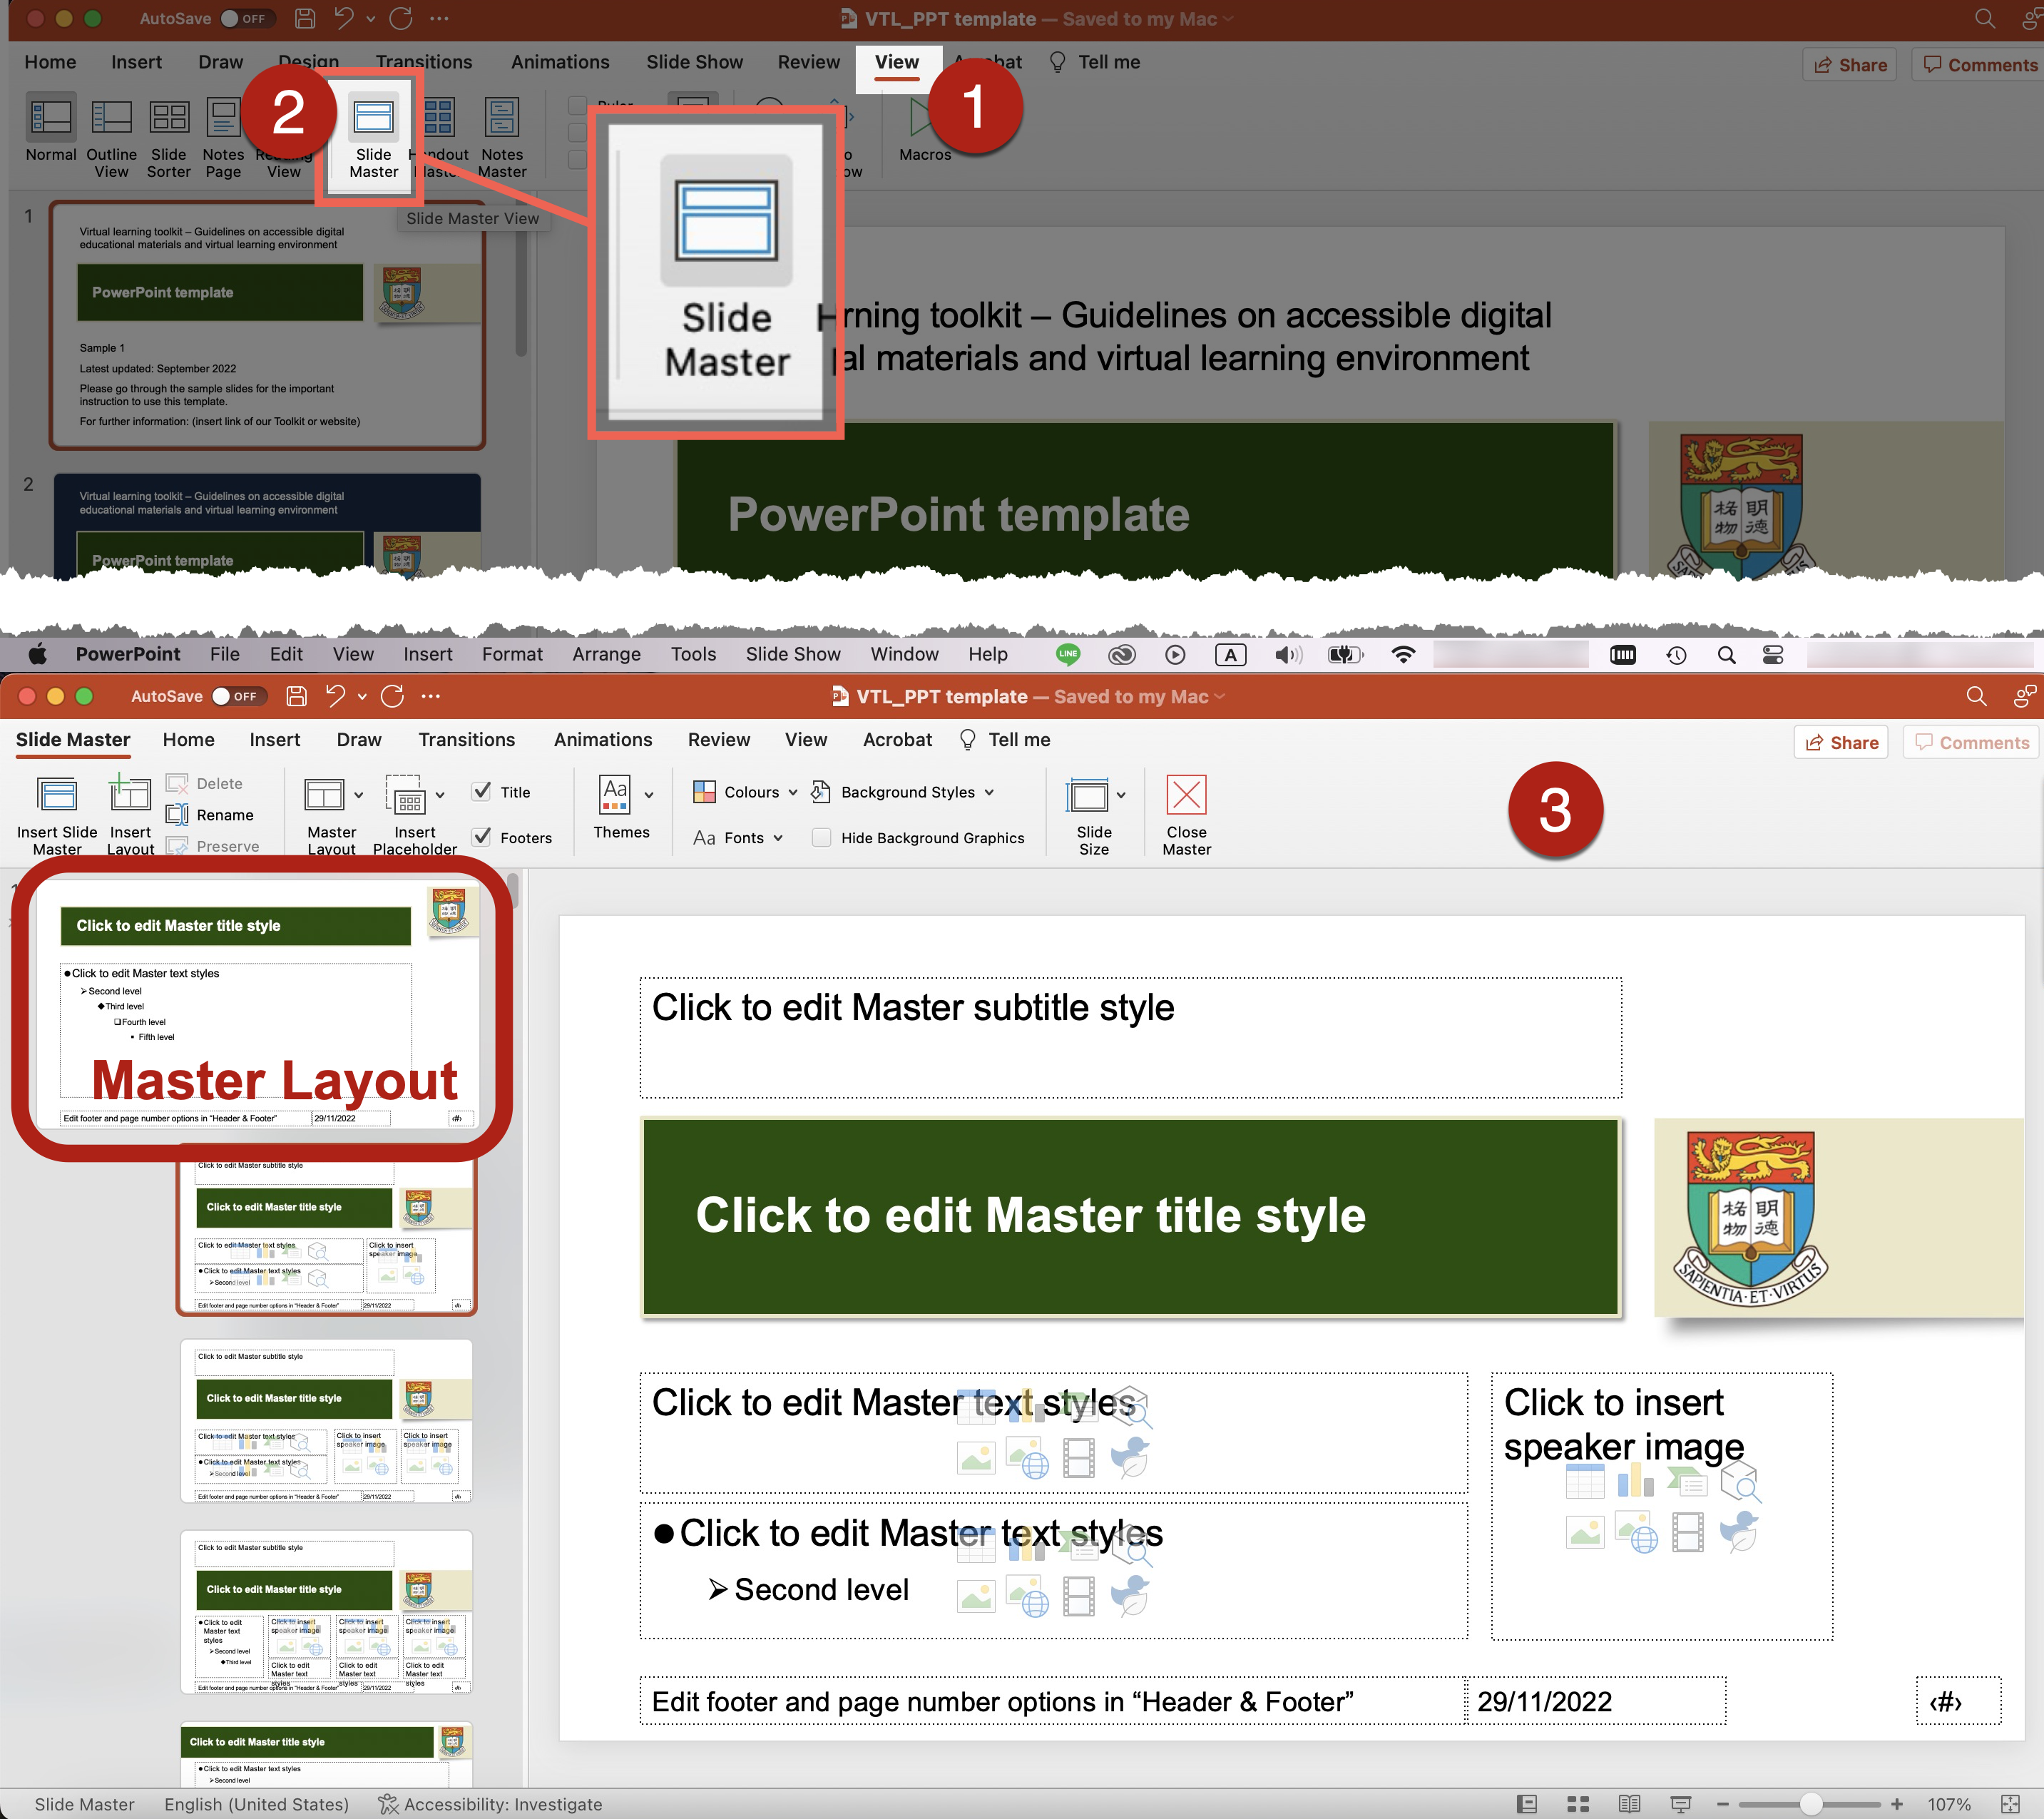
- To open the Slide Master, go to the View tab > Slide Master.
- The first slide displayed in the sidebar on the left is the Master Layout. Any editing made to this Master Layout would be applied to every slide.
- The slides displayed below the Master Layout in the sidebar are the respective individual slides. Any editing made to any of these slides will be applied to that particular slide.
- Make changes in the look and style the slides (such as font, font size, and background) to the Master Layout or particular slide(s) to meet your needs.
- To create customized layout template:
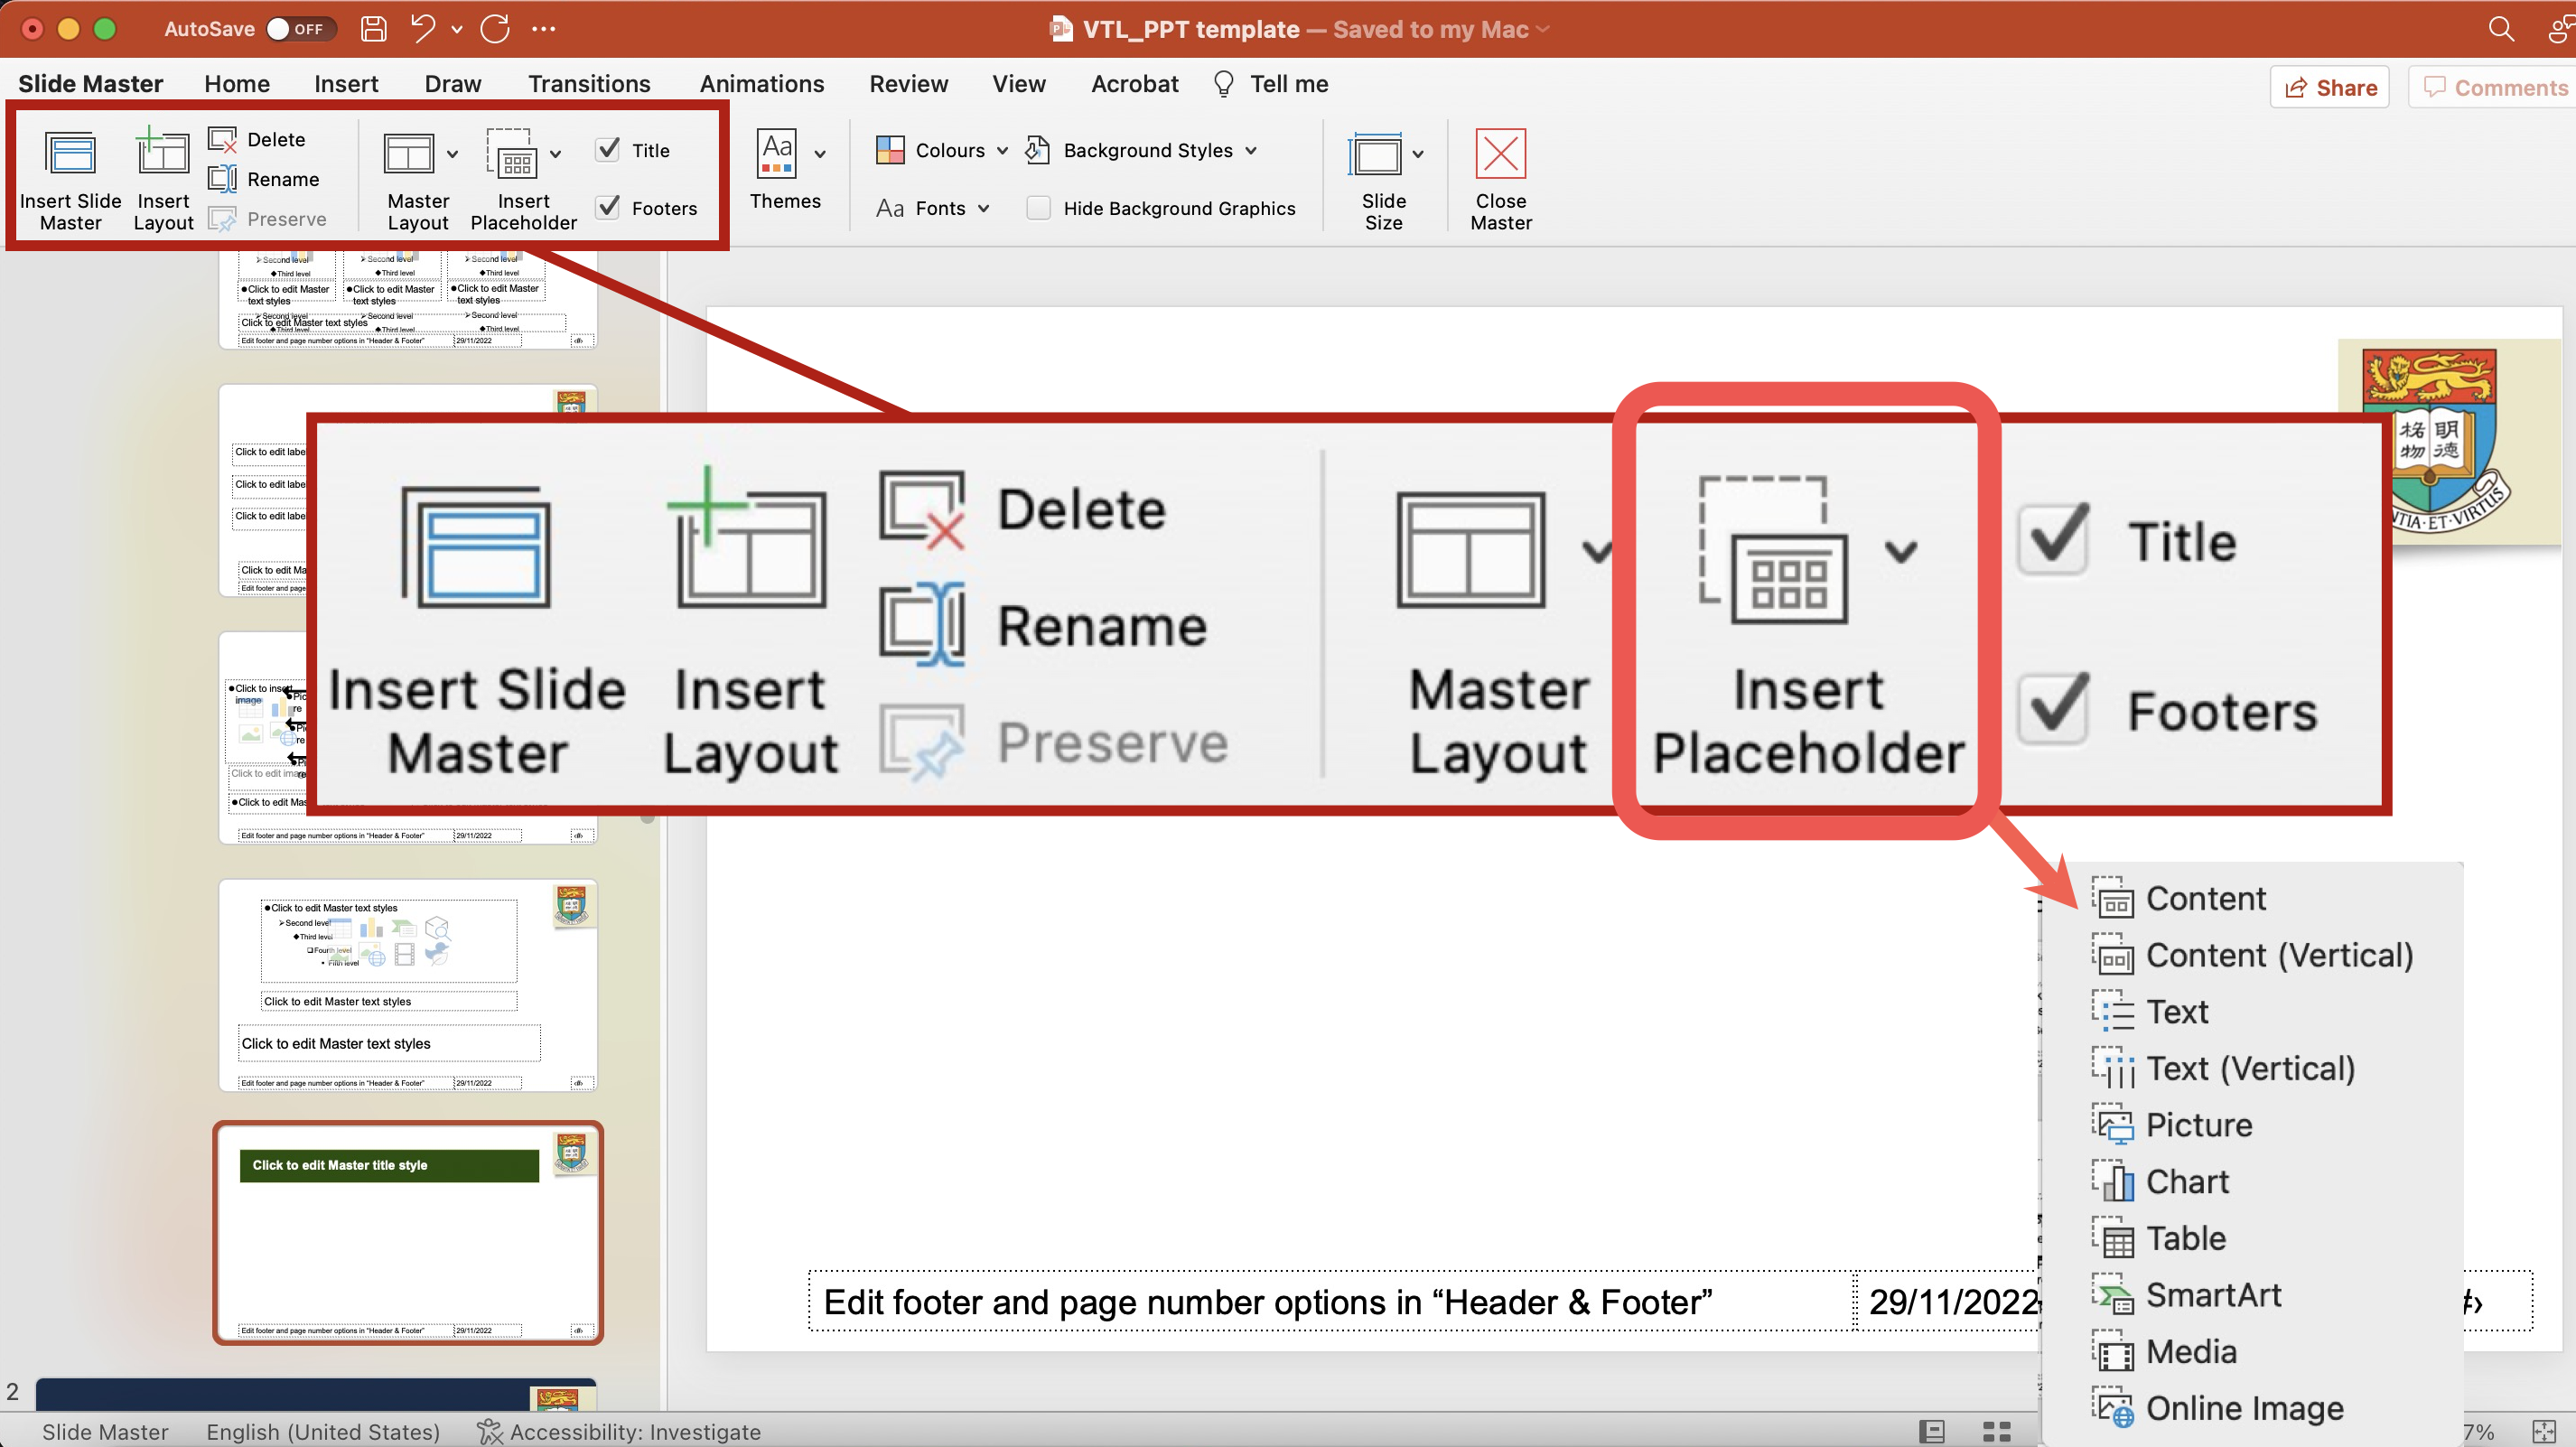
- Go to View tab > Slide Master > Insert Layout > a new slide will be added. Give the customized layout a descriptive and unique name.
- Then, insert required placeholder items. Adjust the positions and sizes of the placeholder items.
-
- For example, if you want to add additional text boxes that are not present in the original built-in layout template, you may add the text boxes by inserting placeholders in the slide(s) concerned.
- Check and fix reading order of the items in each slide using the Slide Master.
- Every slide should have a descriptive and unique title.
- Slide titles help users navigate and select different slides. This is especially important for assistive technologies users because they would navigate the slides by scanning through the list of slide titles. Descriptive and unique slide titles can help them quickly locate the slide they want.
- The descriptive and unique slide titles would help all users better understand the slide content structure and be clear which slide the presenter is on.
- If multiple slides share the same title, add remarks or numbering to each slide title to make it more descriptive and unique.
- Example 1: Title, 1 of 5; Title, 2 of 5; Title, 3 of 5; Title, 4 of 5; Title, 5 of 5.
- Example 2: Title – 1; Title – 2; Title – 3; Title – 4; Title – 5.
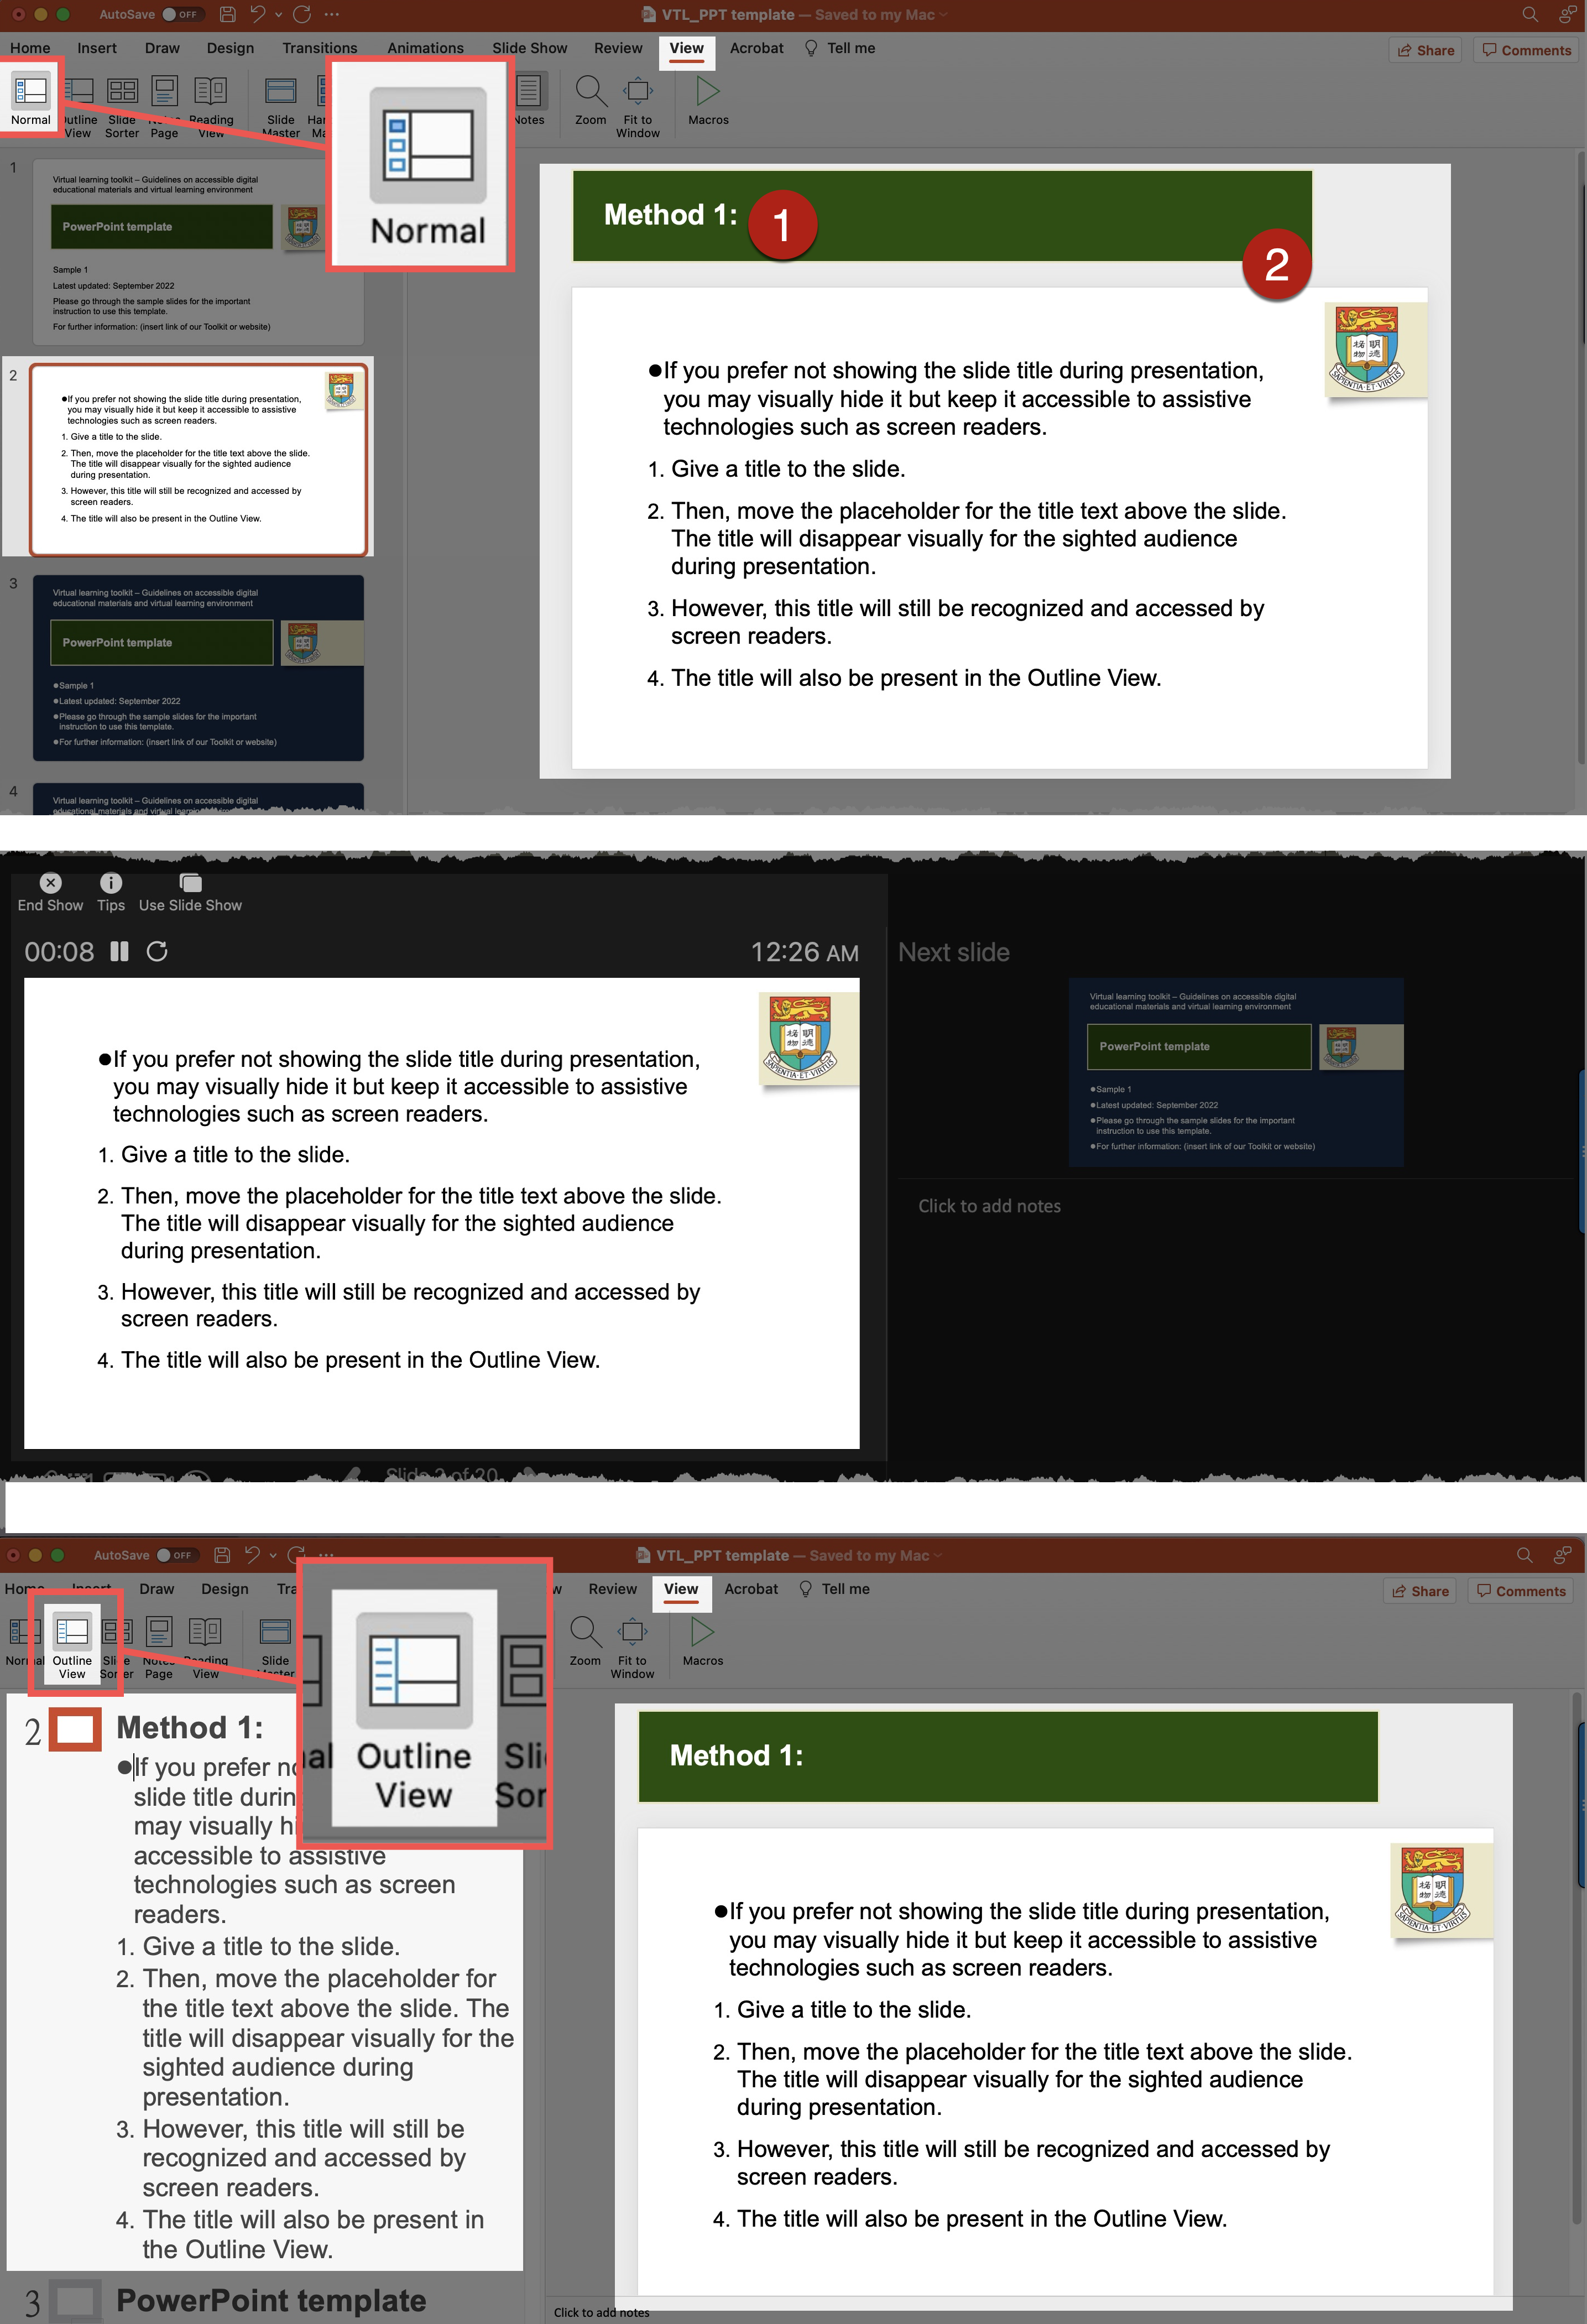
- If you prefer not showing the slide title during presentation, you may visually hide it but keep it accessible to assistive technologies such as screen readers.
- Method 1: Give a title to the slide. Then, move the placeholder for the title text above the slide. The title will disappear visually for the sighted audience during presentation. However, this title will still be recognized and accessed by screen readers. The title will also be present in the Outline View.
-
- Method 2: Select the title text box. Go to Shape Format tab > Arrange > Selection Pane. In the Selection Pane, toggle on the eye icon on the right of the title item to hide it visually. Toggle off the eye icon to display it visually. Even if you hide the title in this way, the title will still be recognized and accessed by screen readers. The title will be present in the Outline View.
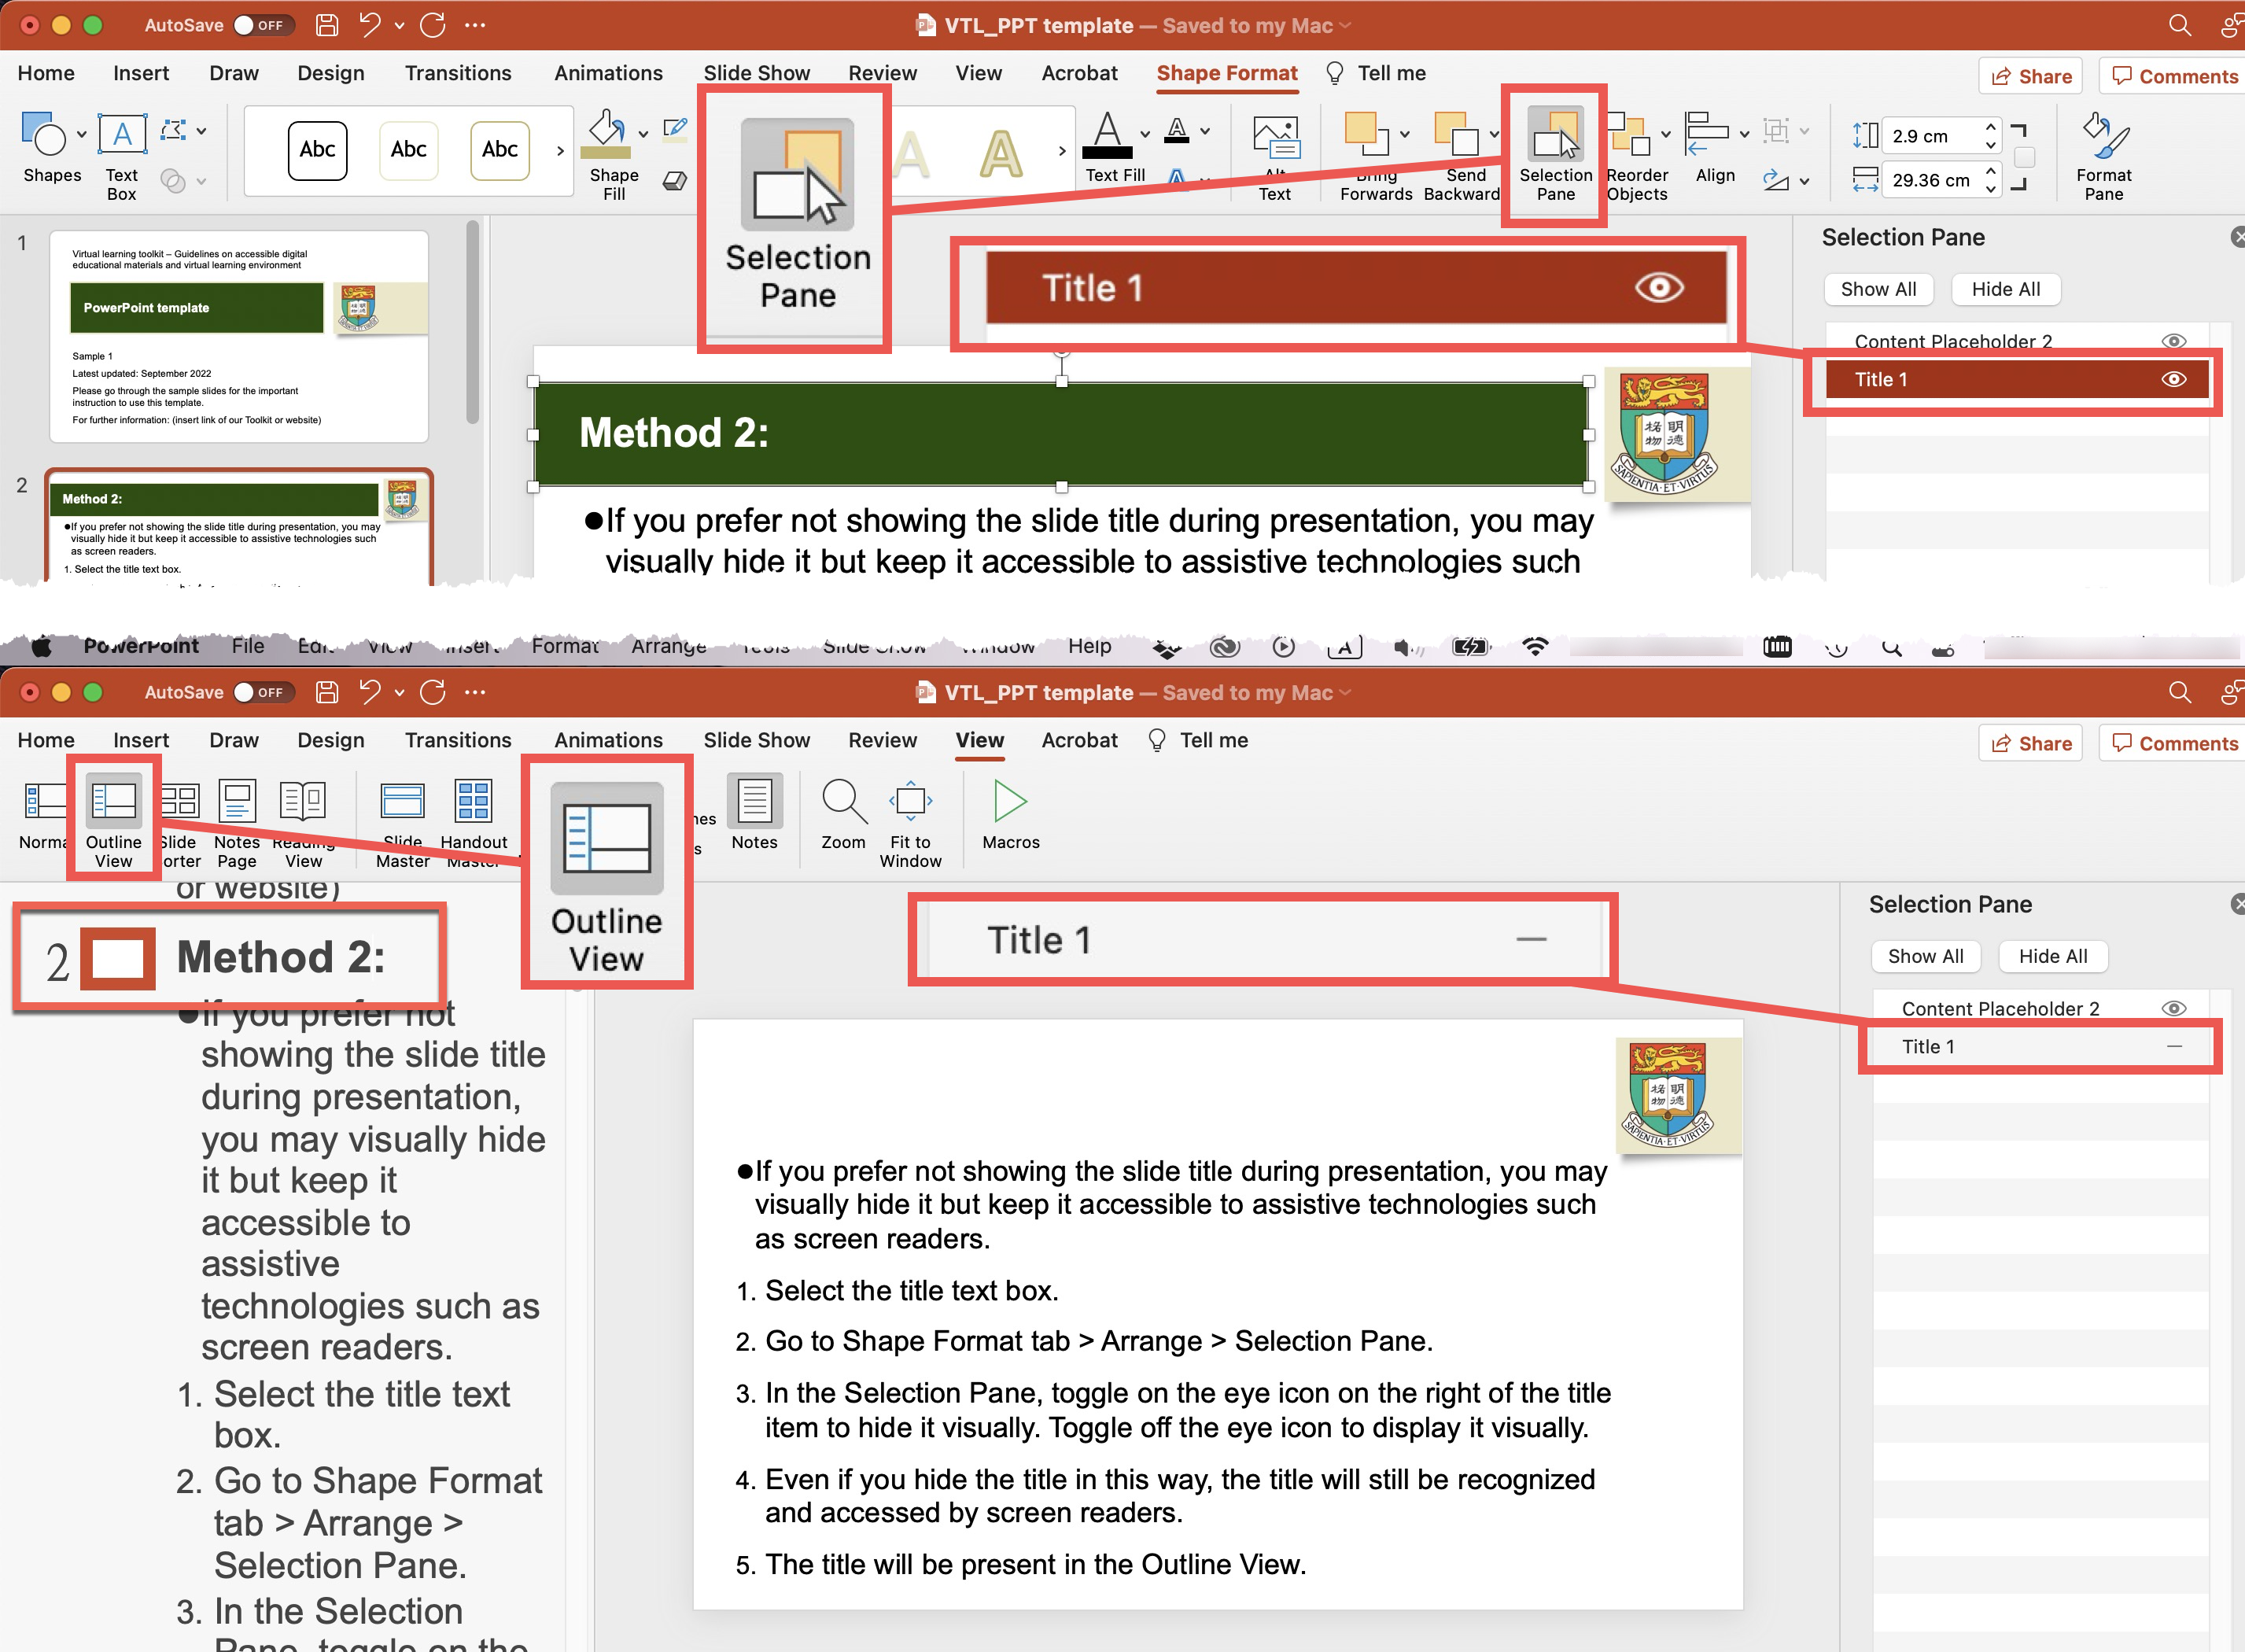
- In case you really need to hide the titles of all slides, you may do it using the Slide Master.
- Refer to Microsoft website for guidelines of other methods of inserting title to a slide.
Content structure
- Ensure logical reading order of all items on each slide.
- Reading order is the sequence of how assistive technologies such as screen readers will read the items on a slide.
- The slide items would be read in the order they were added to the slide, which can be very different from the position and order that visually appears.
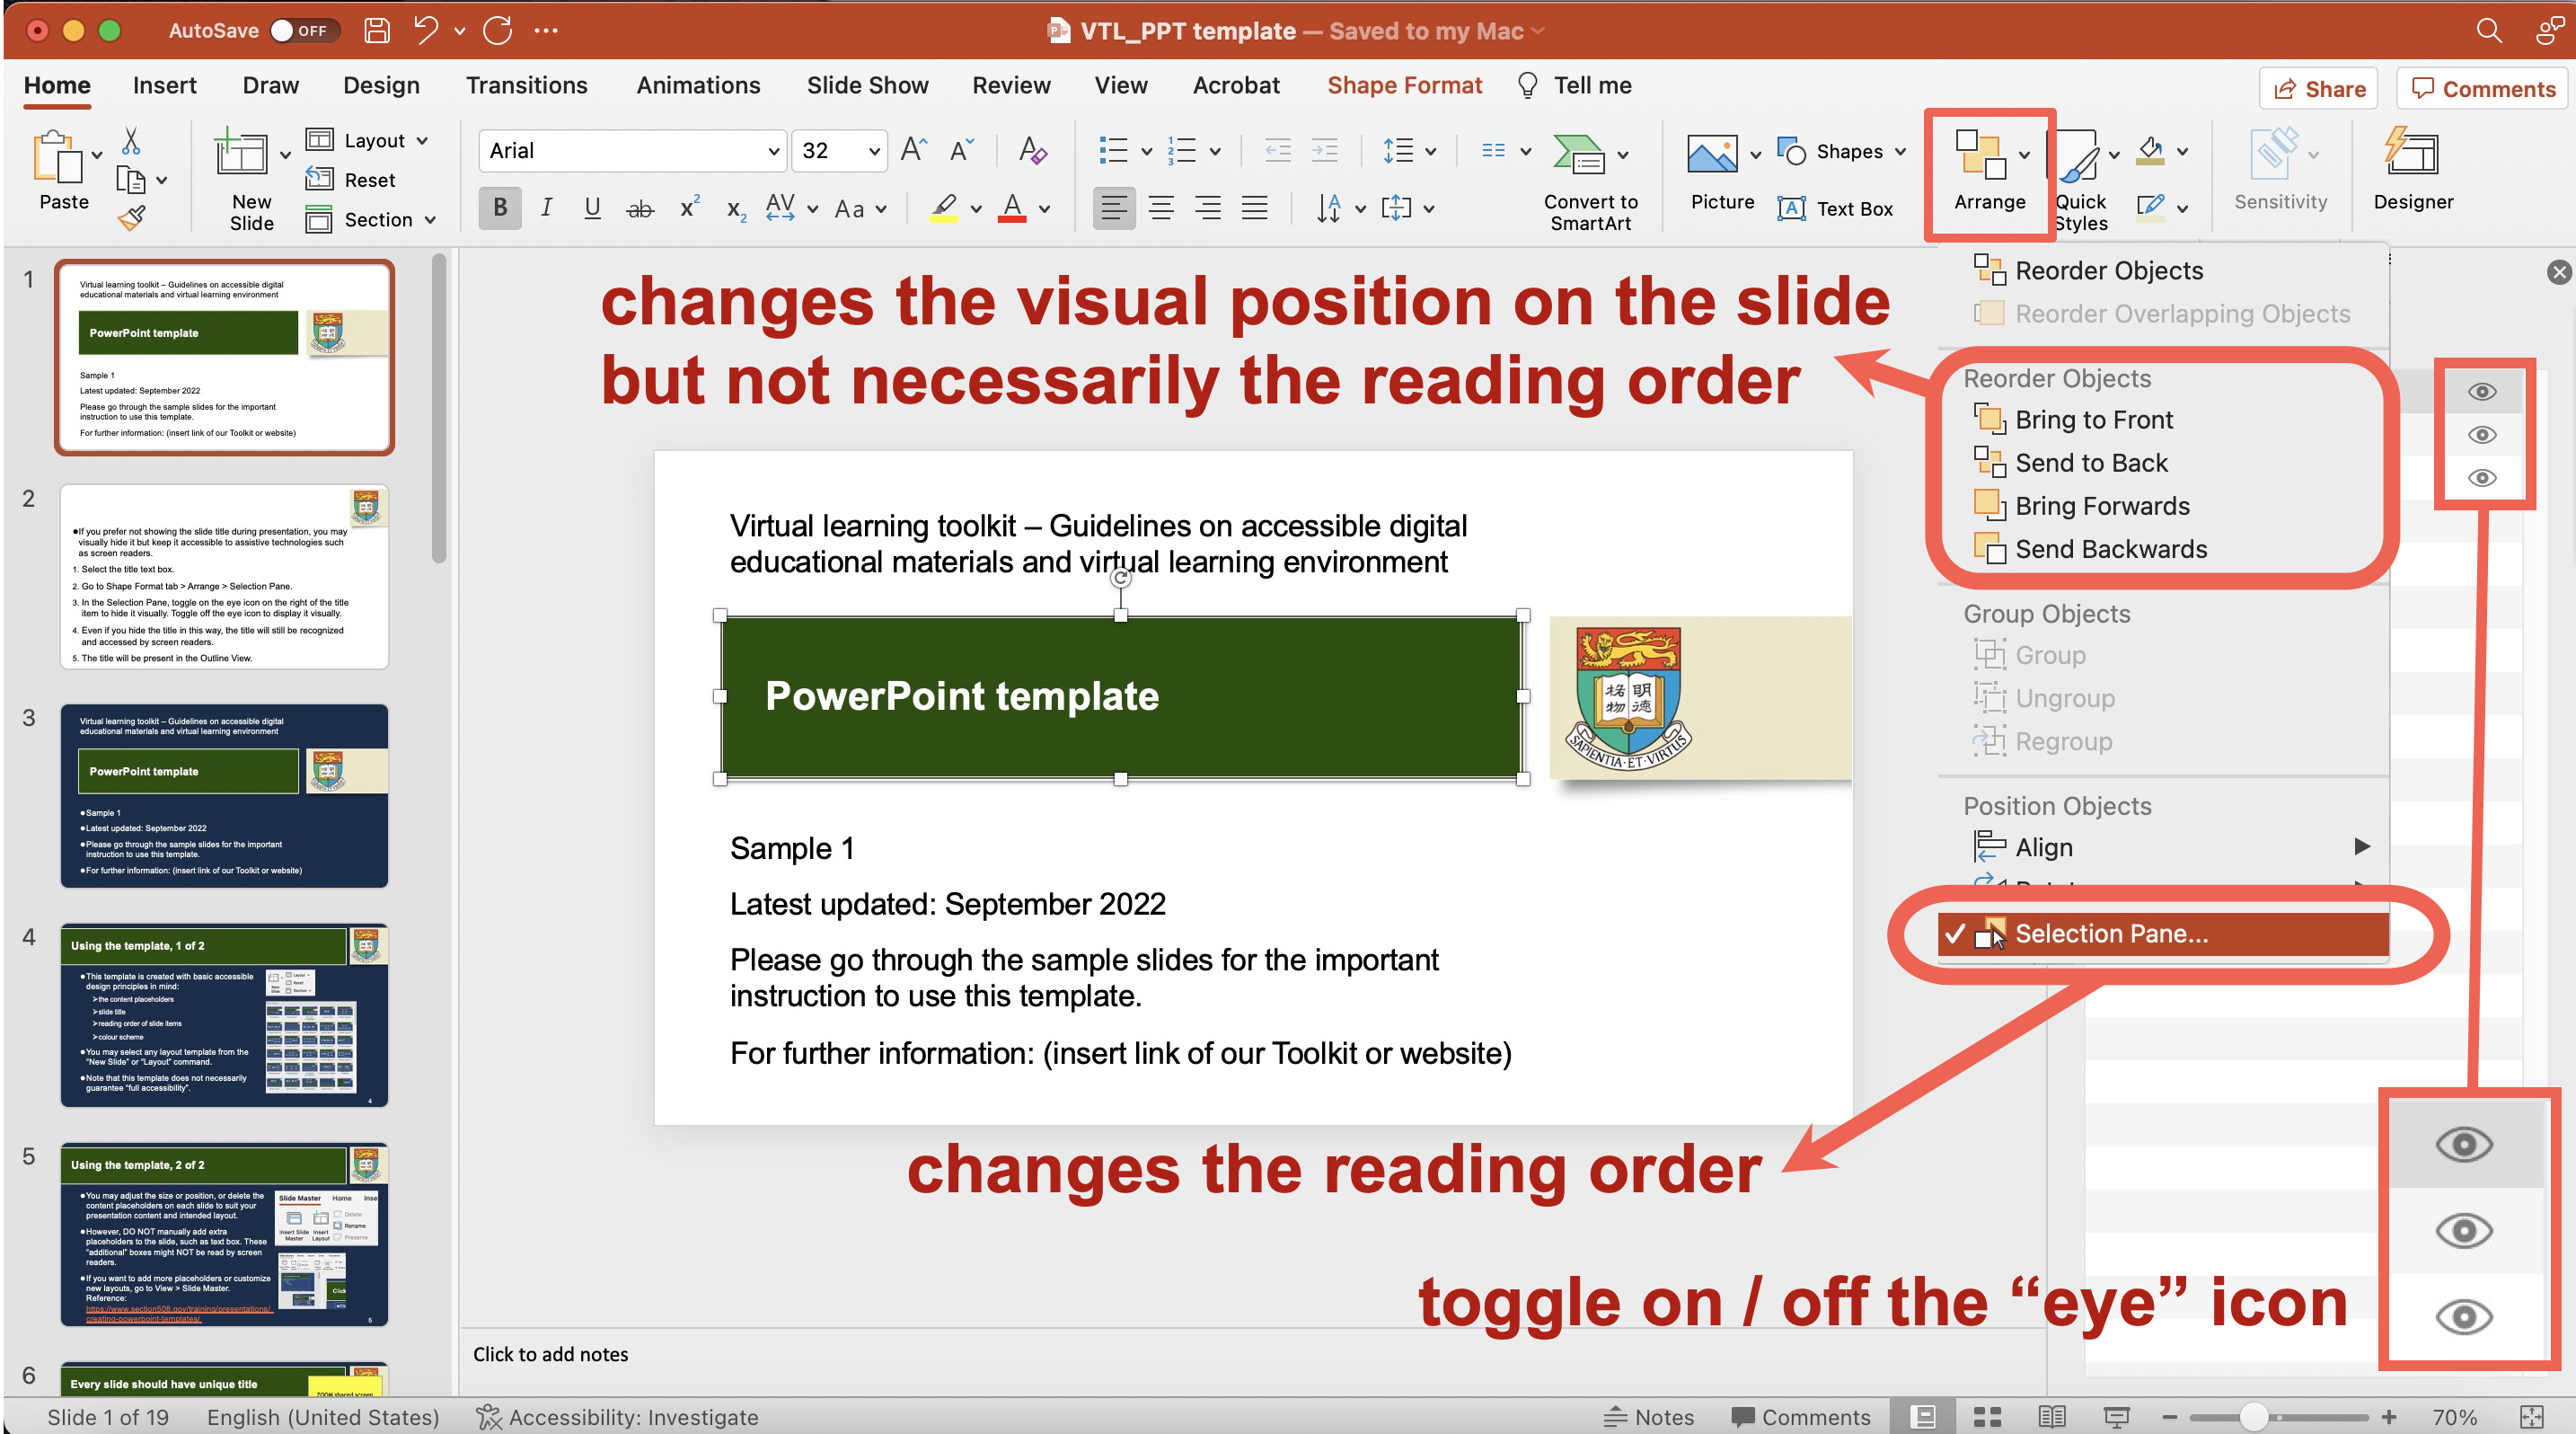
- To verify and fix the reading order of the slide items, go to Home or Shape Format tab > Arrange > Selection Pane.
- The Selection Pane presents every item in the slide. Select and drag the item to rearrange the reading order. Reading order is determined from the bottom to the top as shown in the Selection Pane. Screen readers read the items in the reverse order listed in the Selection Pane.
- Place the slide title at the bottom of the Selection Pane.
- The slide title should always be the first item to be read out by screen readers for effective navigation and understanding of the slides.
- Create “title” by manually editing font size, colour, or style (e.g., bold or italicized text) would only make it visually like a “title”. However, assistive technologies such as screen reader would not recognize it as the slide title.
- In the Selection Pane, toggle on the eye icon on the right of a slide item to hide it visually. Toggle off the eye icon to display it visually. Even if you hide the item in this way, the item will still be recognized and accessed by screen readers.
- The Bring forwards, Bring to front, Send Backwards, or Send to back functions in the Arrange menu changes the visual position on the slide but not necessarily the reading order. However, be sure to check the Selection Pane to ensure logical reading order.
- Delete any blank items from the Selection Pane.
- References: Slide Reading Order. WebAIM.
- A list could help people to read and understand information more easily.
- Create lists using the built-in functions for ordered (numbered) or unordered (bullets) lists.
- Screen readers can recognize it as a “list” and identify the number of items in the list before it begins to read the items. Screen readers would first read that there is a list, followed by the number of items in the list. When screen readers finish reading all the items in the list, screen readers would read the end of the list.
- If the lists are formatted in this way properly, when the author adds or remove items, the order and numbering will automatically adjust. It can save time editing.
- To create a list, go to Home tab > Bullets. Select the desired formatting of the numbering or bullets.
- Do not create lists by manually typing numbers or symbols at the beginning of each line. For example:
- 1) group project
2) individual paper
3) final exam - It may visually look like a “list”. However, screen readers cannot recognize them as a “list”. Screen readers cannot identify the number of items in the list or where to end the list. It could be confusing.
- 1) group project
Inclusive content
- Use inclusive language. Avoid biased language.
- Bias-Free Language. American Psychological Association.
- Inclusive Language Guidelines (PDF; 3.2 MB). American Psychological Association.
- Disability Language Style Guide. National Center on Disability and Journalism.
- ACS Inclusive Style Guide. American Chemical Society.
- Guidelines for Inclusive Language. Linguistic Society of America.
- Guideline on fostering practices for disability inclusion at higher education institutions. The University of Hong Kong.
- Consider disability representation and diversity in mind.
- Diversity & Inclusion in Images, ACS Inclusive Style Guide. American Chemical Society.
- Portray disabled people as ordinary people in society as they are. Do not create an impression of separateness, specialness, and dependence. Avoid focusing on their medical conditions.
- Avoid portraying disabled people as a passive recipient of help from others.
- For example, a student with visual impairment being helped to cross the road or the wheelchair of a wheelchair-using student being pushed by a fellow classmate.
- Portray diversity. Show people with disabilities in everyday social situations and campus environment.
- For example, a picture shows a group of students walking around the campus may include students with diverse characteristics to represent the inherent diversity, e.g., disability and skin colour.
- Avoid emphasizing too much on some people with disabilities who have “remarkable achievements” as role models through storytelling.
- Storytelling approach is often used to “inspire” others by conveying the idea of “see how these people with disabilities can overcome barriers with a never-give-up attitude and complete this and that” to motivate people without disabilities to try harder.
- The hidden agenda is that if people with disabilities can achieve their goals, then surely can people without disabilities. It might also put much pressure on students with disabilities to think that they have to be an “inspiration” to matter. Mind the issues of possibly manifesting “inspiration porn”.
- Inspiration porn is the stereotypical portrayal of people with disabilities doing something ordinary as “inspirational” solely or in part on the basis of their disabilities (Stella Young, 2014).
- After all, the accomplishments of people with disabilities are worth celebrating on the basis of their competency (instead of their disability status) just as it is to celebrate the accomplishments of people without disabilities.
Text formatting
- Avoid long and complicated sentences. Divide long body of text into different sections.
- Sans-Serif fonts, such as Arial, Calibri, and Verdana, are generally preferred to Serif fonts.
- Sans-Serif font do not have decorative lines at the edge. An example is Arial.
- Serif fonts have small lines at the edge that may hamper readability. Some users, especially people with dyslexia, might find it hard to read decorative fonts and those whose letters are close to one another. An example is Garamond.

- Some fonts may not be available in most of the common computer systems. For example, Helvetica is a recommended Sans-Serif font. It is available on Mac but not Windows. Be aware that Helvetica text may or may not displayed as Helvetica style in different computers as intended.
- Avoid only decorative fonts or light fonts. Be aware of whether the “WordArt” is easily readable. SmartArt requires Alt Text and assistive technologies such as screen readers may not be able to read the text on SmartArt.
- Different shapes such as speech bubbles may be used to emphasize certain text. Sometimes, the text may even be split to make it fit within the shapes. It hampers readability. Assistive technologies such as screen readers may not identify these shapes and could not access the associated text content.
- Avoid putting important text over images. It may interfere reading.
- The font size should not be too small, especially if the slides will be presented by a projector.
- Larger fonts would be more accessible for people with visual impairment. It also helps students sitting at the far end of classrooms or lecture halls.
- Avoid capitalizing all text. Avoid using all caps or small caps. It is difficult for most people to read.
- Use appropriate punctuation. Be aware of punctuation that visually looks similar but symbolize different meanings. Otherwise, it would make users assistive technologies such as screen readers difficult to understand the content.
- For example, be aware of the differences between the marks of ” inches, ‘ feet, ’ apostrophe, “ ” quotation marks. Use the marks of “smart quotes” as the quotation marks. Do not use the marks of “straight quotes” as the quotation marks.
- Avoid underlining text. Screen readers and some people with visual impairment may interpret underlined text as hyperlinks.
- Include sufficient whitespace in between lines of text.
- People who have dyslexia describe seeing text merged or distorted.
- Whitespace may make the text visually more balanced. It may lead the readers across different parts of the text.
- Do not manually create empty spaces by pressing the “Enter” key or Spacebar repeatedly to adjust the line spacing or indentation of the text.
- While visually it looks like formatted text, screen readers would read these multiple empty spaces as “Blank”. Multiple empty spaces means that users of screen readers would keep listening “Blank”. It can be very annoying and confusing to the users.
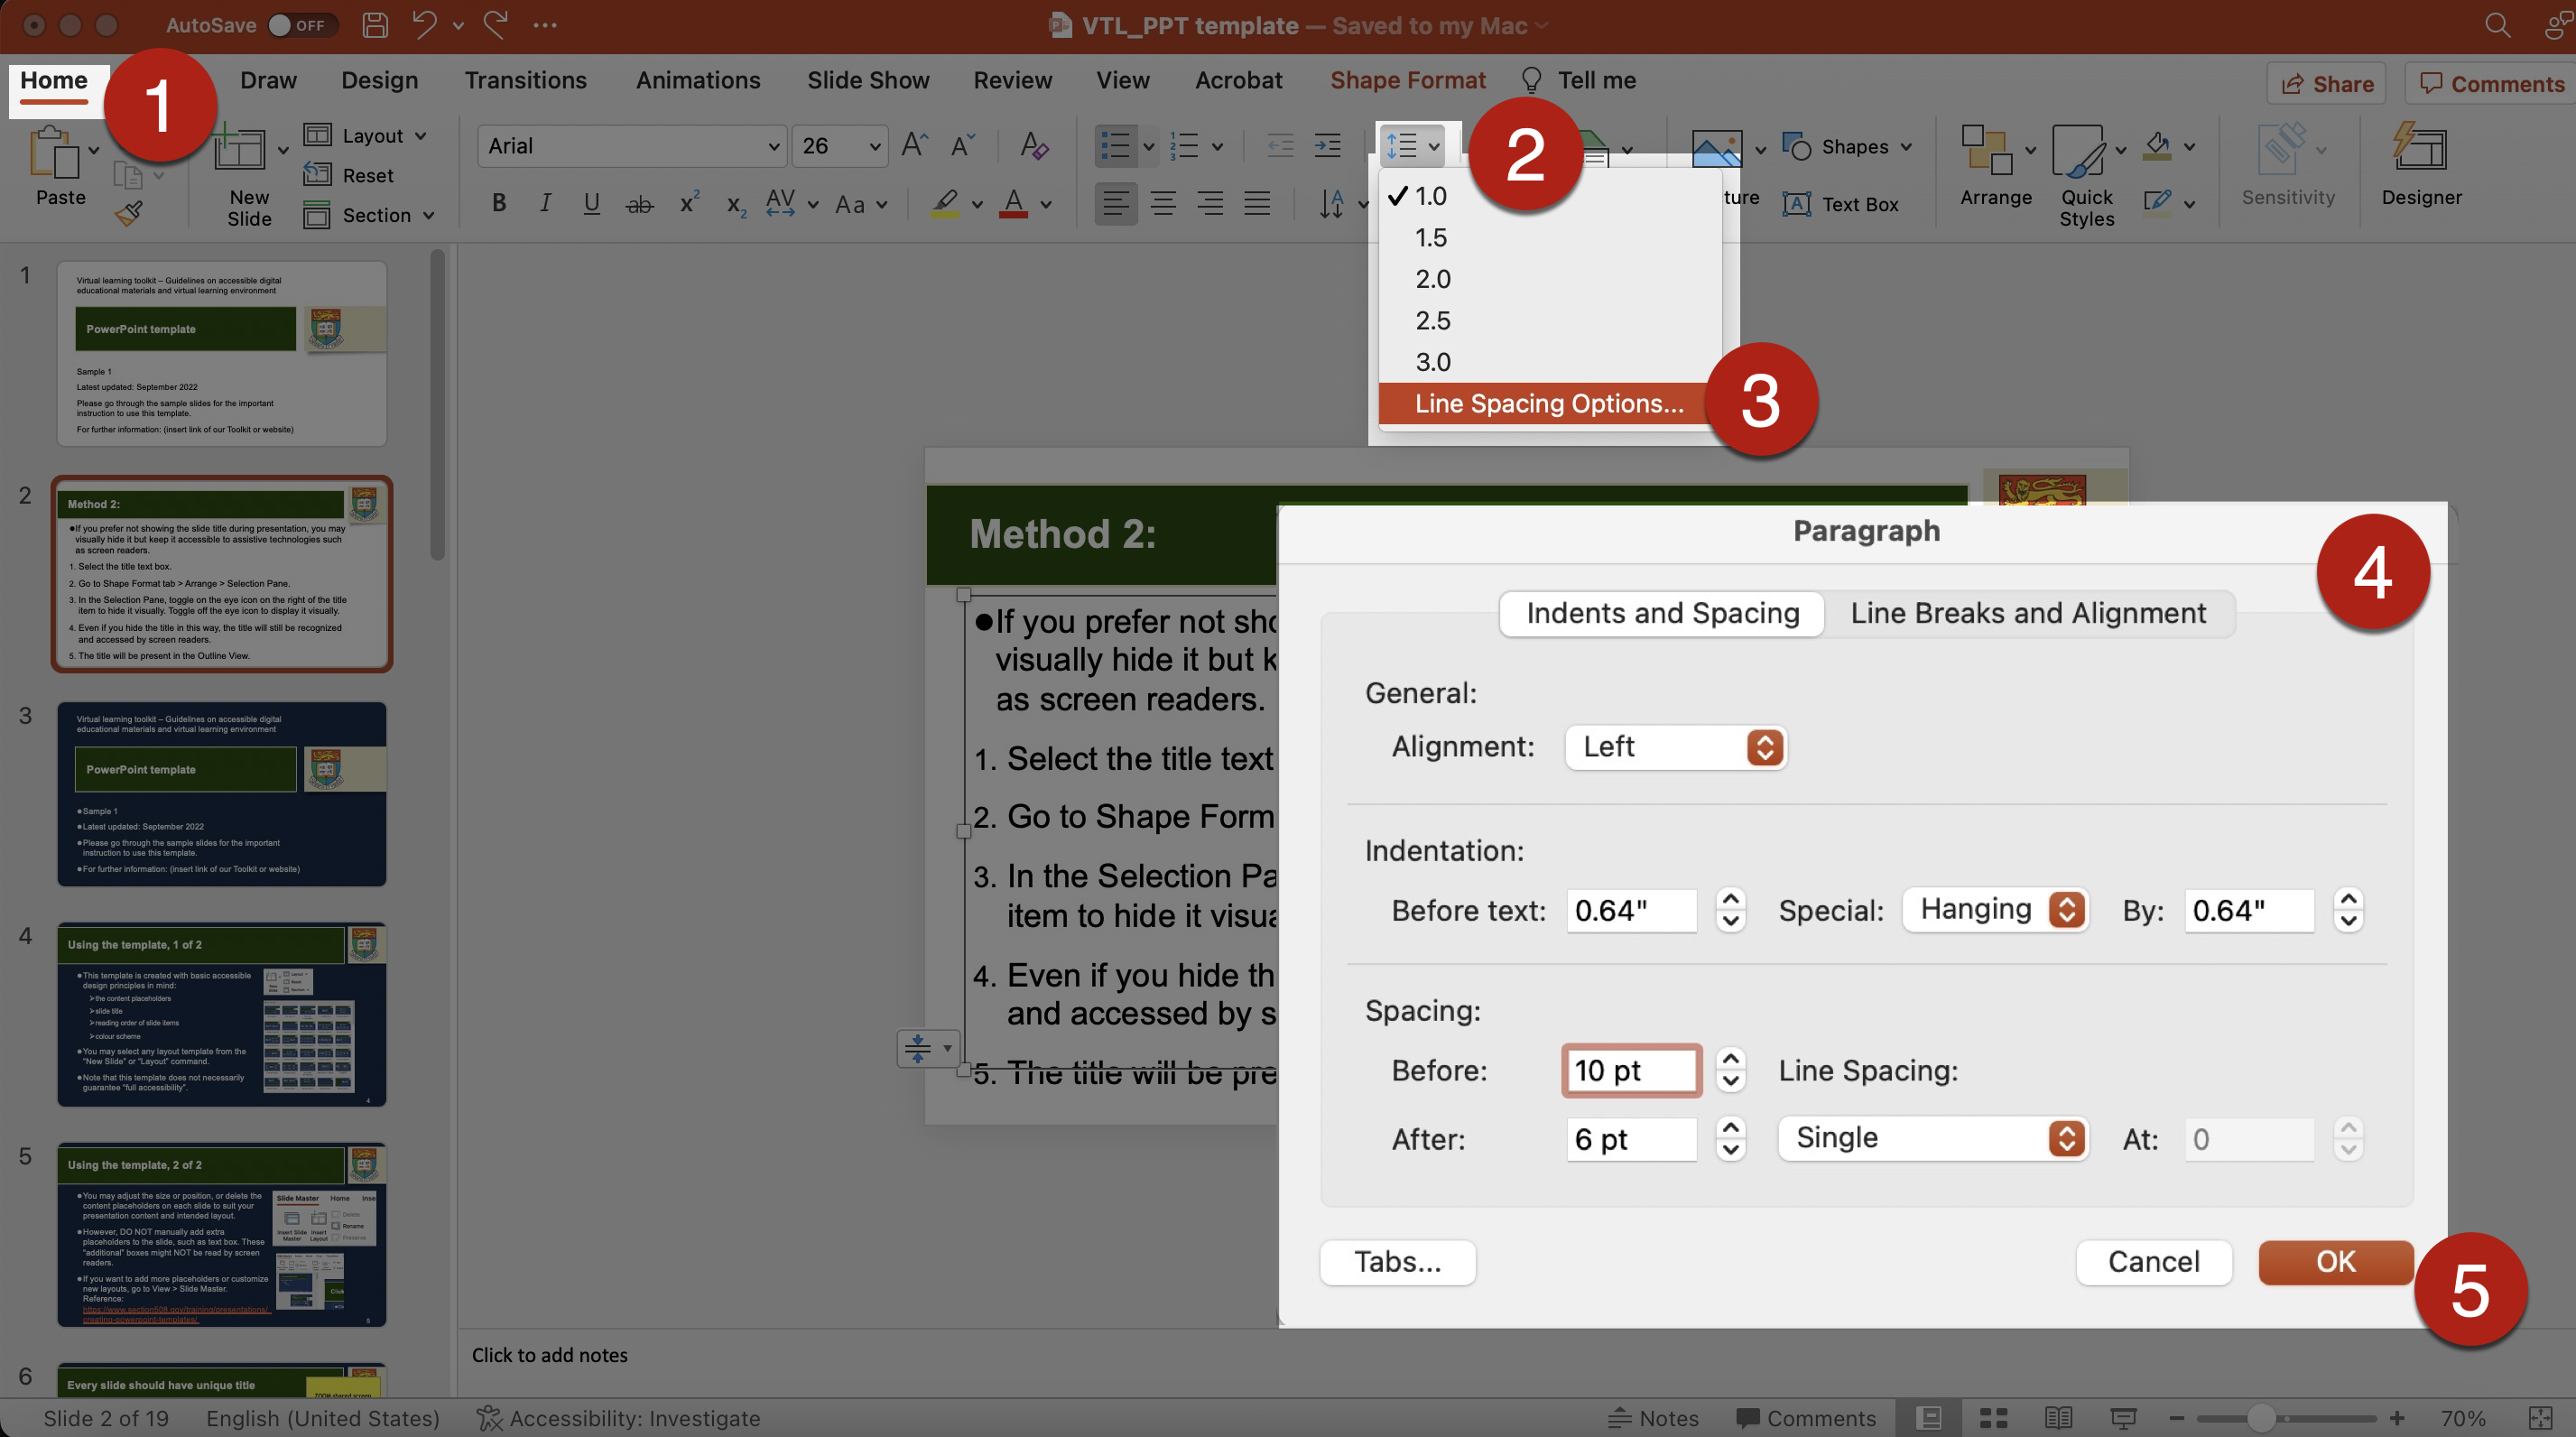
- To adjust line spacing and indentation, go to Home tab > Line and Paragraph Spacing > Select Line Spacing Options in the dropdown menu to open the Paragraph Adjust the line spacing and indentation of the text by the respective commands in the Paragraph dialog.
Use of tables
- Use tables for necessary data presentation only.
- Do not use table just for the purpose of formatting or layout.
- Screen readers cannot locate any header information or make sense of the information in each cell. Even if screen readers read out each cell, it does not provide meaningful information to the users.
- Even if you remove the grid lines of these table cells to make it invisible, it does not mean the table has really disappeared.
- References:
- Layout Table Linearization. WebAIM.
- Layout Tables. WebAIM.
- Use tables for necessary data presentation only, not for layout.
- If possible, present data in paragraphs with headings and avoid using tables. Consider providing both options to cater for different user preference.
- Use PowerPoint’s built-in functionality to insert and format tables.
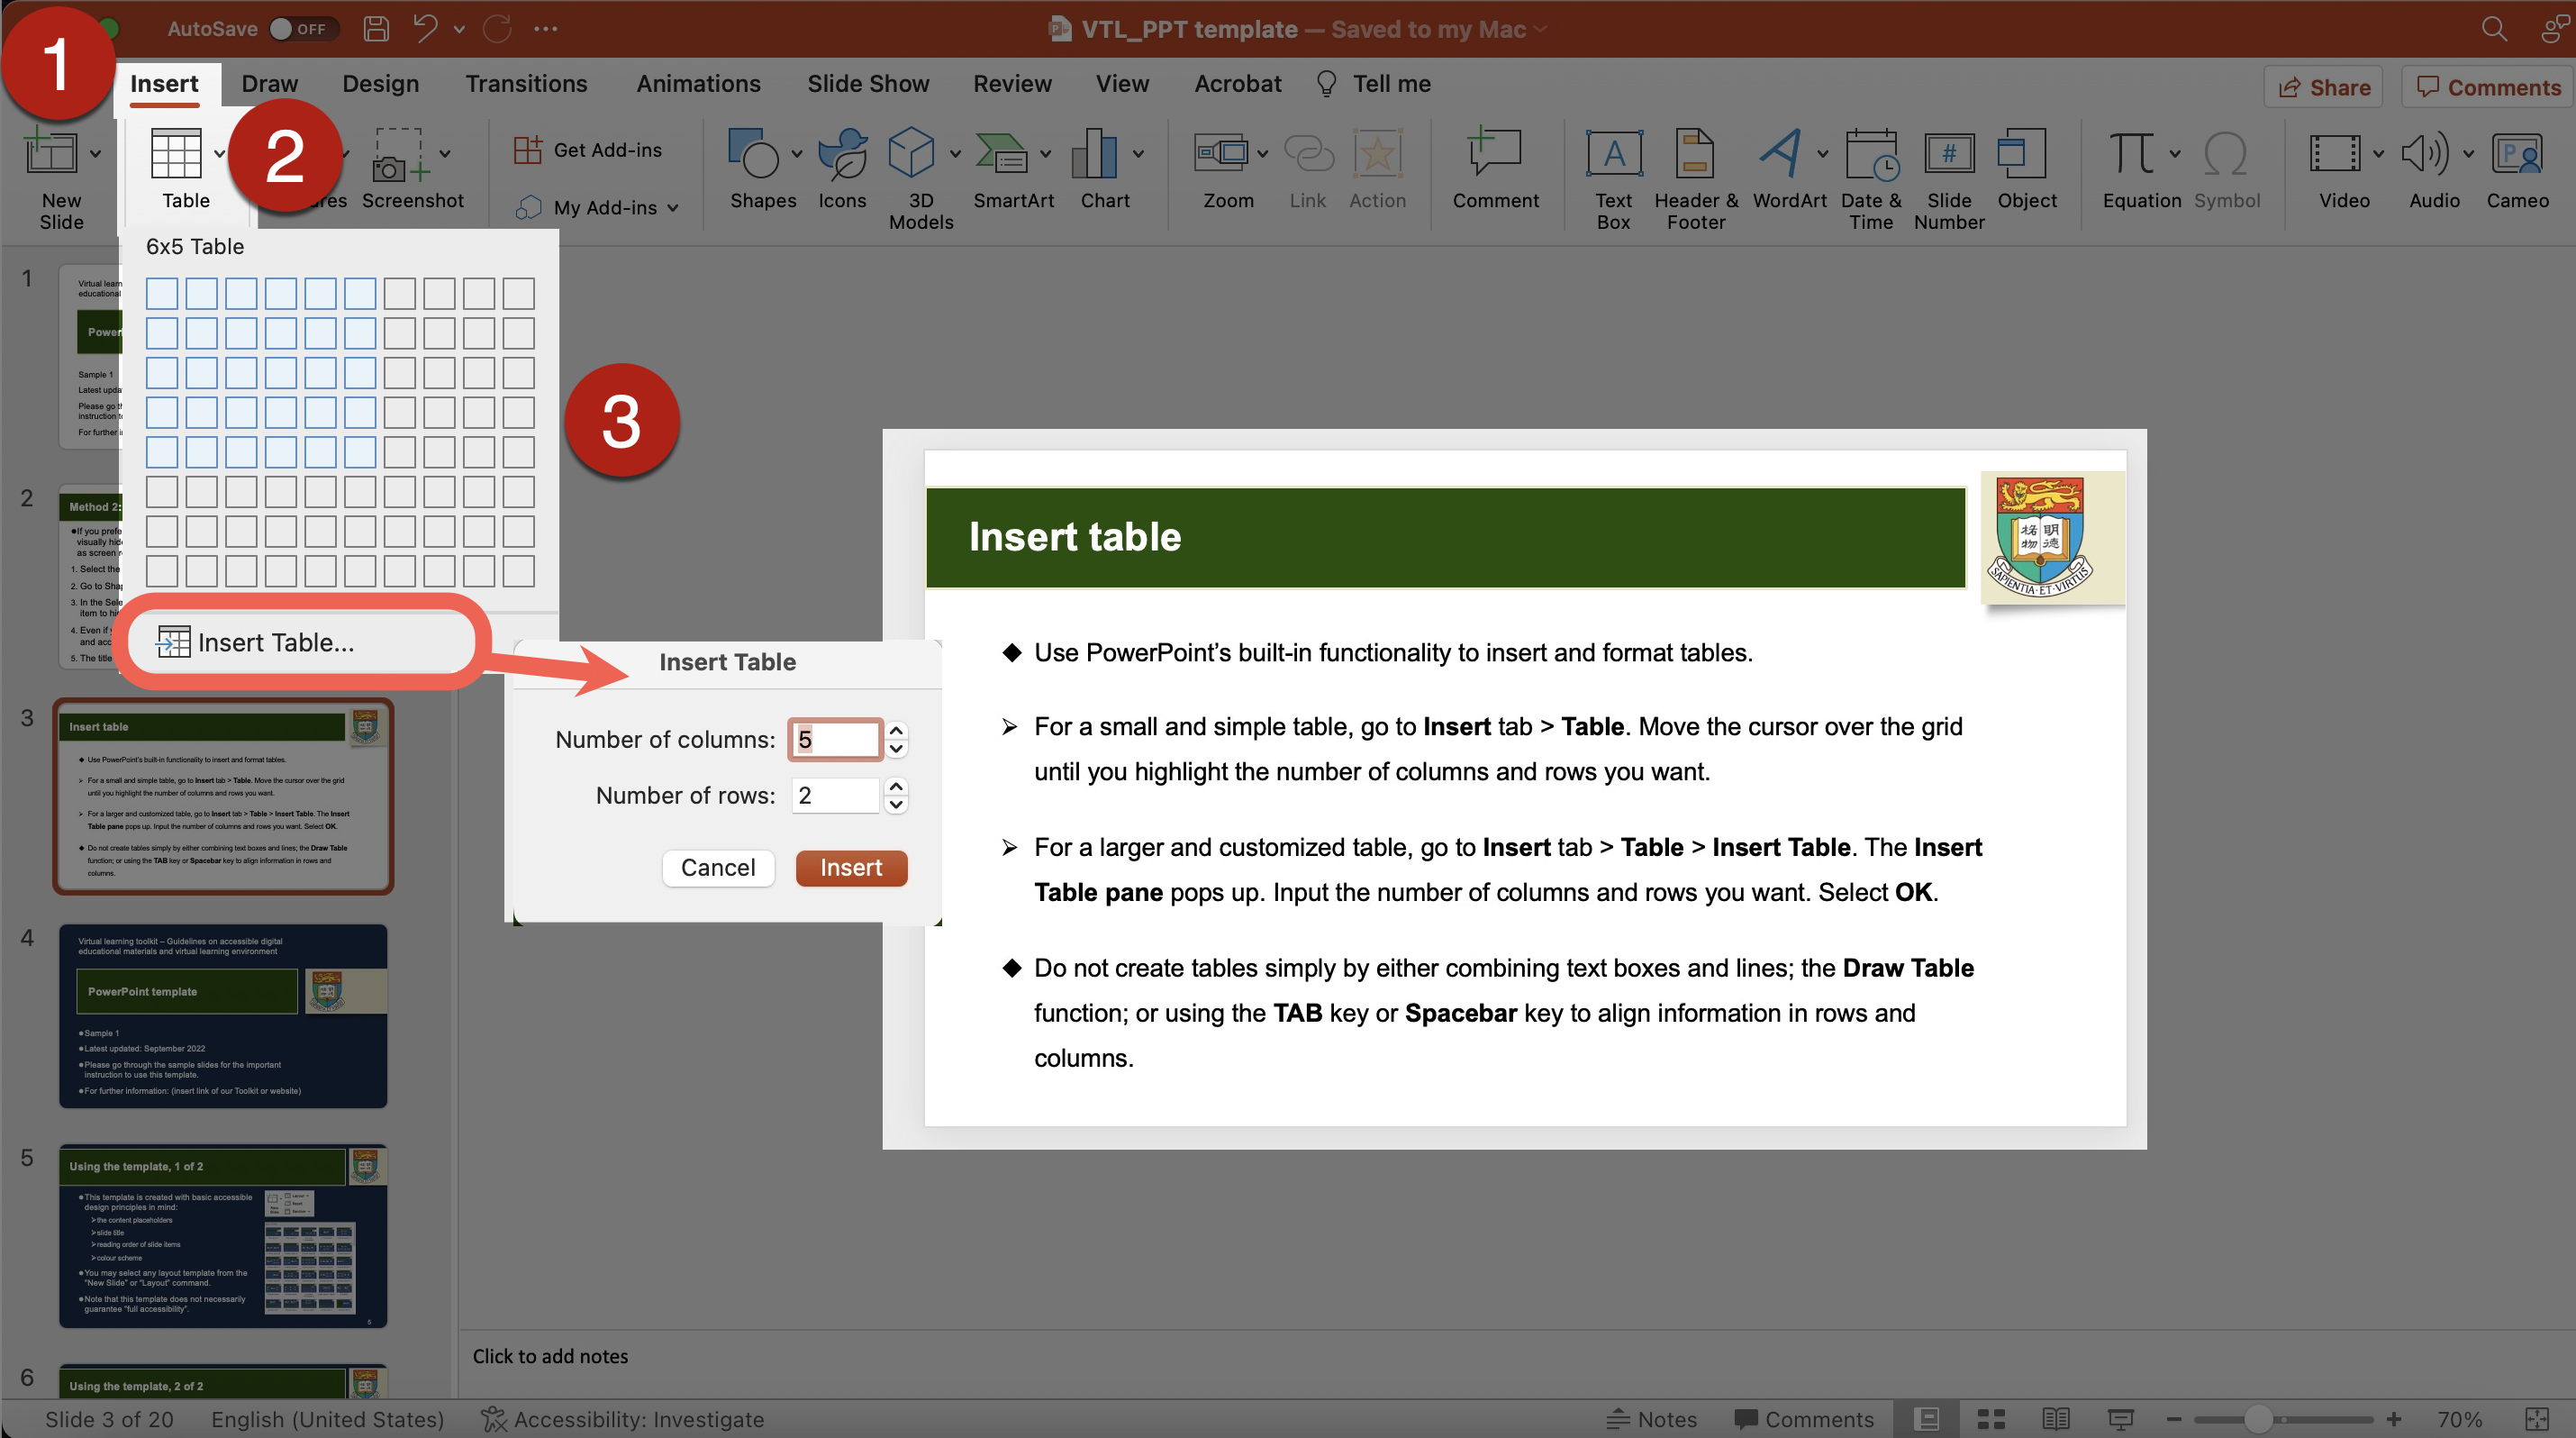
- For a small and simple table, go to Insert tab > Table. Move the cursor over the grid until you highlight the number of columns and rows you want.
- For a larger and customized table, go to Insert tab > Table > Insert Table. The Insert Table pane pops up. Input the number of columns and rows you want. Select OK.
- Do not create tables simply by either combining text boxes and lines; the Draw Table function; or using the TAB key or Spacebar key to align information in rows and columns.
- These methods may create a visual appearance of a “table”. However, screen readers cannot recognize it as truly a table with meaningful structure of columns and header rows. It makes screen readers difficult to understand how to read out the content. The visual appearance of such a “table” may also be distorted if some users magnify the document by increasing the text size.
- Avoid inserting tables as an image into the document. Images would be potentially inaccessible to assistive technologies. If image must be used, insert alternative text (“Alt Text”) to the image of the tables to make it more accessible to assistive technologies. Provide a more detailed text description of the image of the tables if needed.
- Provide title and summary of the table.
- Use the built-in function to add or remove the number of rows or columns. Do not draw grid lines manually to increase or remove rows or columns.
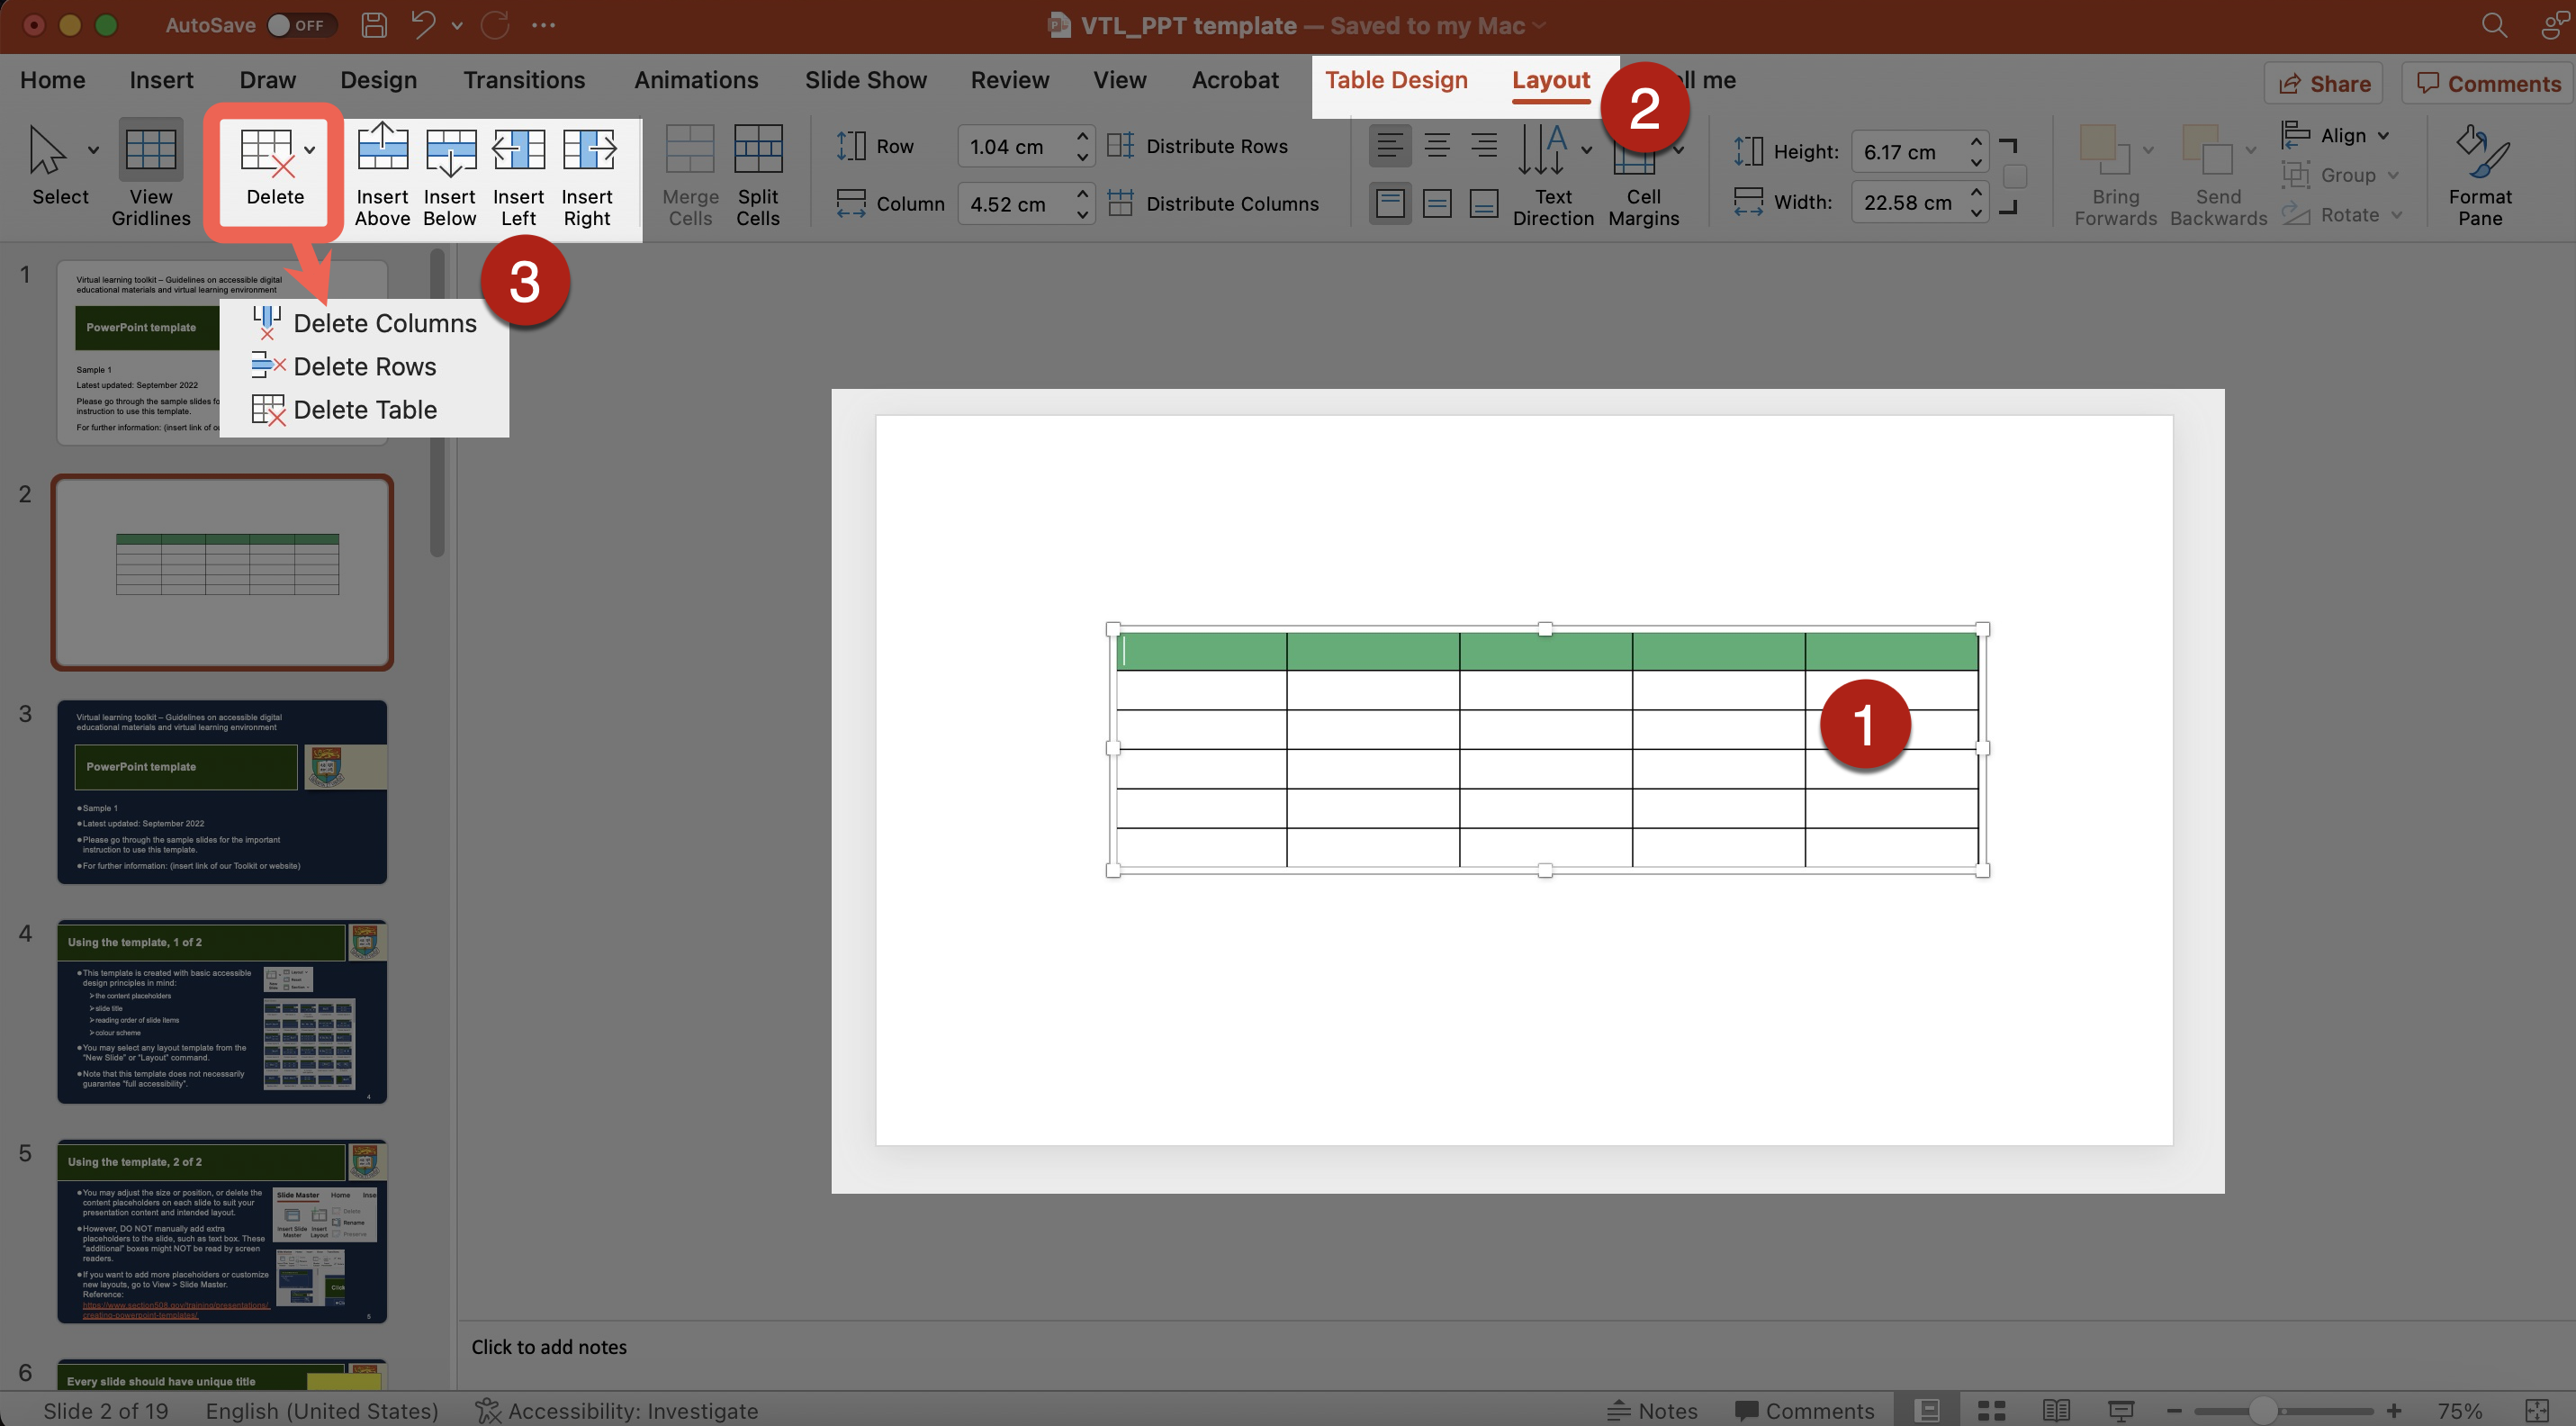
- To increase rows or columns: Select the table > Go to the Layout tab of the Table Tools > Make use of the commands Insert Above and Insert Below to add rows; and the commands Insert Left and Insert Right to add columns.
- To remove rows or columns: Select the table > Go to the Layout tab of the Table Tools > Make use of the commands Delete Columns or Delete Rows to remove rows or columns.
- Do not use merged, split, nested, or multiple headings. Use simple tables, if possible.
- These designs make screen readers lose count of the number of rows and columns and cannot read out meaningful information from the table.
- Screen readers count the number of columns and rows, locate the header information. Screen readers read the information in each cell one by one from left to right, and from the top to the bottom.
- Avoid blank cells. Screen readers may assume there is nothing more in the table. It can be confusing.
- If you include the blank cells on purpose, consider mentioning the purpose of those blank cells in the slides to let more users understand it.
- Use some text or symbols to clearly indicate cells that are intentionally left blank. It let users, whether using screen readers or not, know whether the blank cells are intentionally left blank or accidentally missing data. It is also a recommended practice of data cleaning in research. Examples: “No data”, “Intentionally left blank”, “n/a”, “Missing data”.
- If you include the blank cells on purpose, you may mention the purpose in the Alt Text of the table or the body text to let screen readers understand it.
- Check the reading order of the table by pressing only the TAB key starting from the top left cell. Assistive technologies such as screen readers read the information in each cell one by one from left to right, and from the top to the bottom. Tables should follow such a logical reading order from left to right, top to bottom.
- Ensure sufficient colour contrast of the table design.
- Be aware that the default colour scheme for tables may not provide sufficient colour contrast.
- Ensure sufficient colour contrast between the background colour of the table cells and the colour of the text in each cell.
- Do not use only coloured text to present information.
- For example, a red “X” and a green “X” are used to represent “Compulsory lecture” and “Optional class” in the table, respectively. However, some users such as people with colour blindness may be unable to differentiate the red “X” and the green “X”. A more accessible method can be using both colour and descriptive text in the table, such as “Compulsory lecture” and “Optional class”, respectively.
- Always specify the header row of a table.
- Sighted users may be able to identify row and column headers based on the visual presentation of the table. However, screen readers need the header information to identify rows and columns. Screen readers can further count and read aloud the number of columns and rows. Then, screen readers can read the information in each cell one by one from left to right, and from the top to the bottom.
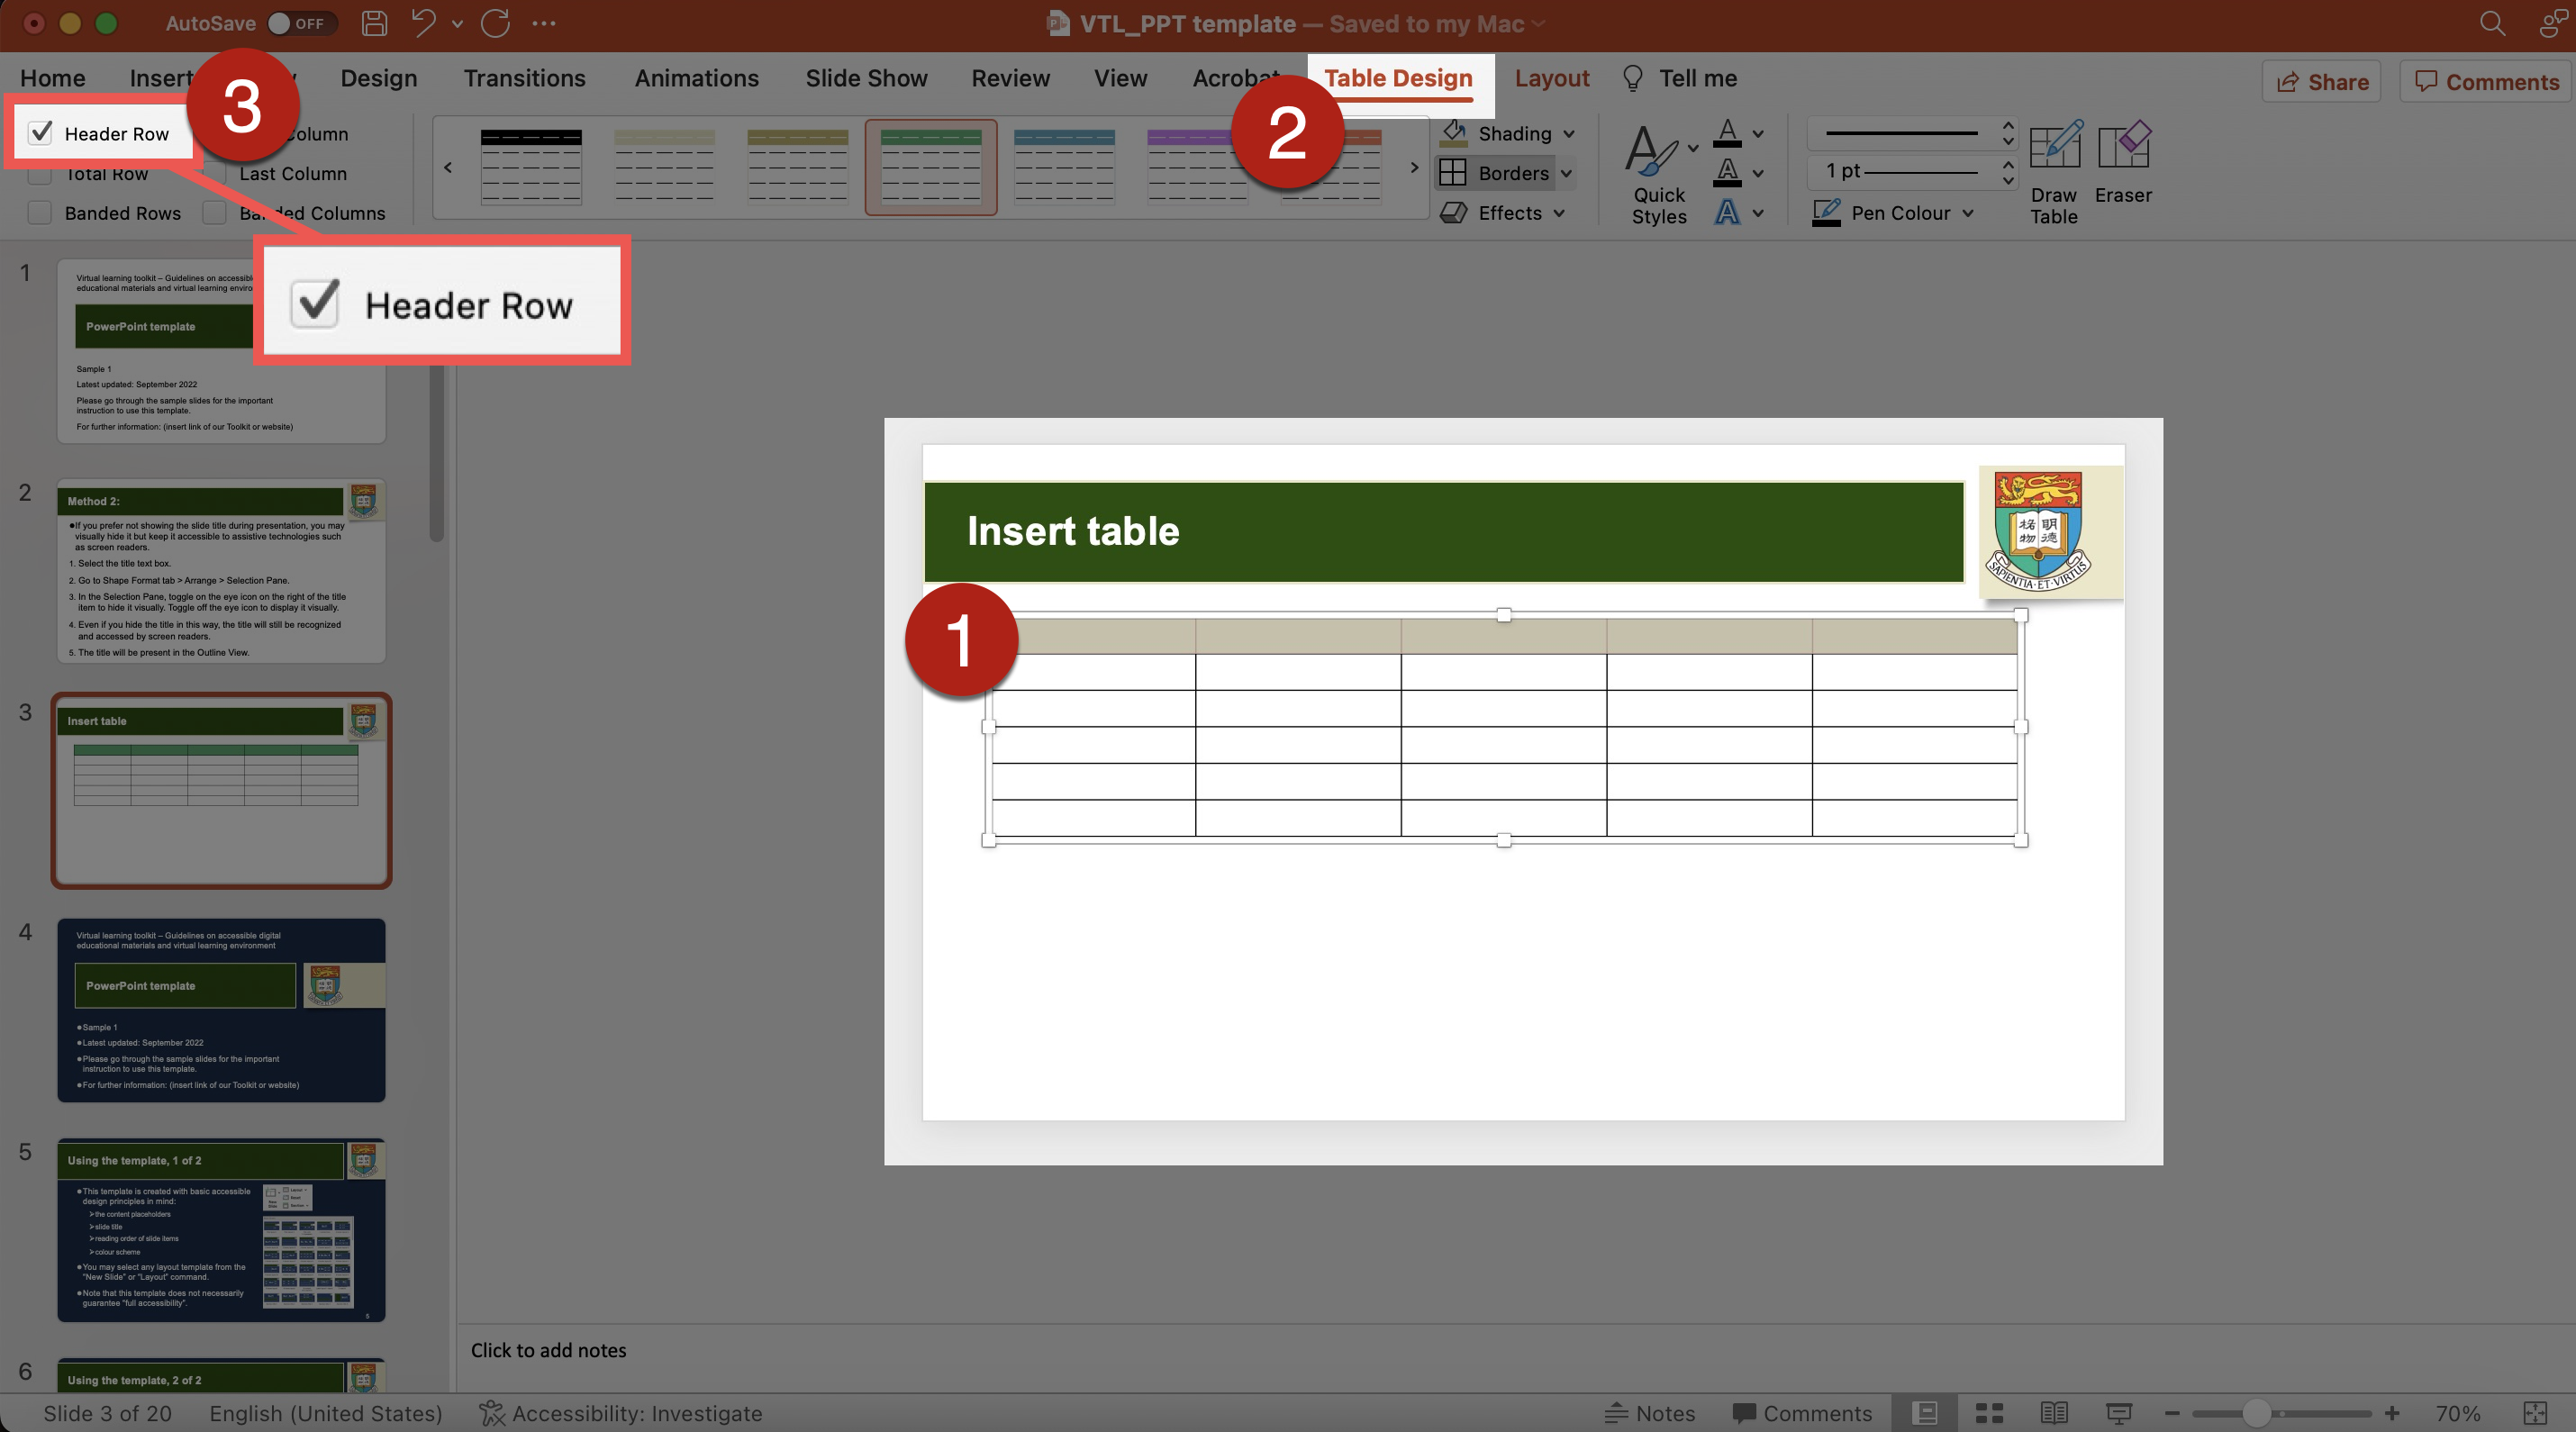
- To specify header row, highlight the header row of the table > go to Table Design tab > select the option Header Row. The first row should be the column header. The first column should be the row header.
- Do not specify header row by manually formatting the cells and texts of the first row, e.g., using bold and larger text. While it may create a visual appearance of “header”, screen readers cannot identify it as truly a header.
Use of colours
- Make sure to check colour contrast. Content with sufficient colour contrast is easier for everyone to read. Content without sufficient colour contrast would be inaccessible to some users, particularly:
- People who are colour blind;
- People with visual impairment;
- People viewing the slides through monitors in bright sunlight or glare;
- People viewing the slides through a projector display in a well-lit venue.
- Make use of software applications to check colour contrast. There is a number of colour contrast checkers that are free-of-charge.
- Colour contrast is checked against the Web Content Accessibility Guidelines (WCAG) using these checkers. Enter the colours of the background and foreground (e.g., text), respectively. These checkers generally allow multiple methods of entering colours, such as the colour picker tool, RGB colour codes, or hex colour codes. The colour picker is particularly useful to users who are unfamiliar with colour codes. Then, the checkers will tell whether this colour combination would fulfil or fail the colour contrast requirements based on the WCAG Guidelines. If it fails, then it might suggest that we need to consider changing the colour of either the background or the foreground colours, or both. Otherwise, this colour combination might not be visually accessible to some readers. After we change the colours, re-do the check, until you get a combination that fulfils the accessibility requirement.
- Examples of colour contrast checkers that are free-of-charge:
- WebAIM Contrast Checker: An online checker.
- WebAIM Link Contrast Checker: An online checker. It helps check the colour contrast between the link text, the surrounding body text, and the background colour.
- Colour Contrast Analyser (CCA) from TPGi: It needs to be downloaded onto your computer, available for both Windows and Mac. It also provides a Color Blindness Simulator.
- Adobe Colour Contrast Analyzer: An online checker. You may input the text colour and background colour values or upload a screenshot of your project to pick the colours you want to check for contrast. It will also recommend colours that would give better contrast. In the Accessibility Tools tab of the Adobe Colour Contrast Analyzer, apart from general colour contrast checker, you can choose the Colour Blind Safe Checker to check whether the colour theme or palette would be accessible for people with colour blindness.
- Ensure sufficient colour contrast between the link text and its surrounding body text. Ensure the colours of the not-yet-visited hyperlinks and visited hyperlinks show sufficient contrast against the background colours, respectively.
- An example of online checker for link texts: WebAIM Link Contrast Checker.
- Do not use “colour-on-colour” background and text, such as light blue text on dark blue background. An example of exceptional case is the use of “hidden text”.
- Check whether the slides are readable and the coloured text or diagrams are properly displayed in grayscale. It is useful and important practice because many students would print out PowerPoint slides as handouts in black-and-white.
- Check whether the slides are readable and the coloured text or diagrams are properly displayed in grayscale. It is useful and important practice because many students would print out PowerPoint slides as handouts in black-and-white.
- Examples of colour filters for checking grayscale display:
- Windows Built-in colour filters: Go to Start > Settings > Ease of Access > Colour Filters. Switch on the toggle for colour filters.
- PowerPoint in Windows: Go to Select View > Grayscale or Black and White.
- Mac Built-in colour filter: Go to Apple menu > System Preferences > Accessibility > Display > Colour Filters > Enable Colour Filters > Select Grayscale in the dropdown menu. Then, the grayscale filter will be applied to the entire screen.
- PowerPoint in Mac: Go to File > Print. In the Output dropdown menu, select Grayscale or Black and White. Then, you can view the slides in grayscale or black-and-white in the Print Panel.
- Try selecting the other colour filters in the dropdown menu to view the document in simulated colour blindness situations. Fix any parts in the document that do not present the intended meanings under colour filters.
- Examples of colour filters for checking grayscale display:
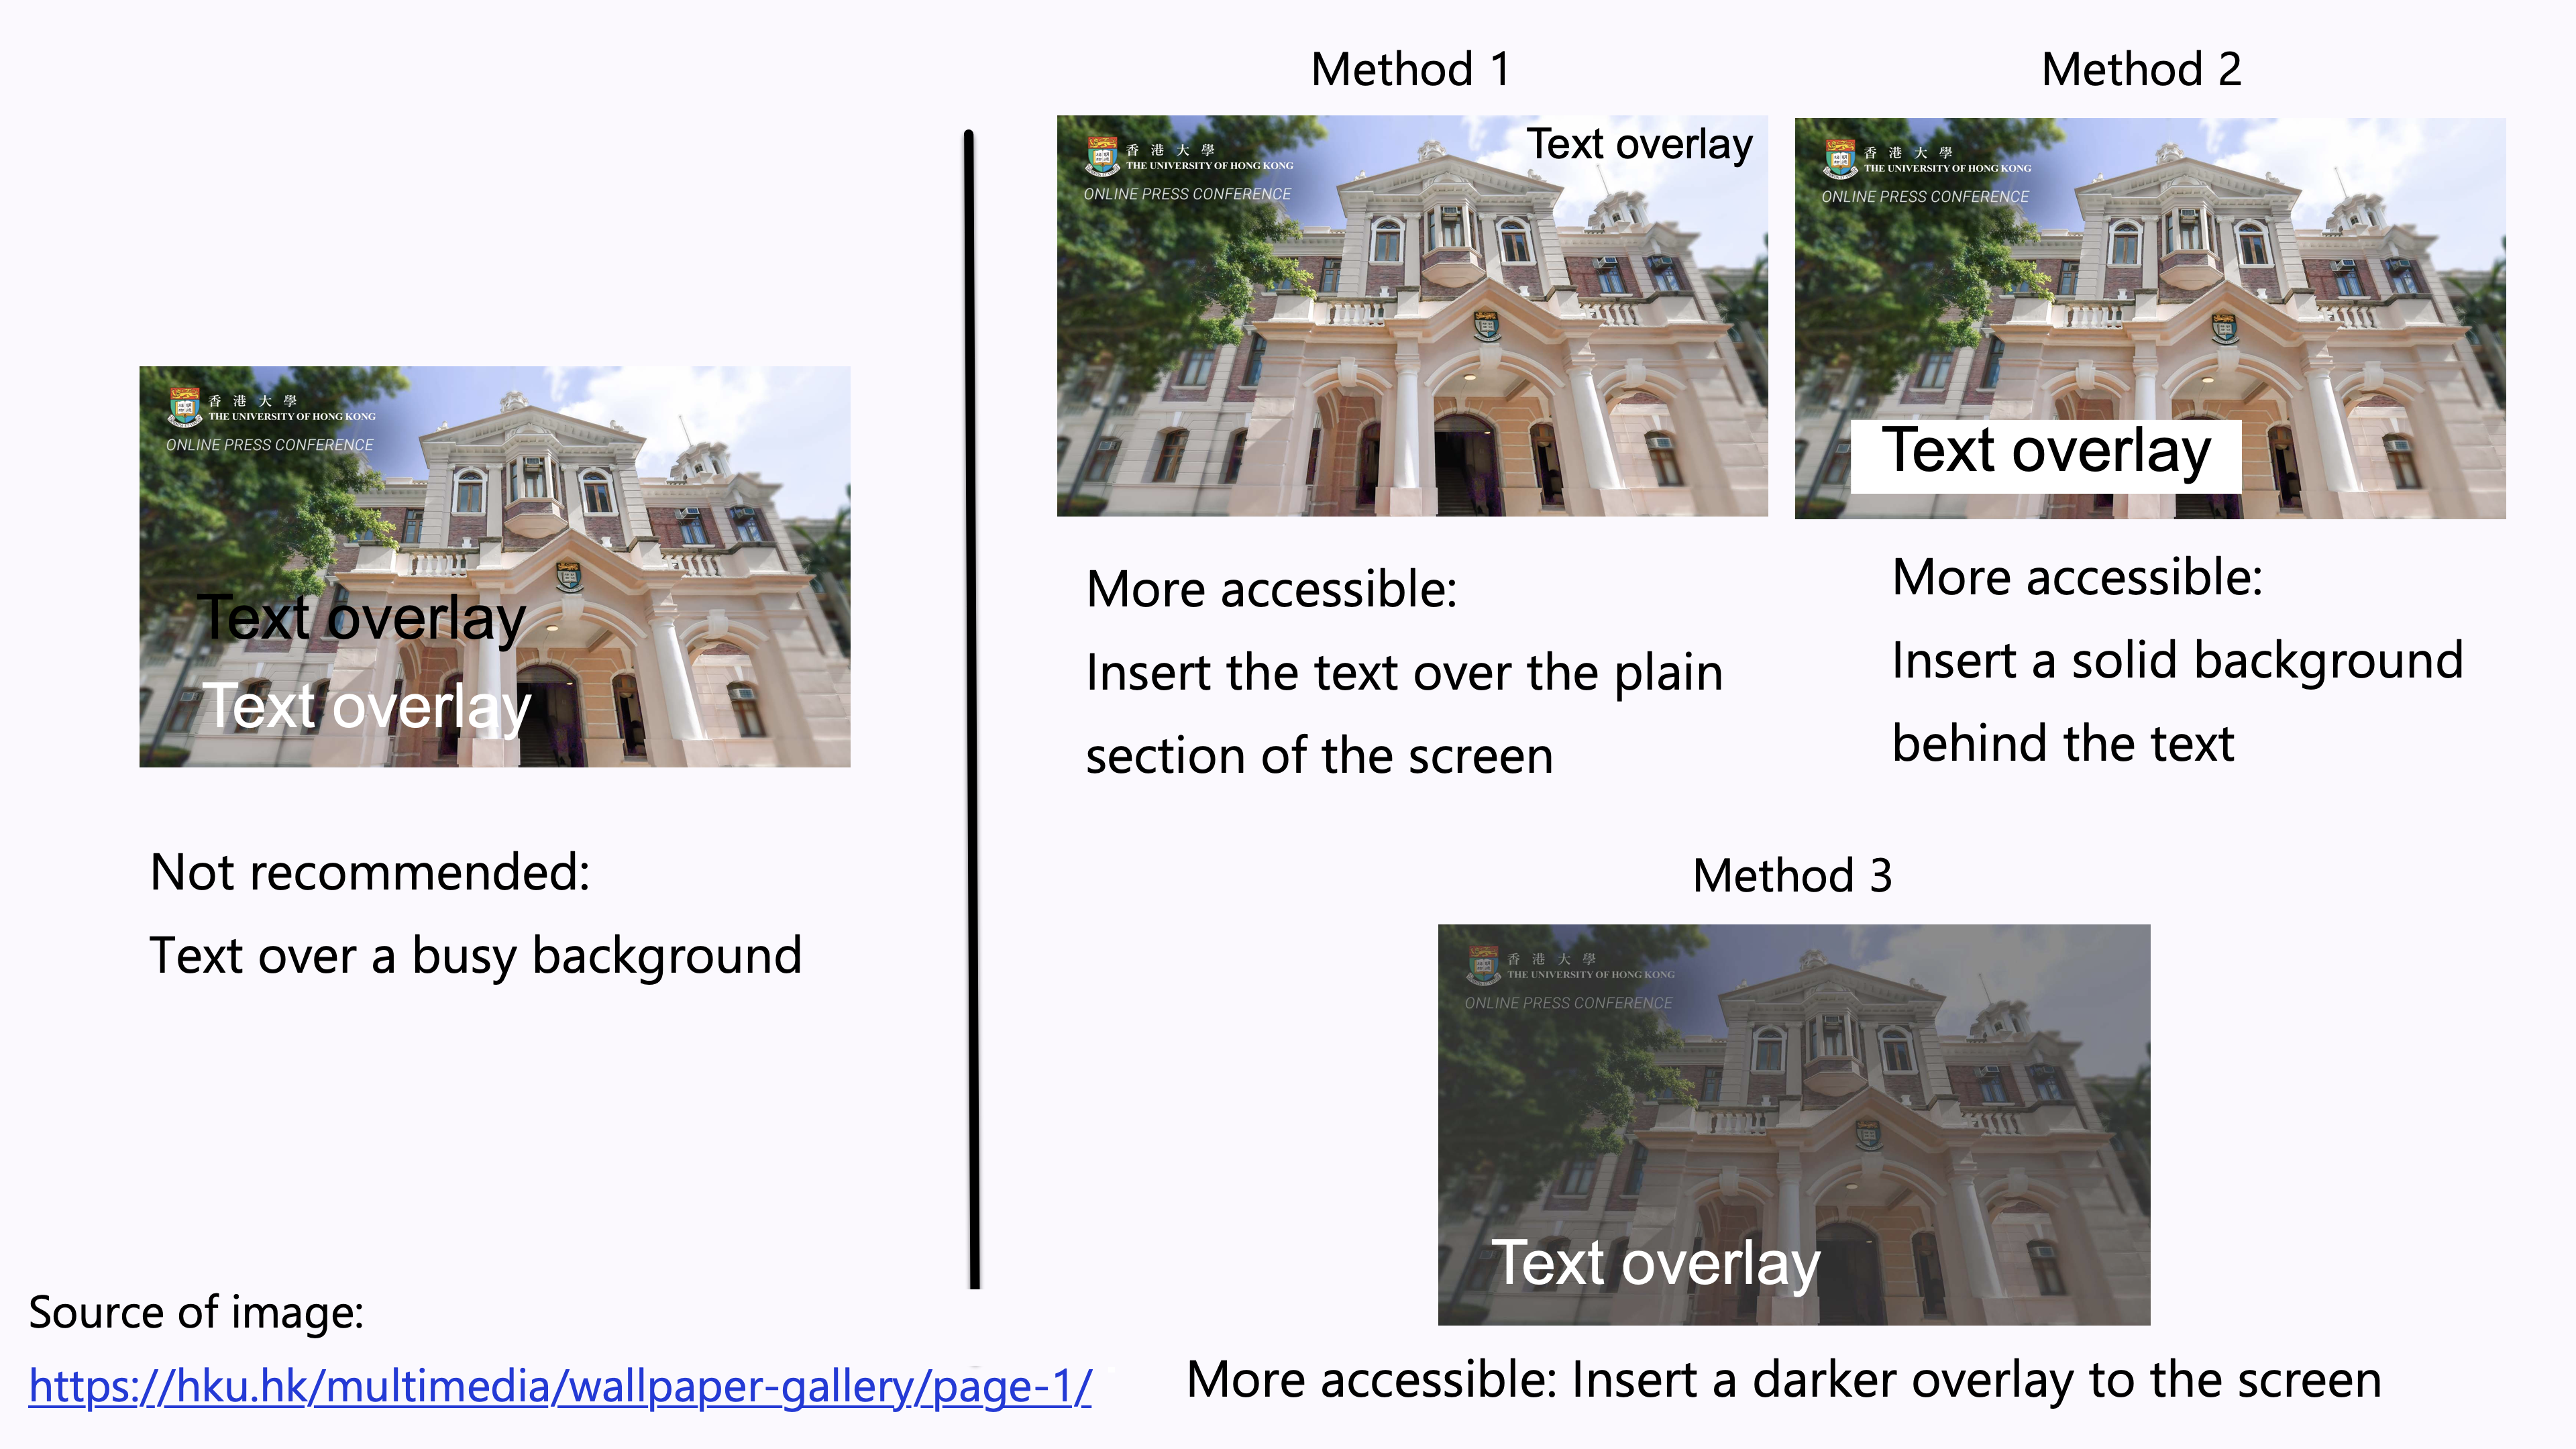
- Avoid overlay text on a busy background.
- Images usually consist of a wide range of colours. It could be difficult to ensure sufficient contrast between the colours in the background image and the text. It is difficult to read the overlaid text.
- Examples of increasing the accessibility of the text overlay:
- Method 1: Insert the text over the plain section of the photo. Ensure sufficient colour contrast between that section and the text.
- Method 2: Insert a solid background behind the text. Ensure sufficient colour contrast between the solid background and the text.
- Method 3: Insert a darker overlay to the image to increase the colour contrast between the background and the text.
- People with colour blindness, low contrast sensitivity, or some visual impairment, may have difficulty distinguishing between certain colours. Therefore, using colour as the only visual cue to convey important information could hinder understanding of the document content.
- For example, a red “X” and a green “X” are used to represent “Compulsory lecture” and “Optional class” in the table, respectively. However, some users such as people with colour blindness may be unable to differentiate the red “X” and the green “X”. Users who print out the slides in grayscale may also be unable to differentiate the colours.
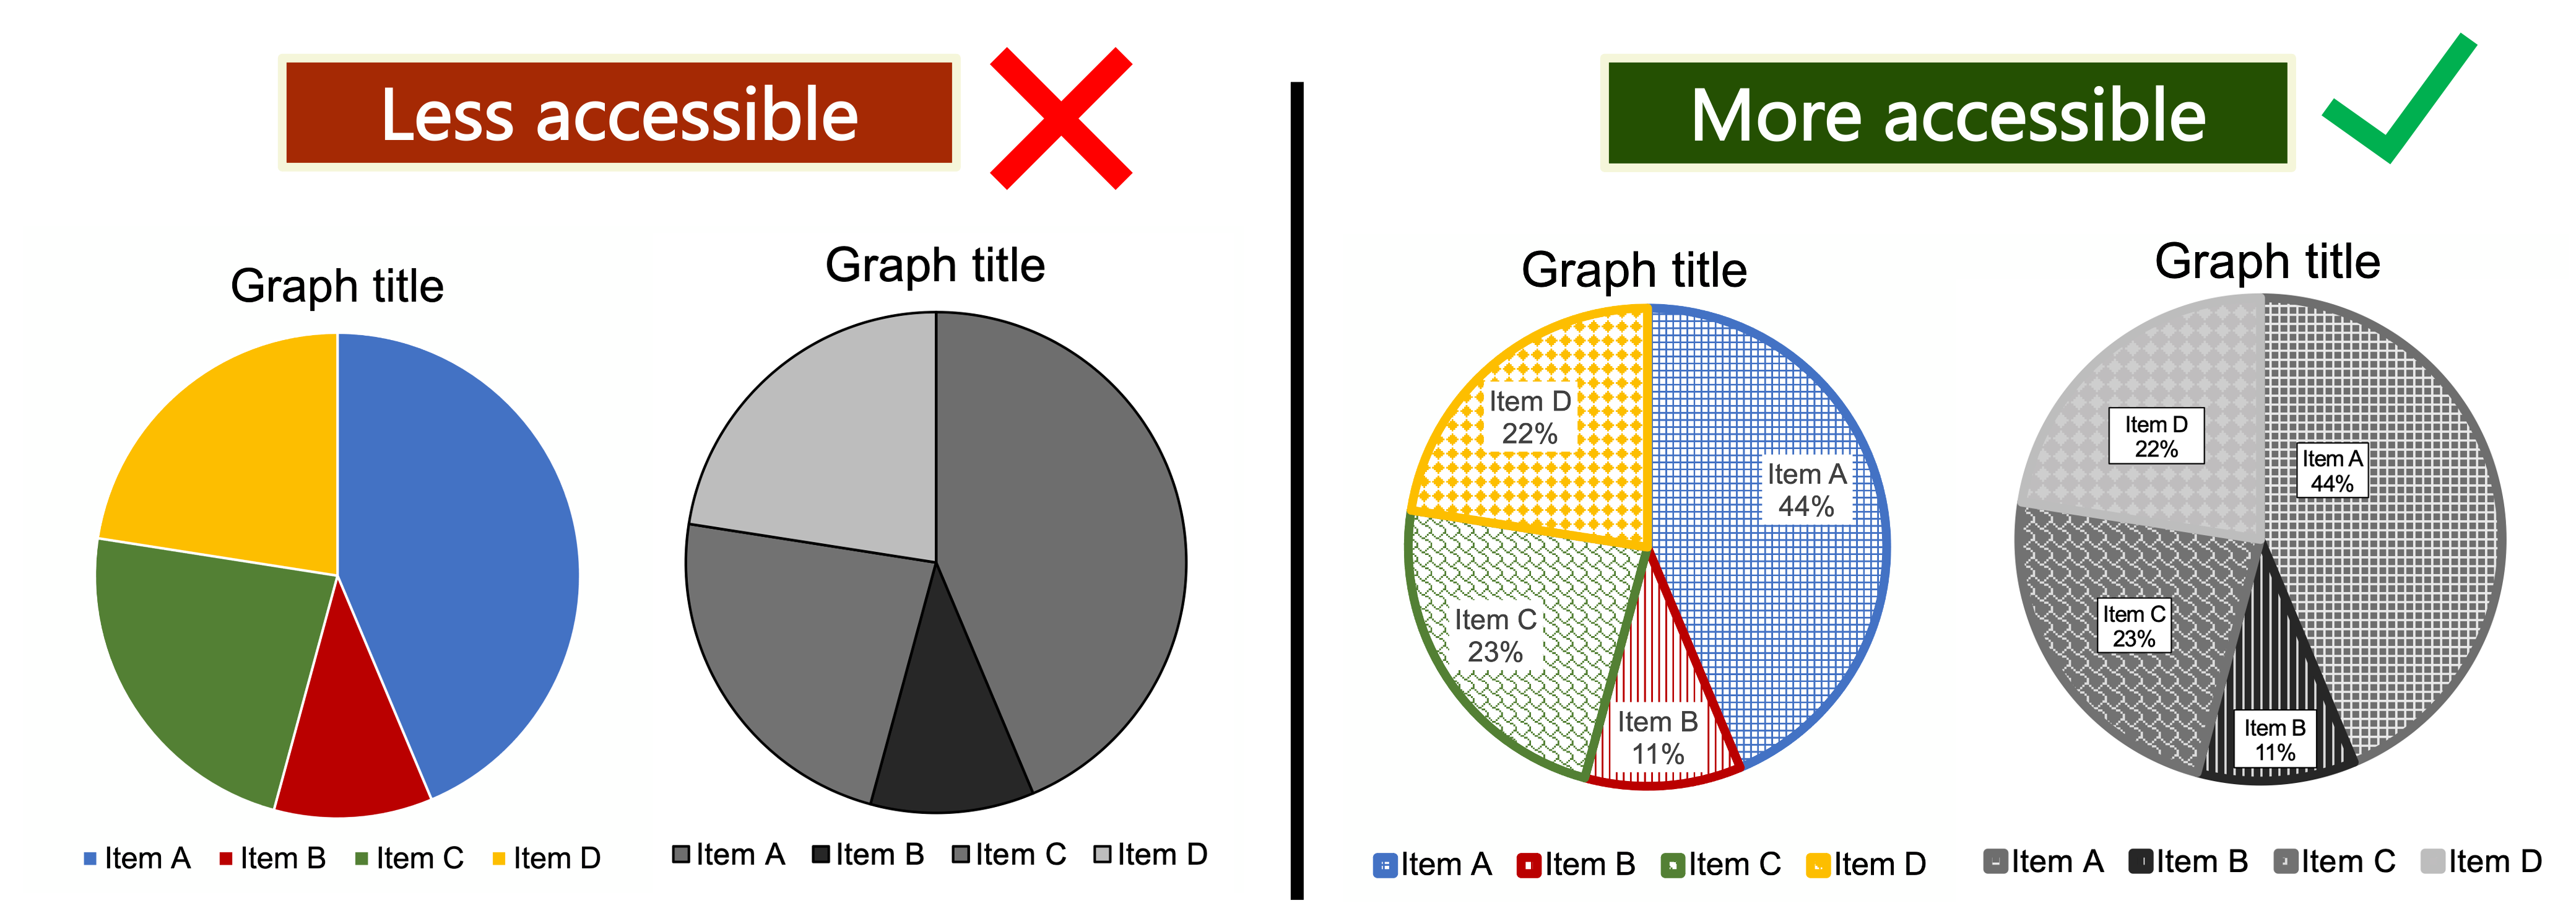
- To enhance accessibility, use multiple visual cues to present information to enhance accessibility to wider range of users, especially graphics, tables, and charts, such as colour, pattern fill, line style (e.g., solid, or dotted lines), data labels, text description, and/or legend.
- Example 1: Use both colour and descriptive text in the table, such as “Compulsory lecture” and “Optional class”, respectively.
- Example 2: Use colour, pattern, and text labels, to identify each pie section of pie charts. Put the text labels near or directly on the corresponding pie section to enable readers to understand the chart clearly. Do not put all the text labels below the chart.
- References: Charts & Accessibility. Pennsylvania State University
- More examples of using multiple visual cues to present information in a more accessible way.
Audio-visual content
- Alternative text (“Alt Text”) concisely describes the content and the purposes of the graphical content in brief phrases or 1-2 sentences. Examples of graphical content include photos, shapes, pictures, charts, SmartArt, and graphics. Be aware that SmartArt requires Alt Text and assistive technologies such as screen readers may not be able to read the text on SmartArt.
- Alt Text enables users of assistive technologies to understand graphical content. When screen readers recognize an image with Alt Text, screen readers will read “Image” or “Graphic” followed by reading the associated Alt Text.
- Sighted users generally do not see the Alt Text. However, when images do not load successfully and/or the browsers block images by default, Alt Text of that image may display to let users know what the image is about. Sighted users would also see the Alt Text under this situation even if they are not using assistive technologies.
- To insert Alt Text:
- Select the graphical content, go to Picture Format tab > Alt Text. The Alt Text Pane opens for inputting the Alt Text.
- Sometimes, a description is auto-generated but it might not be accurate. Remove this auto-generated descriptive and input your own Alt Text.
- Do not select the Generate alt text for me command in the Alt Text Pane. The automatically generated description may not be accurate.
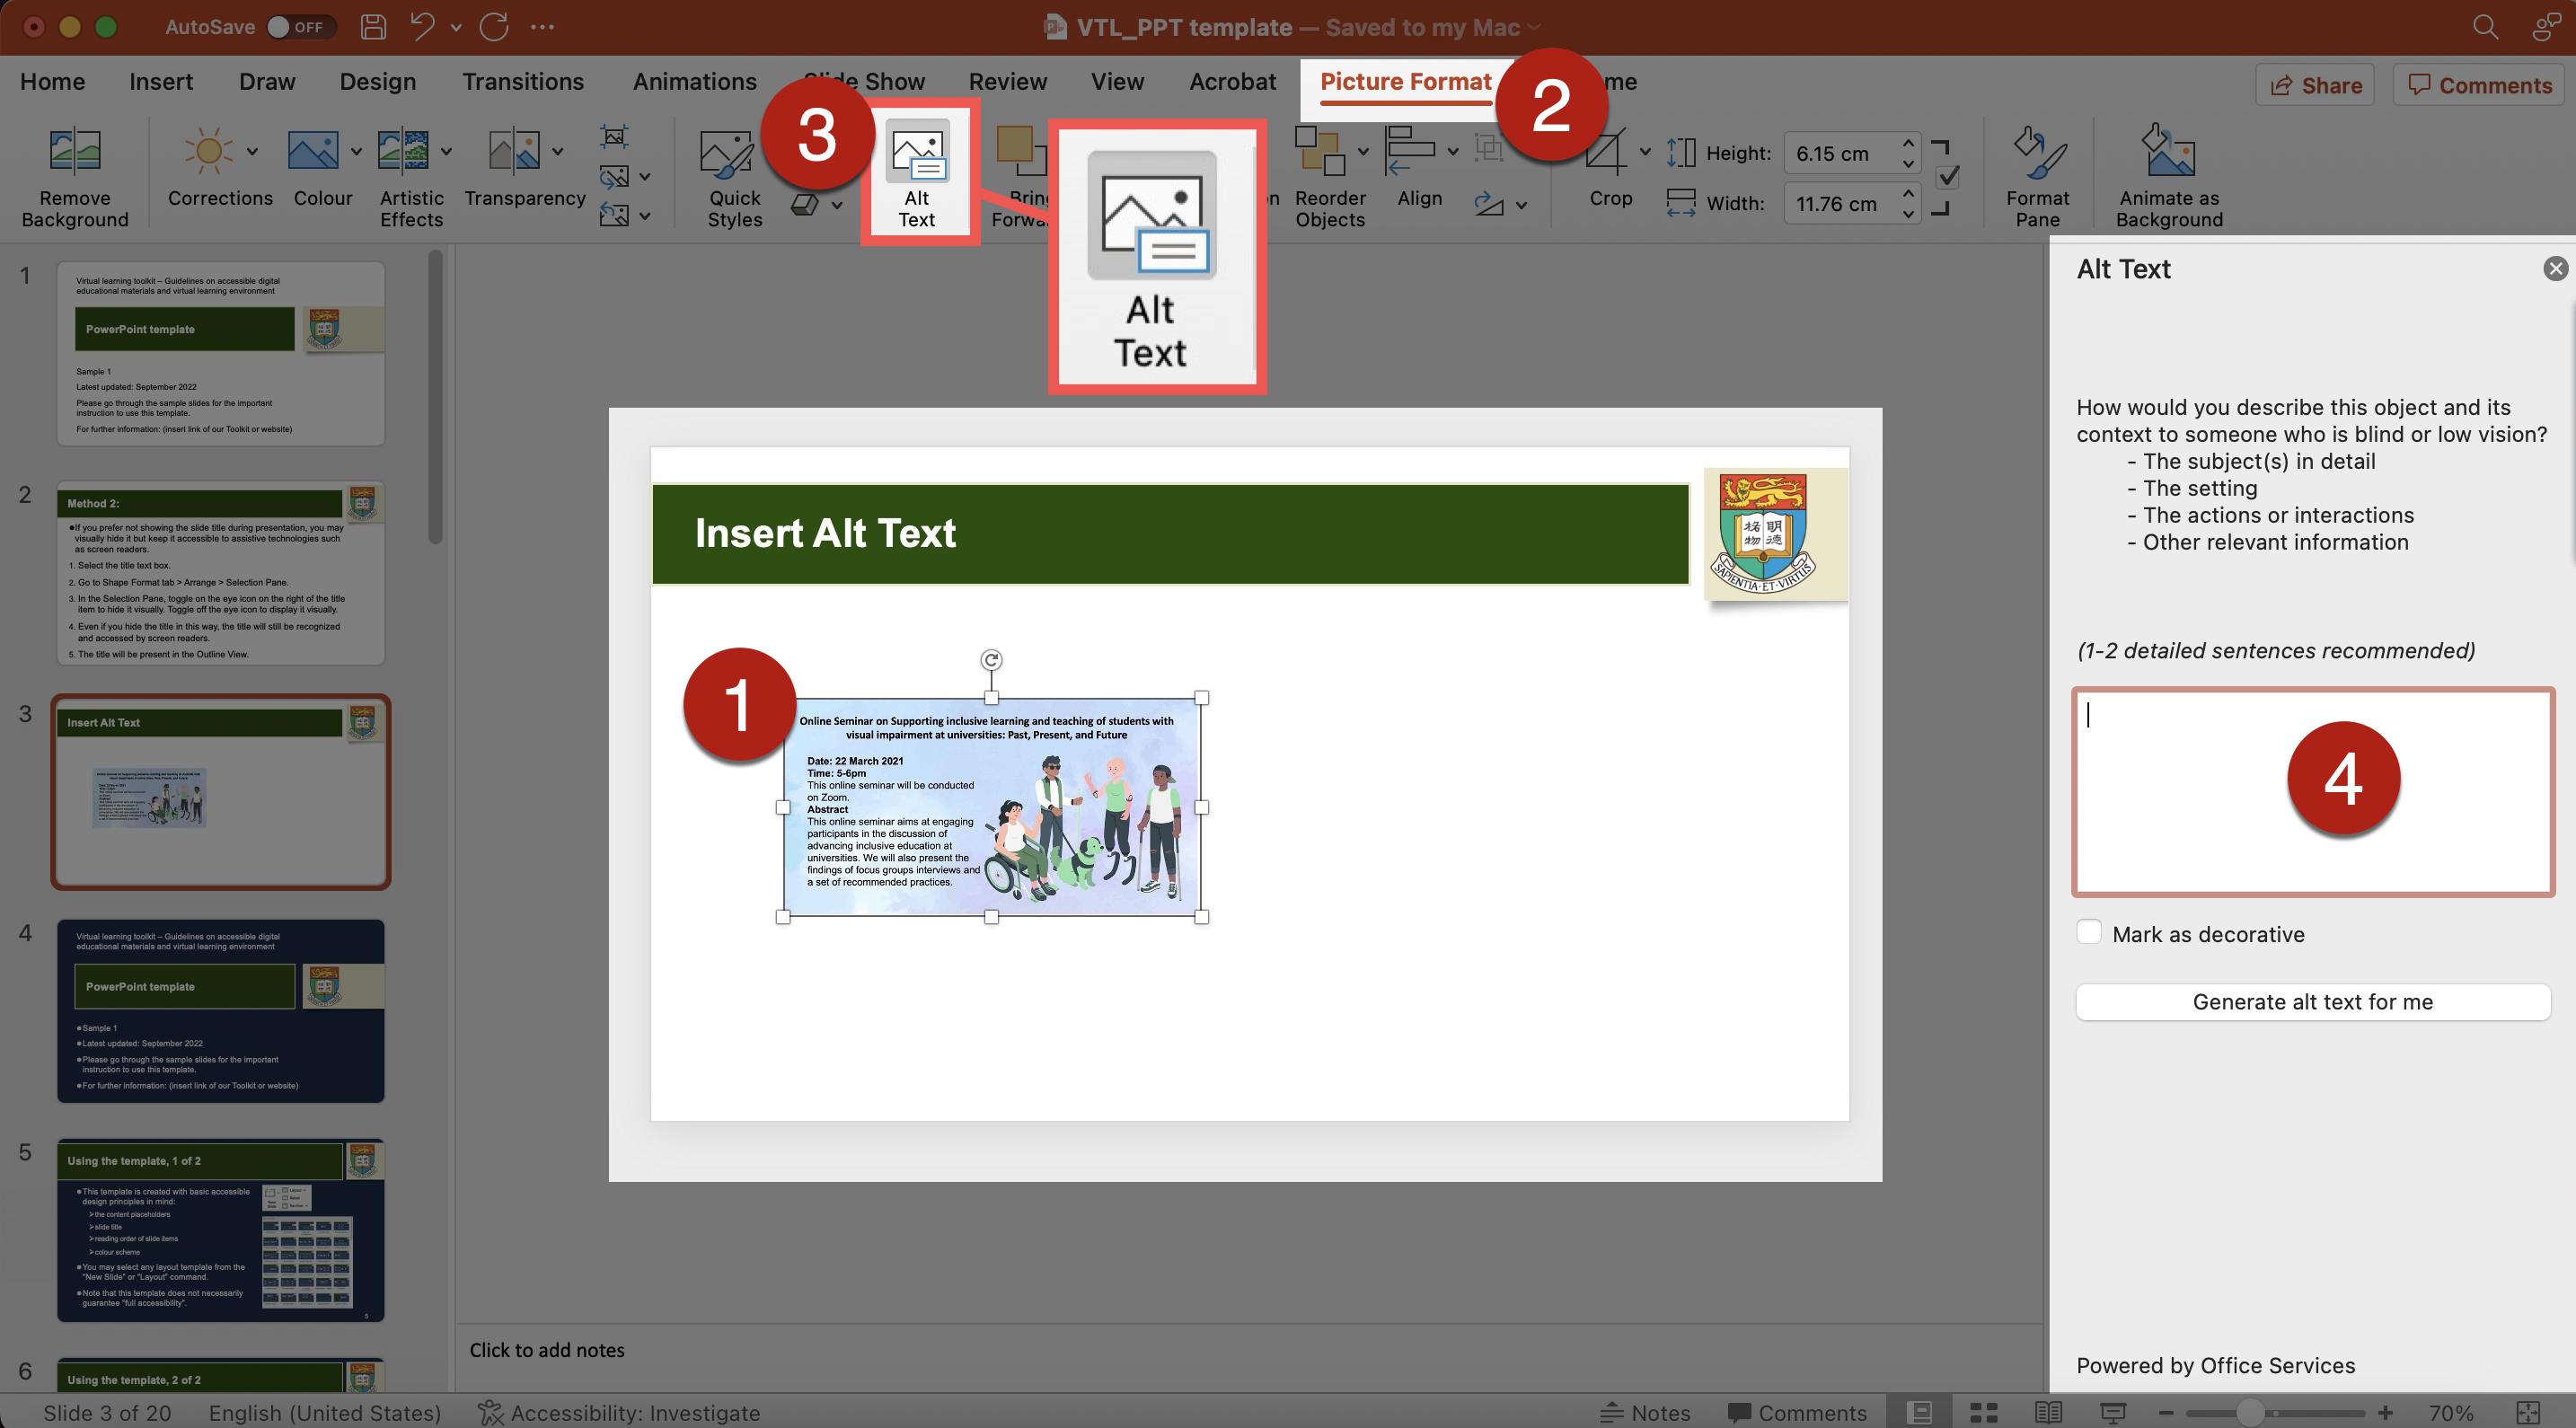
- In general, no need to begin the Alt Text with phrases such as “Picture of…” or “Image of…”
- When screen readers recognize an image with Alt Text, screen readers will read “Image” or “Graphic” followed by reading the associated Alt Text.
- Include the informative text embedded within the graphical content in the Alt Text.
- Be aware that hyperlinks in the Alt Text cannot be activated or presented by link text.
- Use punctuation such as periods to end the Alt Text. Otherwise, screen readers may mix up the Alt Text and the main body text that follows. It may confuse the users.
- For any acronym to be read aloud letter-by-letter (such as “I” – “D” – “E” – “A”) instead of as a word (such as “IDEA”), the letters in the acronym may be spaced out (such as “I D E A”) so assistive technologies such as screen readers would read aloud letter-by-letter.
- Graphical content that are purely for visual decorative purposes, for formatting purposes (such as stylistic borders), repetitively used, or do not provide meaningful information generally do not require Alt Text.
- For decorative graphics, select the Mark as decorative check box in the Alt Text Pane. This would hide the graphics from assistive technologies such as screen readers. Screen readers will not read aloud this image.
- If you leave the Alt Text entry field empty and do not mark this graphics as decorative in the Alt Text Pane, screen readers would read aloud as “Graphic”. However, users would not know whether this graphical content is informative or decorative.
- Use “hidden text” or Speaker’s Notes to provide lengthy description of complex graphical content for screen reader users.
- Create the hidden text by using “colour-on-colour” background and text, e.g., white text on the same white background. This hidden text visually does not appear for sighted users, but assistive technologies such as screen readers could access and read aloud this hidden text. Ensure the hidden text will appear in the Outline View.
- Input the lengthy description in the Speaker’s Notes. Then, write a “hidden text” to refer users to the Speaker’s Note, e.g., “Please refer to the Speaker’s Notes for the description.” However, be aware that the text in the Speaker’s Note will not appear in the Outline View.
- Putting lengthy description in Alt Text is generally not preferred. The use of “hidden text” or Speaker’s Notes can enable screen reader users to control when and how they access the long description at their own pace.
- Sometimes, you may want to write the lengthy description as “captions” instead of Alt Text, “hidden text”, or text in the Speaker’s Note. Image captions are visible to both users and non-users of assistive technologies.
- Input the captions in any text box in built-in slide layout. Do not input the captions in text box that is manually added to the slide, as it might not appear in the Outline View for access. Add extra text boxes to the slide using the Slide Master to ensure the text will appear in the Outline View.
- If the Alt Text and the captions are similar, use the Alt Text to refer screen reader users to the caption, such as “Image caption below.”
- Do not repeat the captions in the Alt Text. Otherwise, screen readers will read the same information twice. It would confuse the users.
- Further guidelines for writing Alt Text and image descriptions:
- Alternative Text. WebAIM.
- Documentation Screen Captures. Pennsylvania State University.
- Flowcharts & Concept Maps. Pennsylvania State University.
- Image Description Guidelines (Art, Chemistry, Diagrams, Flow Charts, Formatting & Layout, Graphs, Maps, Mathematics, Page Layout, Tables, Text-only images). The DIAGRAM Center.
- Best Practices for Accessible Images. California State University, Northridge.
- Effective Practices for Description of Science Content within Digital Talking Books. The WGBH National Center for Accessible Media.
It covers guidelines for writing image descriptions for bar chart, line graph, Venn diagram, scatter plot, table, pie chart, flow chart, standard diagrams or illustrations, and complex diagrams or illustrations. - NWEA Image Description Guidelines for Assessments (PDF; 5.6 MB). The Carl and Ruth Shapiro Family National Center for Accessible Media at WGBH (NCAM).
It cover discussion about challenges and guidelines for writing image descriptions for a variety of images, charts, and graphics targeted to the assessment of reading, language usage, science, and mathematics. - Excerpts from the NBA Tape Recording Manual, Third Edition. National Braille Association.
Instruction and examples of describing complex images.
- Provide captions, transcripts, sign language interpretation, and audio descriptions for video and audio.
- Audio description provides narration of the key visual elements in the video. It makes the video more accessible to people with visual impairment.
- Consider uploading the video or audio on certain database or online media platforms (e.g., YouTube) that can generate hyperlinks for the video or audio. Include the hyperlinks in the slide.
- The Player Control in PowerPoints may not be accessible to all users. The Player Control may work differently across different devices.
- With hyperlinks, users can access the video or audio at their own pace. It would also help users access the video or audio in case the embedded video or audio cannot be played properly in the slide presentations.
- References:
- Avoid animations or flashing objects. It may distract users from the presentation main content or the speaker.
- Some people who are photosensitive may feel uncomfortable with flashing content. Content that flashes more than three times per second may trigger seizures and other discomfort in some people.
- World Wide Web Consortium (W3C) guidelines on flash thresholds and a more precise technical formula are available for calculating general flash and red flash thresholds.
- The Trace Center at the University of Maryland has developed a Photosensitive Epilepsy Analysis Tool (PEAT) for measuring whether web or computer applications are likely to cause seizures.
- Do not use animation content alone to convey important information. Provide text description if needed.
Hyperlinks
- Users of assistive technologies such as screen readers users sometimes scan a list of hyperlinks in the document for effective navigation and understanding.
- Screen readers would read aloud link text, such as “link, [link text], out of link”, to notify users that this is a hyperlink.
- Example of a screen reader (NVDA) reading link text. Source: California State University, Northridge.
- Do not simply use non-descriptive link text such as “Read more”, “More information here”, or “Click here” to present the hyperlink. It is important the link text is concise and give relevant information of the action and destination of the hyperlinks.
- Screen readers would read it as “Read more, link” or “Click here, link”. It is confusing as it does not provide meaningful information of where or what the hyperlinks will take the users to and when used out of context.
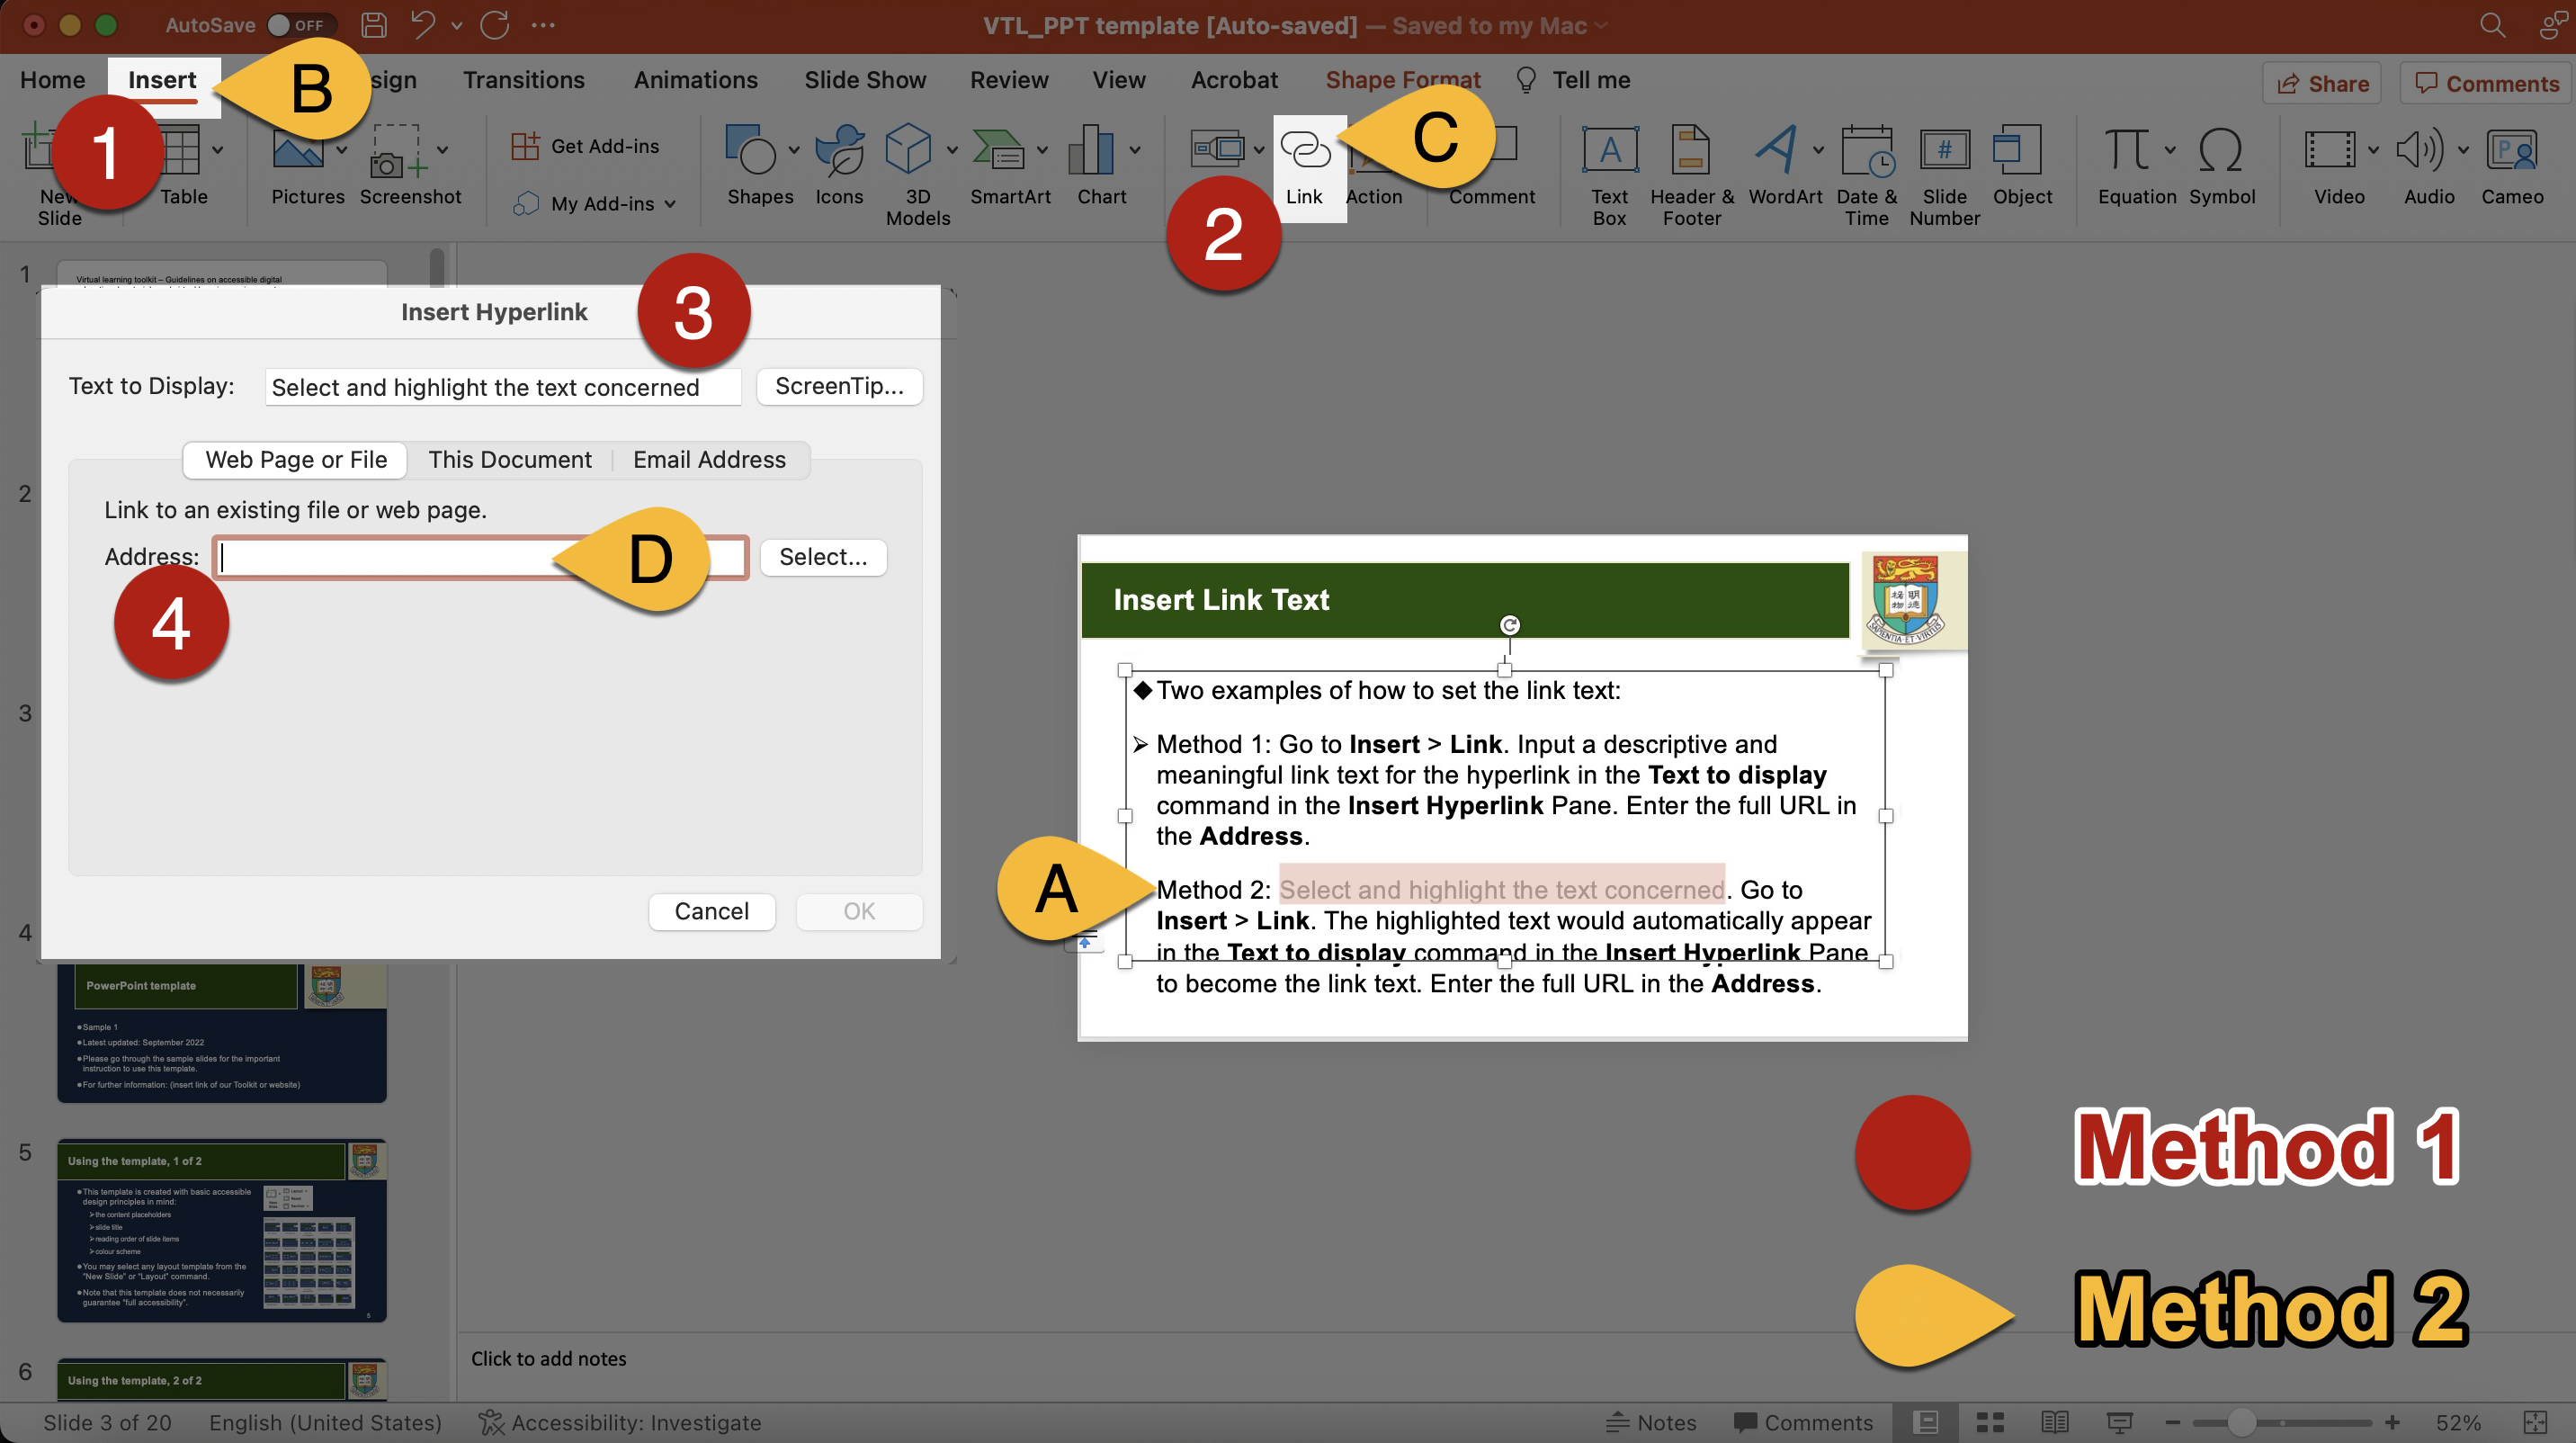
- Two examples of how to set the link text:
-
- Method 1: Go to Insert > Link. Input a descriptive and meaningful link text for the hyperlink in the Text to display command in the Insert Hyperlink Enter the full URL in the Address.
- Method 2: Select and highlight the text concerned. Go to Insert > Link. The highlighted text would automatically appear in the Text to display command in the Insert Hyperlink Pane to become the link text. Enter the full URL in the Address.
- Depending on the context, in general, do not embed the links using the full URL as the link text. Using the full URL as link text would make screen readers read aloud every single character of the URL which can be confusing to the users.
- For documents likely to be presented both electronically and in print, such as students’ lecture notes, you may want to retain the full URL for users’ reference. The link text may include both the URL and brief description of the hyperlink’s destination. Embed the “short URL”, if possible, to keep the link text concise.
- For reference list items, the work’s URL or DOI may be retained for users’ information. The title of the work can be the link text under these situations. The difference between a reference list and the body content is that the reference list is not meant to be read from start to finish. The information in the reference list is only needed if users want more information about some specific references cited in the body content. Not every user would follow every link in a reference list. Sometimes, the materials may be printed out as hardcopy. It is helpful to preserve the actual link address.
- Example: Ma, G. Y. K., Chan, B. L. F., Wu, F. K. Y., Ng, S. T. M., Ip, E. C. L., & Yeung, P. P. S. (2021). Enhancing Learning Experience for Students with Visual Impairment in Higher Education. Guideline on fostering practices for disability inclusion at higher education institutions. (Trial ed.). The University of Hong Kong. (146 pages.). https://doi.org/10.25442/hku.17032685
- Use concise link text. If the link text is too long, it may visually appear to break across separate lines. Some users may misunderstand there are several hyperlinks. A long link text may also hinder understanding.
- Add remarks in a bracket to indicate it will open in new browser tab.
- If the hyperlink downloads a file, indicate the file type and file size in link text.
- Use the full email address as the link text.
- Accessible: [email protected]
- It shows the hyperlink opens email instead of webpages or documents.
- Not accessible: Contact the Project Team or Email us
- It does not indicate that this hyperlink is an email address.
- Accessible: [email protected]
- Avoid using the same link text for different hyperlinks within the same document.
- Avoid using different link texts for the same hyperlinks within the same document.
- The look of the link text should be visually different from other nonlinked text in the document. Usually, the link text is underlined and in blue.
- It would be inaccessible to use colour alone to indicate link text. It would create barriers to some users such as people with colour blindness.
- Ensure sufficient colour contrast between the link text and its surrounding body text. Ensure the colours of the not-yet-visited hyperlinks and visited hyperlinks show sufficient contrast against the background colours, respectively.
- An example of online checker for link texts: WebAIM Link Contrast Checker.
- Check that users can access the hyperlinks using multiple commands, e.g., the mouse, keyboard, or speech recognition systems.
Accessibility check
- The built-in Accessibility Checker in Microsoft PowerPoint can automatically detect some potential inaccessible designs of the document, such as missing Alt Text, and provide suggestions for fixing the potentially problematic areas.
- To run the built-in checker, go to Review tab > Check Accessibility.
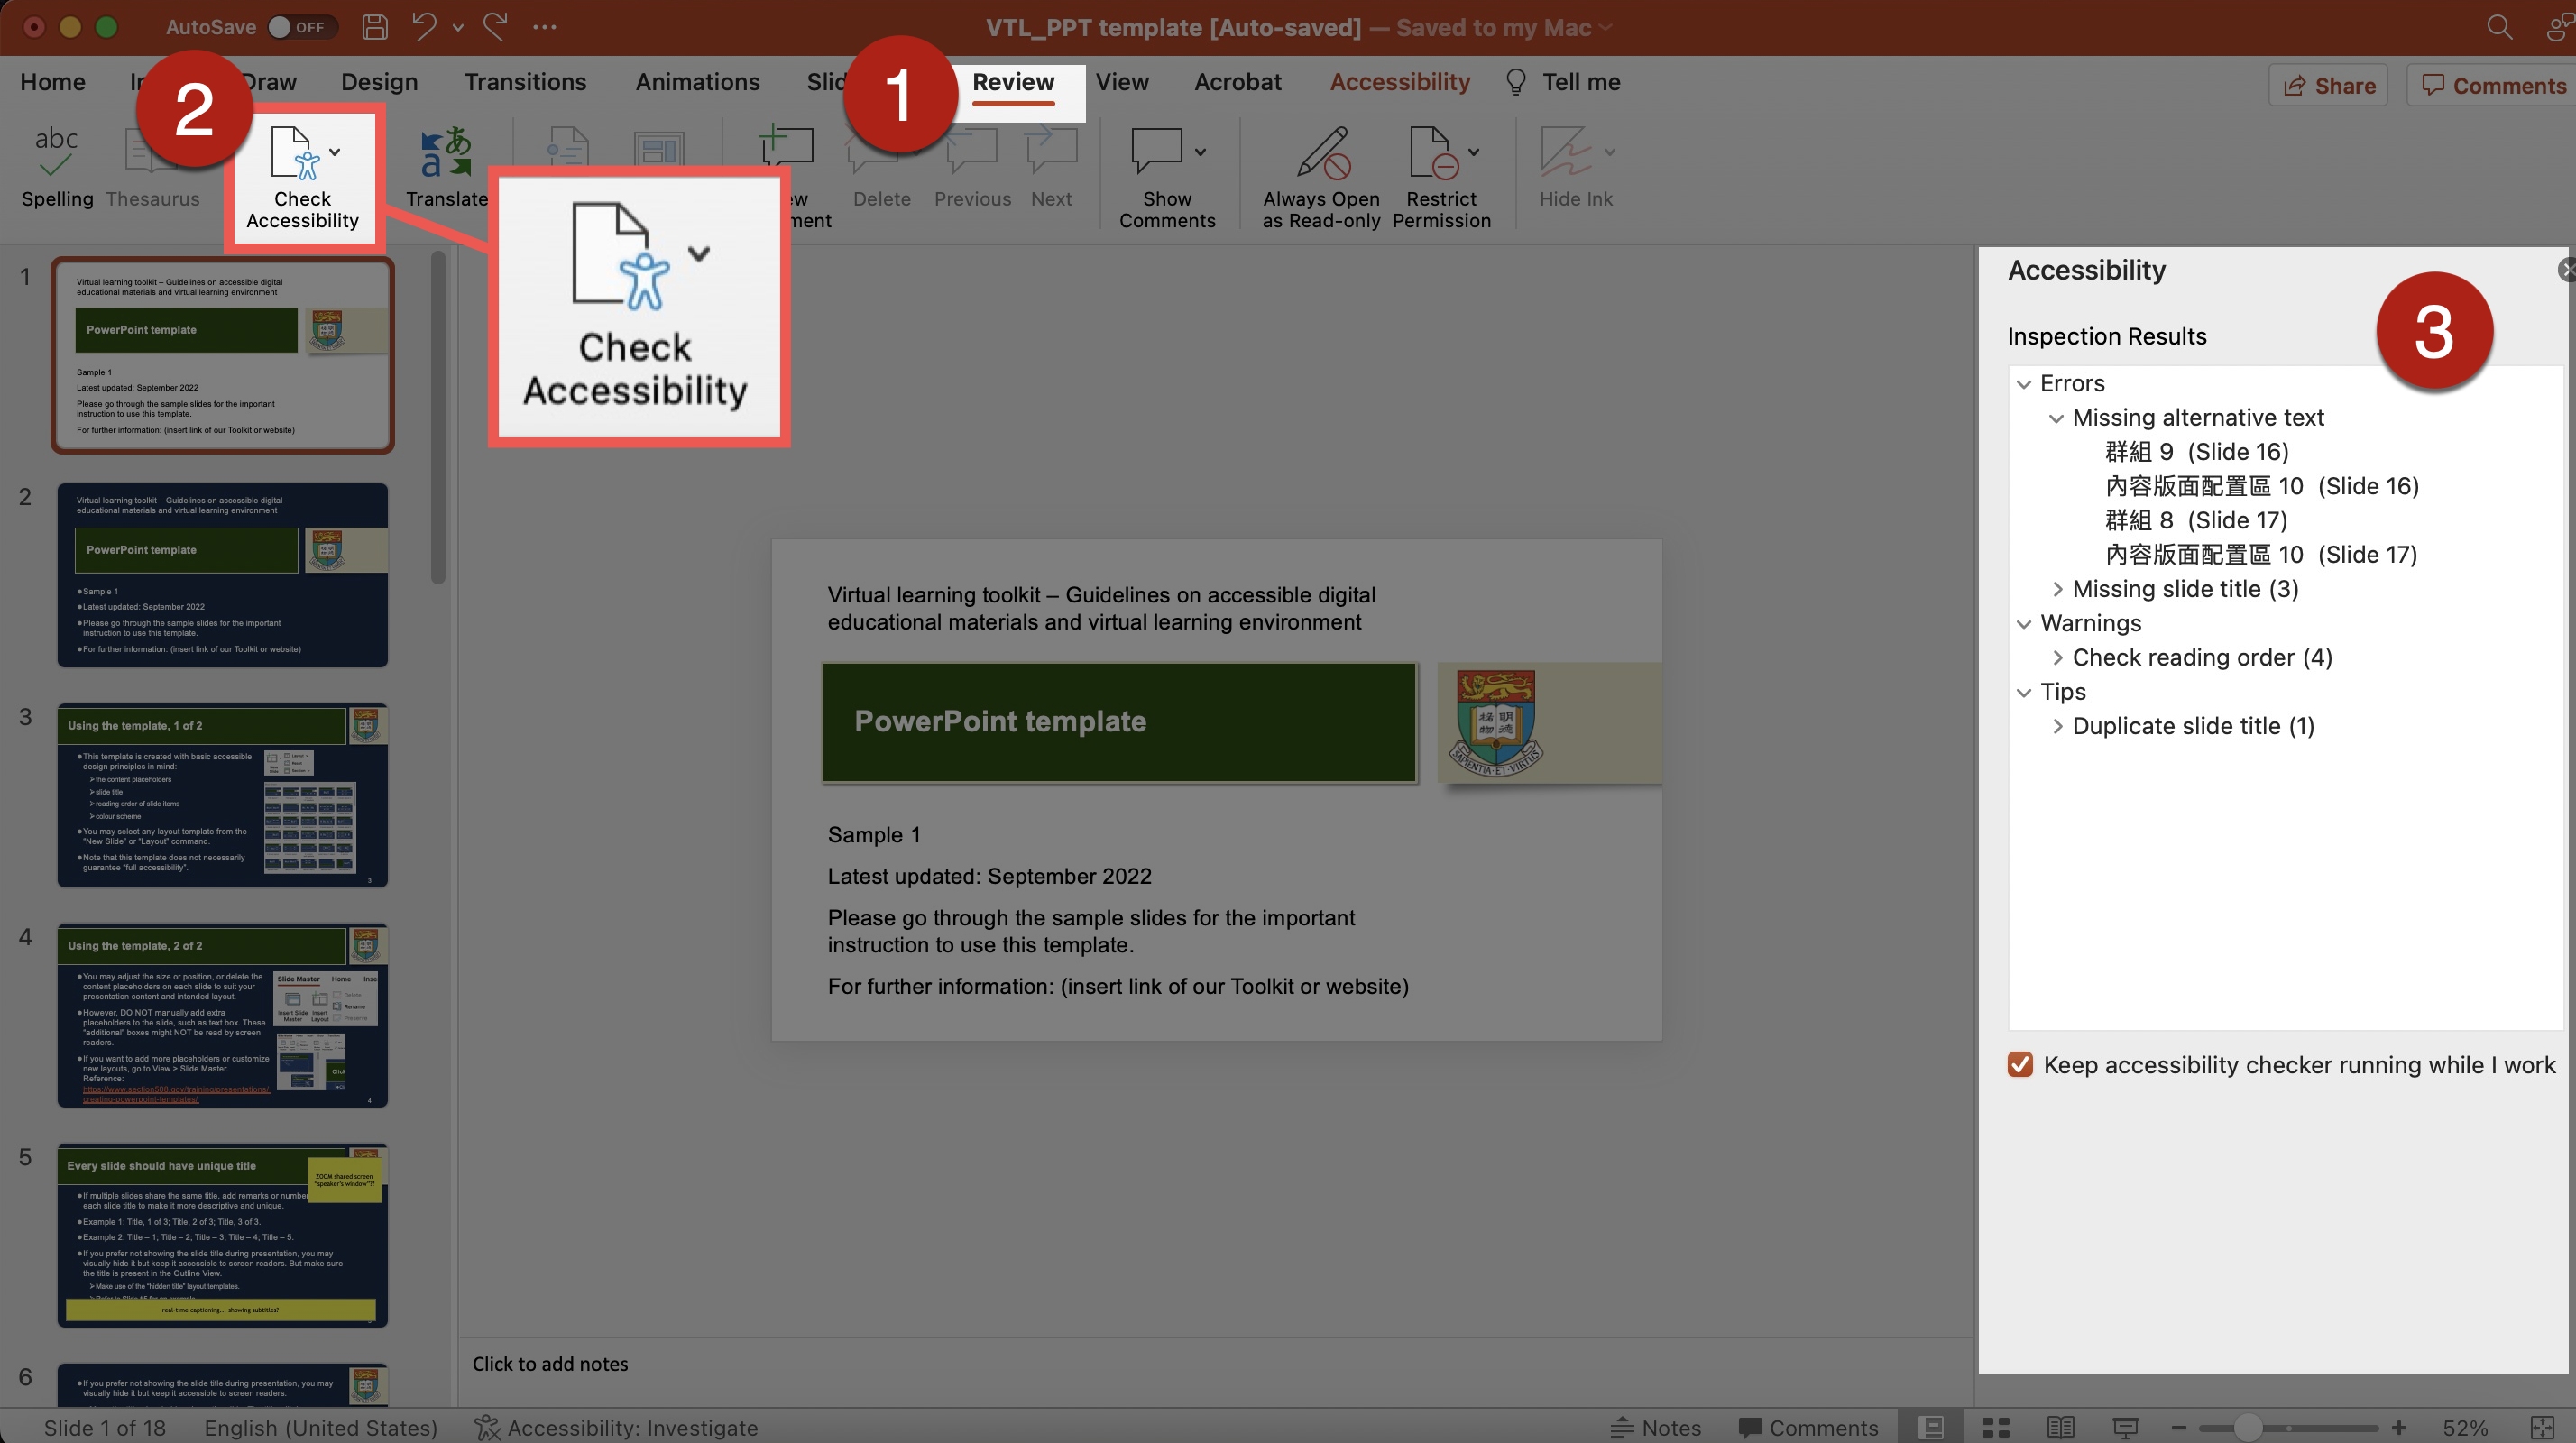
- Note that passing the check does not necessarily guarantee “full accessibility” but failing the check would mean there are some inaccessible features that needs to be addressed. Do not solely rely on this checker for accessible documents. Be aware of the limitations of the built-in Accessibility Checker. For example, the checker could not tell whether the Alt Text is meaningful.
- Go through the document with screen readers to check the reading order of the document. Below are examples of screen readers.
- Narrator in Windows, built-in voiceover function in Windows.
- VoiceOver on Mac, built-in voiceover function in Mac.
- NVDA, screen reader that can be downloaded free of charge; available for computers running Microsoft Windows 7 SP1 and later.
- NVDA add-on developed by the Hong Kong Blind Union with a Chinese speech engine.
- Do not use the built-in Immersive Reader in Microsoft Pow erPoint for the web for testing the reading order and accessibility.It may work differently from assistive technologies such as screen readers.
- Check the document control and content order accessed by keyboard users by going through the document using only the keyboard, such as the TAB key.
- Test for any problems with the content when the document or the screen is magnified to around 200%.
Presentation delivery
- Use simple slide transition. Complicated slide transition could be distracting.
- Use the On Click option for slide transition to allow speakers or users go through the slide at their own pace.
- Avoid automatic slide transition. Users may not have sufficient time to go through the slide content. Users may need to re-read the slides.
- The built-in subtitles function in PowerPoint could make your presentations more accessible to the audience, particularly:
- Deaf or hard-of-hearing people;
- People who use the Speaker’s spoken language as their second language;
- People attending your presentation in noisy environments or sound-sensitive environments with audio off.
- To enable subtitles using the built-in option in PowerPoint, go to Slide Show > Subtitle settings.
- Customize the settings to suit your presentation, e.g., Spoken Language, Subtitle Language, and Position of Subtitles display.
- Consider the use of the Always Use Subtitles” feature carefully. The subtitles would be displayed to all audience and audience cannot turn off the subtitles. It may be distracting or disturbing to some people.
- Refer to Microsoft guidelines on Subtitles setting for details.
- When you want to respond to any questions or comments from the audience, you may first verbally repeat that questions or comments before giving your response. Then, the built-in subtitle’s function could capture and caption the questions and comments as well for better understanding.
File sharing
- Ensure the title and body text of each slide are displayed in the intended and logical reading order properly.
- The content in the Outline View can be exported as “Rich Text Format (RTF)” with accessible text structure that would be useful for alternative format conversion such as Braille or large print.
- The text content and the reading order in the Outline View will be read by screen readers.
- To check content and reading order, go to View > Outline View. Edit the text directly in the Outline View if needed.
- Note that the following content will not display in the Outline View:
- tables and graphics in the slides;
- text in the Speaker’s Note section;
- text from text boxes that are manually added to the slides instead of pre-existing text boxes in slide layout templates.
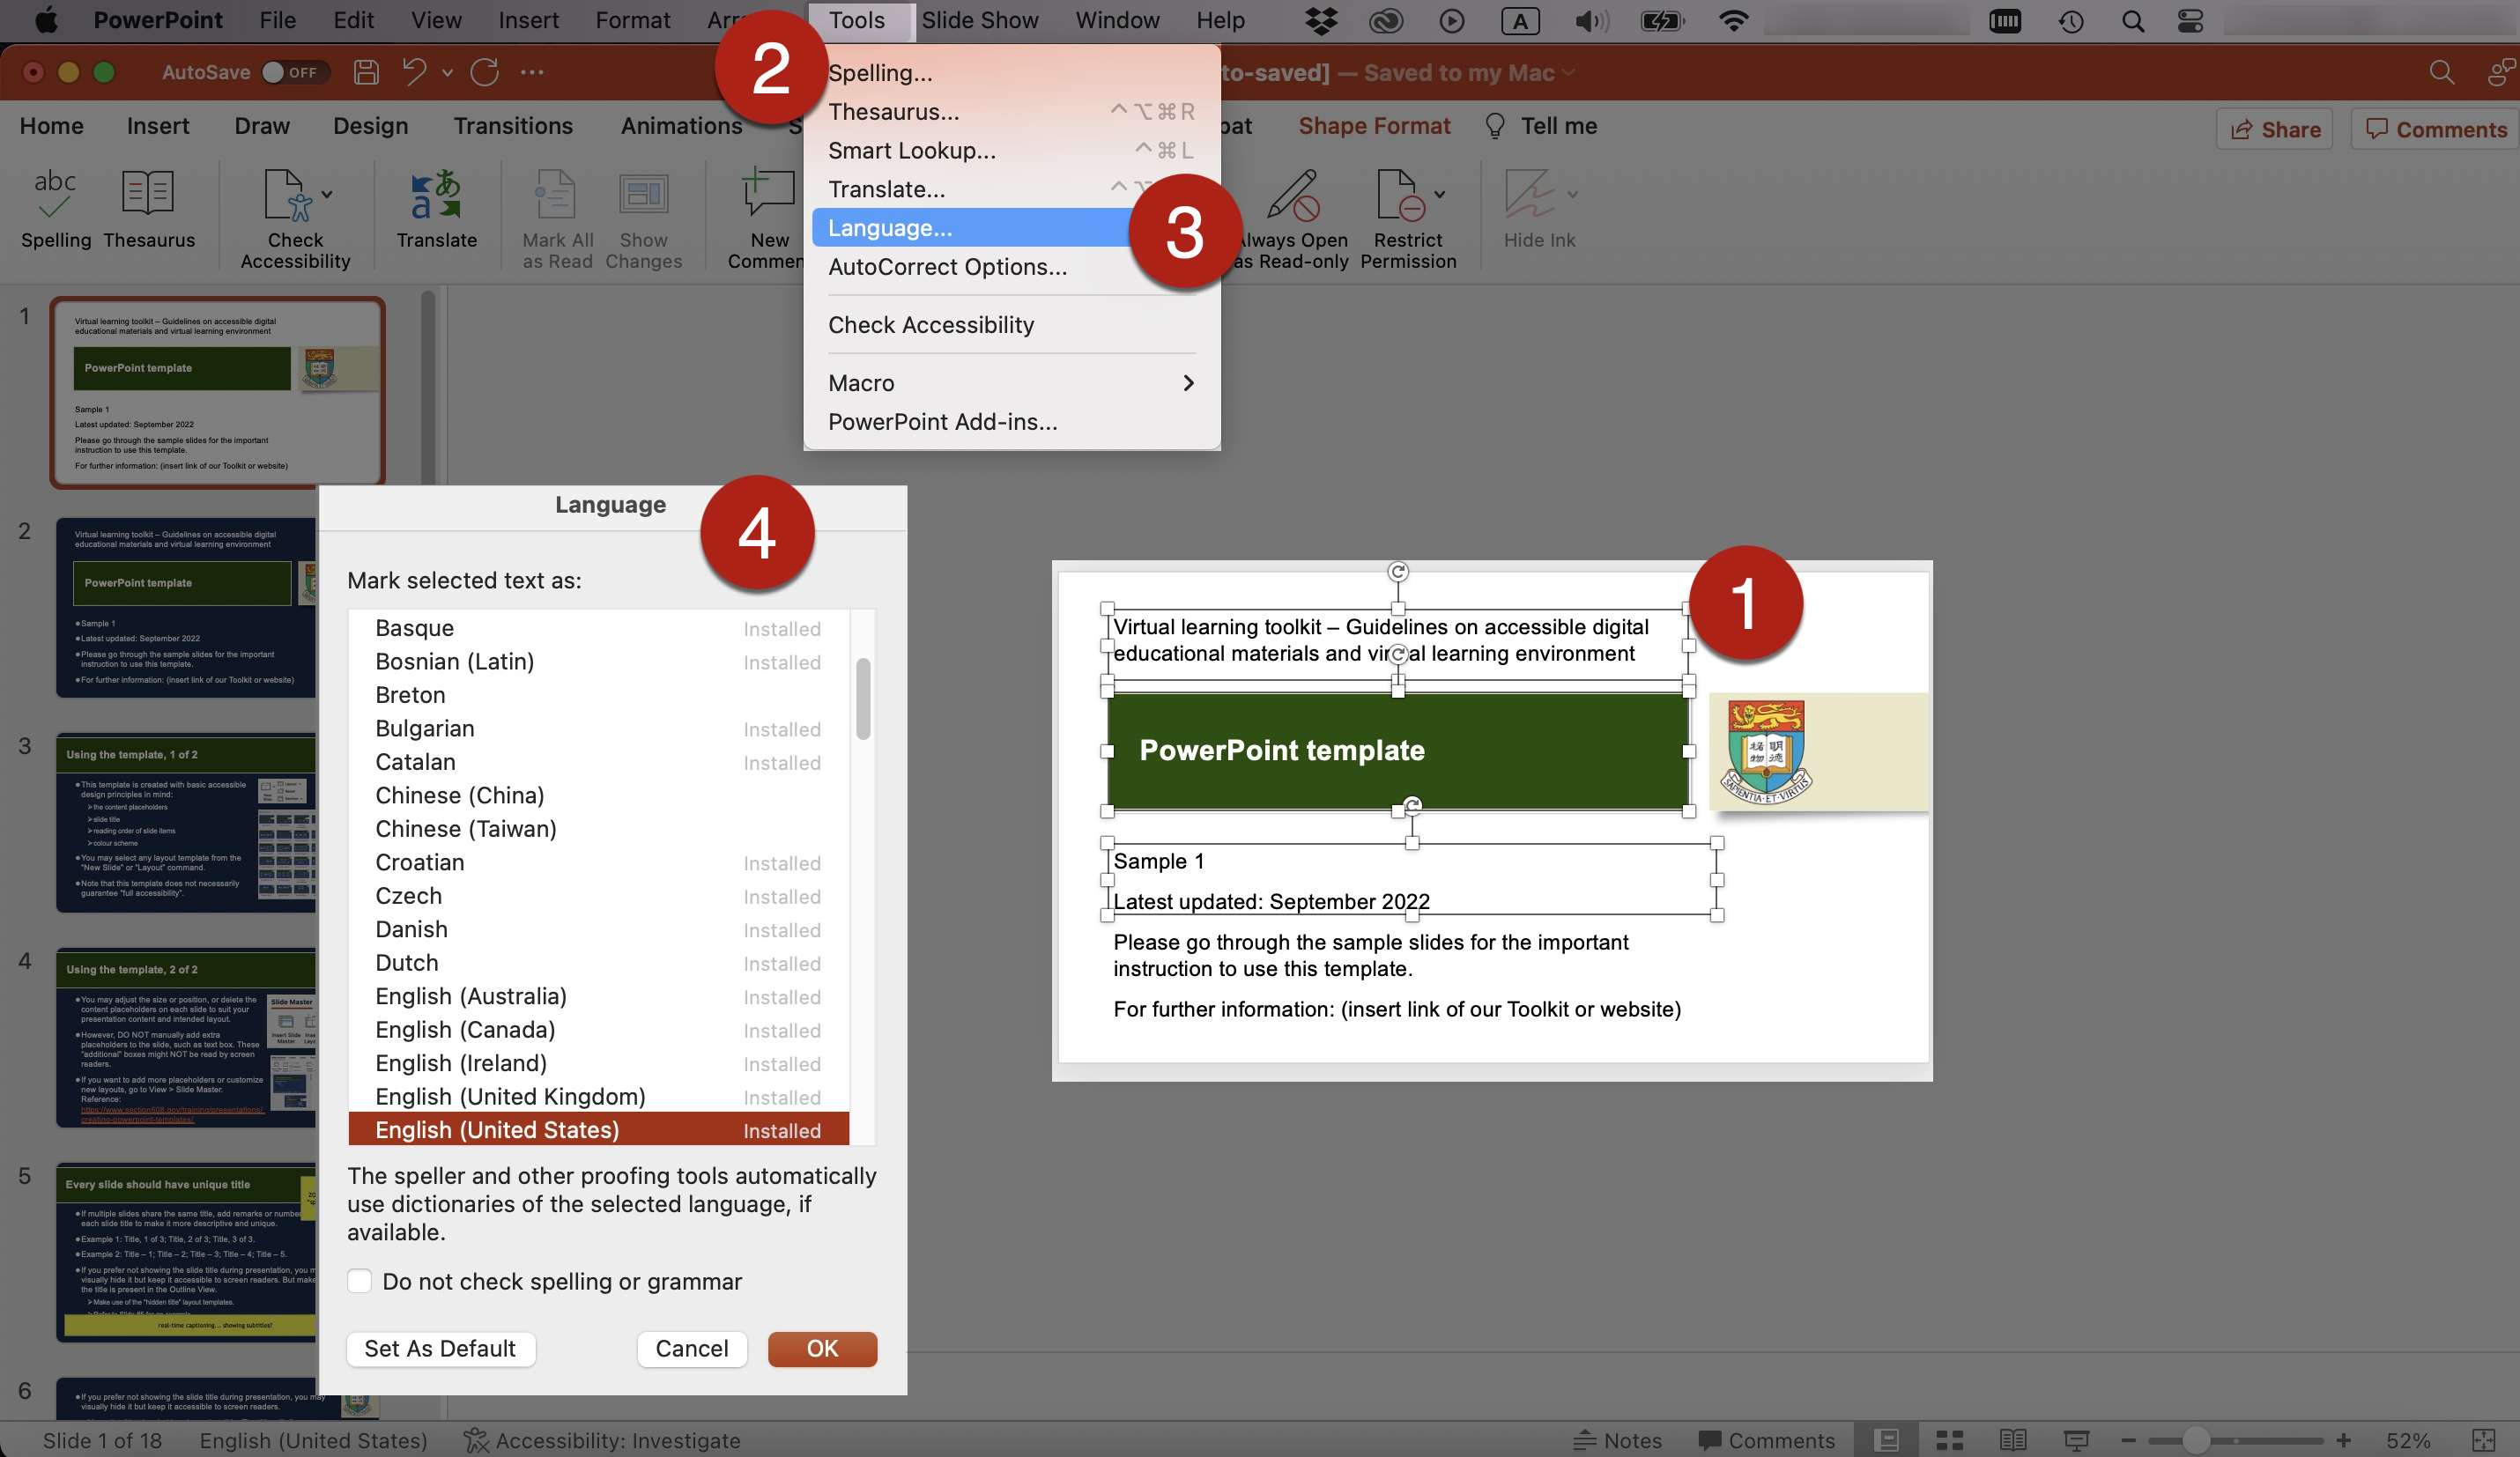
- Indicate the languages within the document for screen readers to identify and read properly.
- To set the document language(s):
- Select and highlight the text you want to set the language for. This could be the entire document or just a paragraph depending on your situation.
- Go to Tools > Language. The Language dialog In the Language dialog pane, select the language you want to set. Select OK.
- Repeat the procedures if you need to set another language for other parts of text in the document.
- References: Document and Content Language. WebAIM.
- Edit the file information, such as title, author, and keywords, of the PowerPoint slides. It could facilitate users to identify and search the document.
- To edit the file information, go to File > Properties > Select Summary in the Properties dialog box. Edit the file information in the corresponding fields.
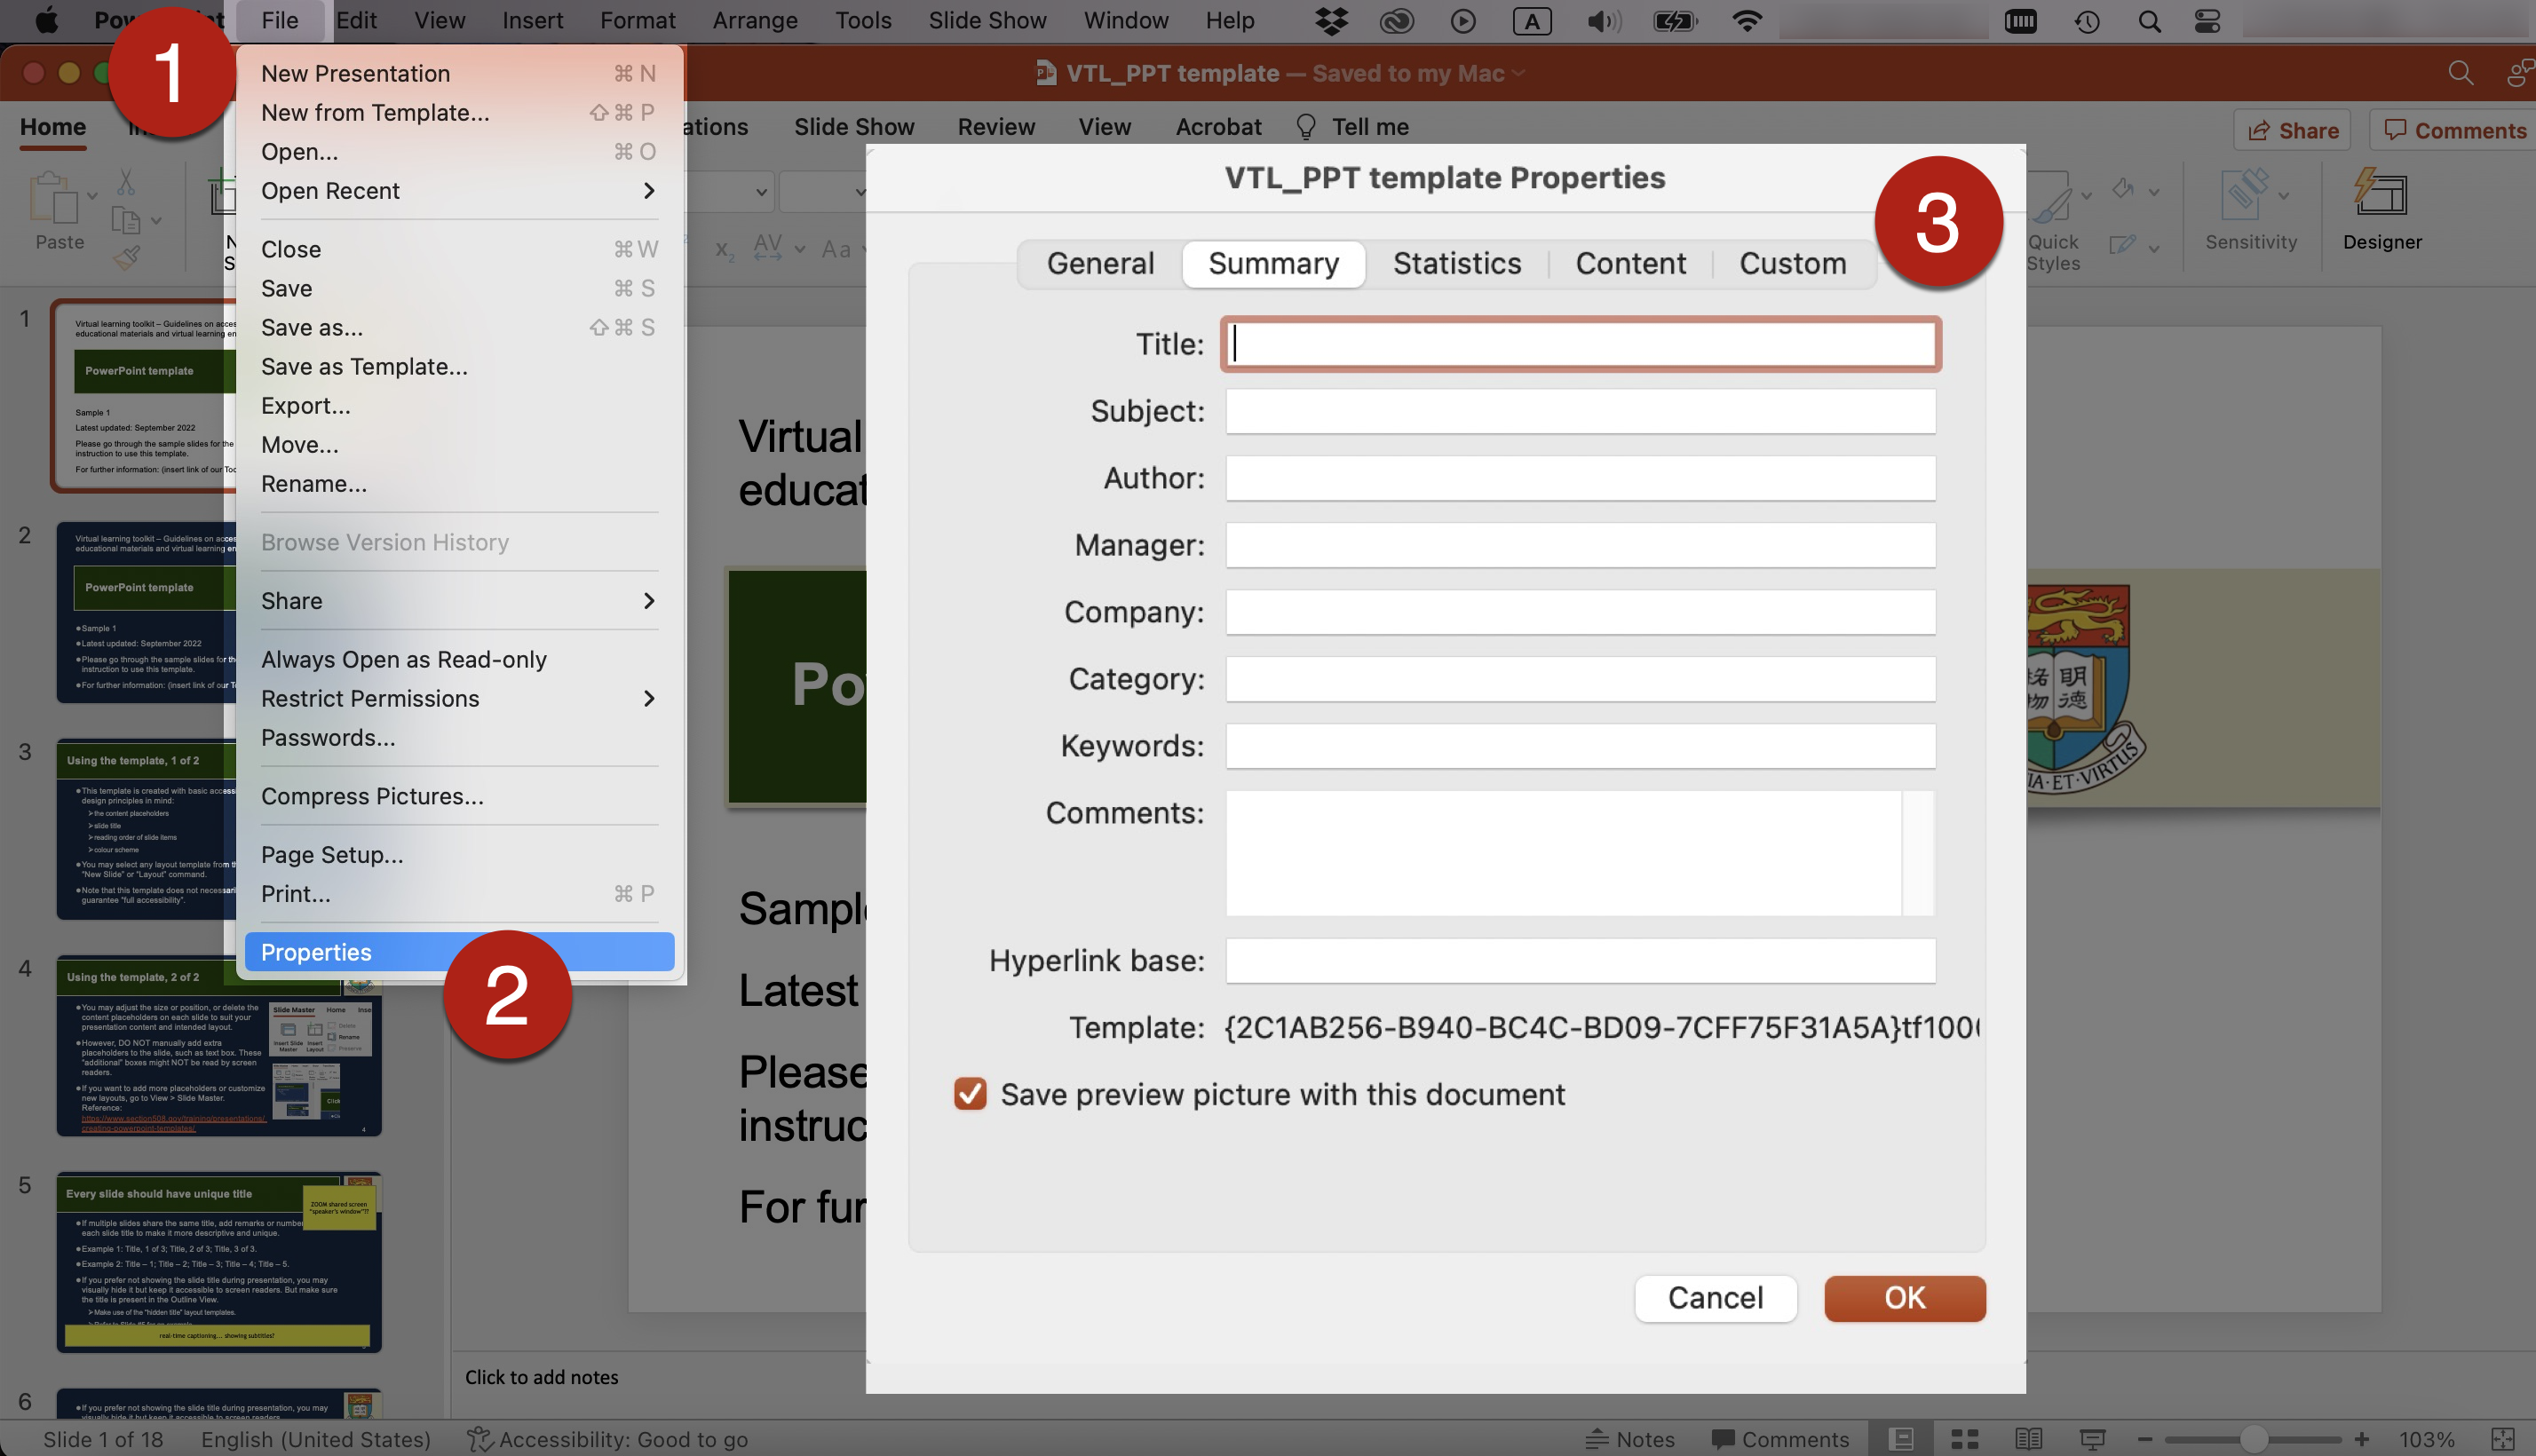
- Document title could be different from the file name. The document title can be a descriptive version of the file name. It could enable the PDF converted from PowerPoint display the document title in the PDF window. If users open multiple PDF files at the same time, the descriptive title of each document can help users differentiate and browse between the different PDF files.
- Keywords could make it easier for users to search for a file. For example, instructors can add the course code or keywords related to the slides.
- Use either the Save As or Export to PDF options to convert the PowerPoint slides to PDF to help retain the accessible designs of the original slides.
- For Mac: Go to File > Save As. Select PDF from the menu of export file types.
- For Windows: Go to File > Save As. Select PDF from the menu of export file types. By default, this produces a PDF that would retain the accessible features of the document. Select Options, then, be sure to select and check the command Document structure tags for accessibility.
- Do not use the Print to PDF or Best for printing
- The PDF created in this way would not retain the accessible features in the original PowerPoint slides, e.g., the heading structure, Alt Text of graphical content, and logical reading order. It makes the resulting PDF less accessible.
- Further check the accessibility of this PDF and fix any potential issues.
References
- PowerPoint Accessibility. WebAIM.
- Make your PowerPoint presentations accessible to people with disabilities. Microsoft.
- PowerPoint Accessibility. California State University, Northridge.
- Word and PowerPoint Accessibility Evaluation Checklist. WebAIM.
- Rules for the Accessibility Checker in Microsoft.
- Accessibility tools for PowerPoint. Microsoft.
- Make your content accessible to everyone. Microsoft.
- Make your document or presentation more accessible. Google Docs.
- Accessibility for Google Docs, Sheets, Slides, & Drawings. Google Docs.
- Making PowerPoint decks more accessible. By Sheri Byrne-Haber.